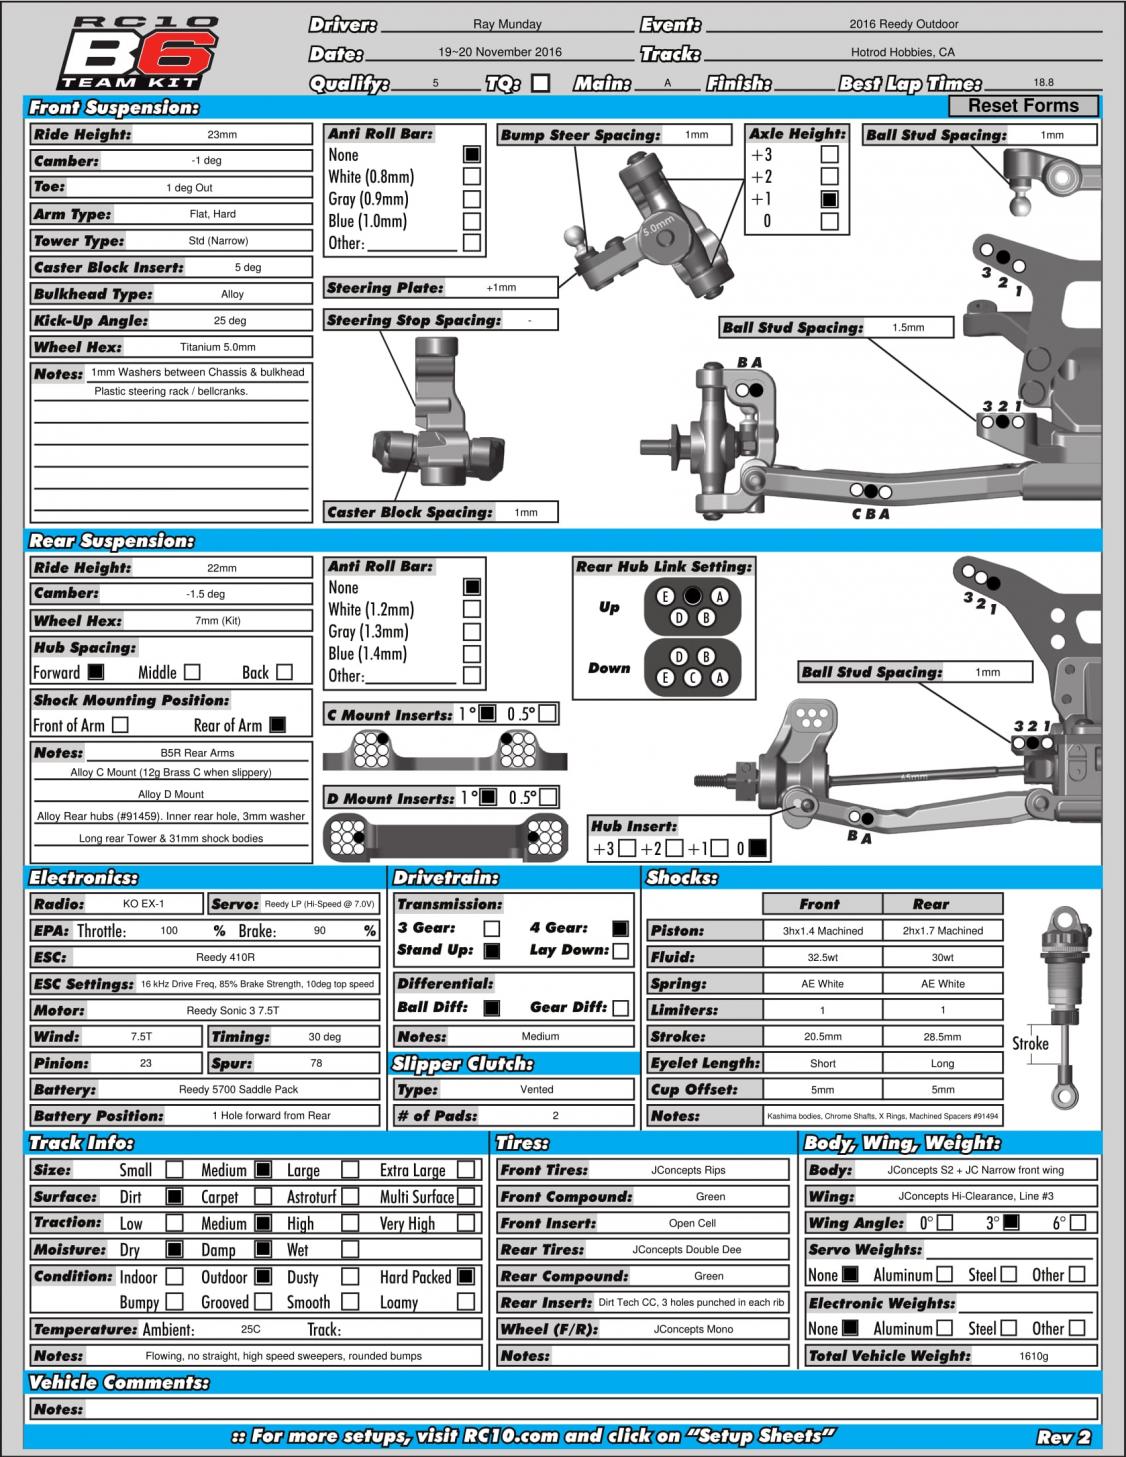
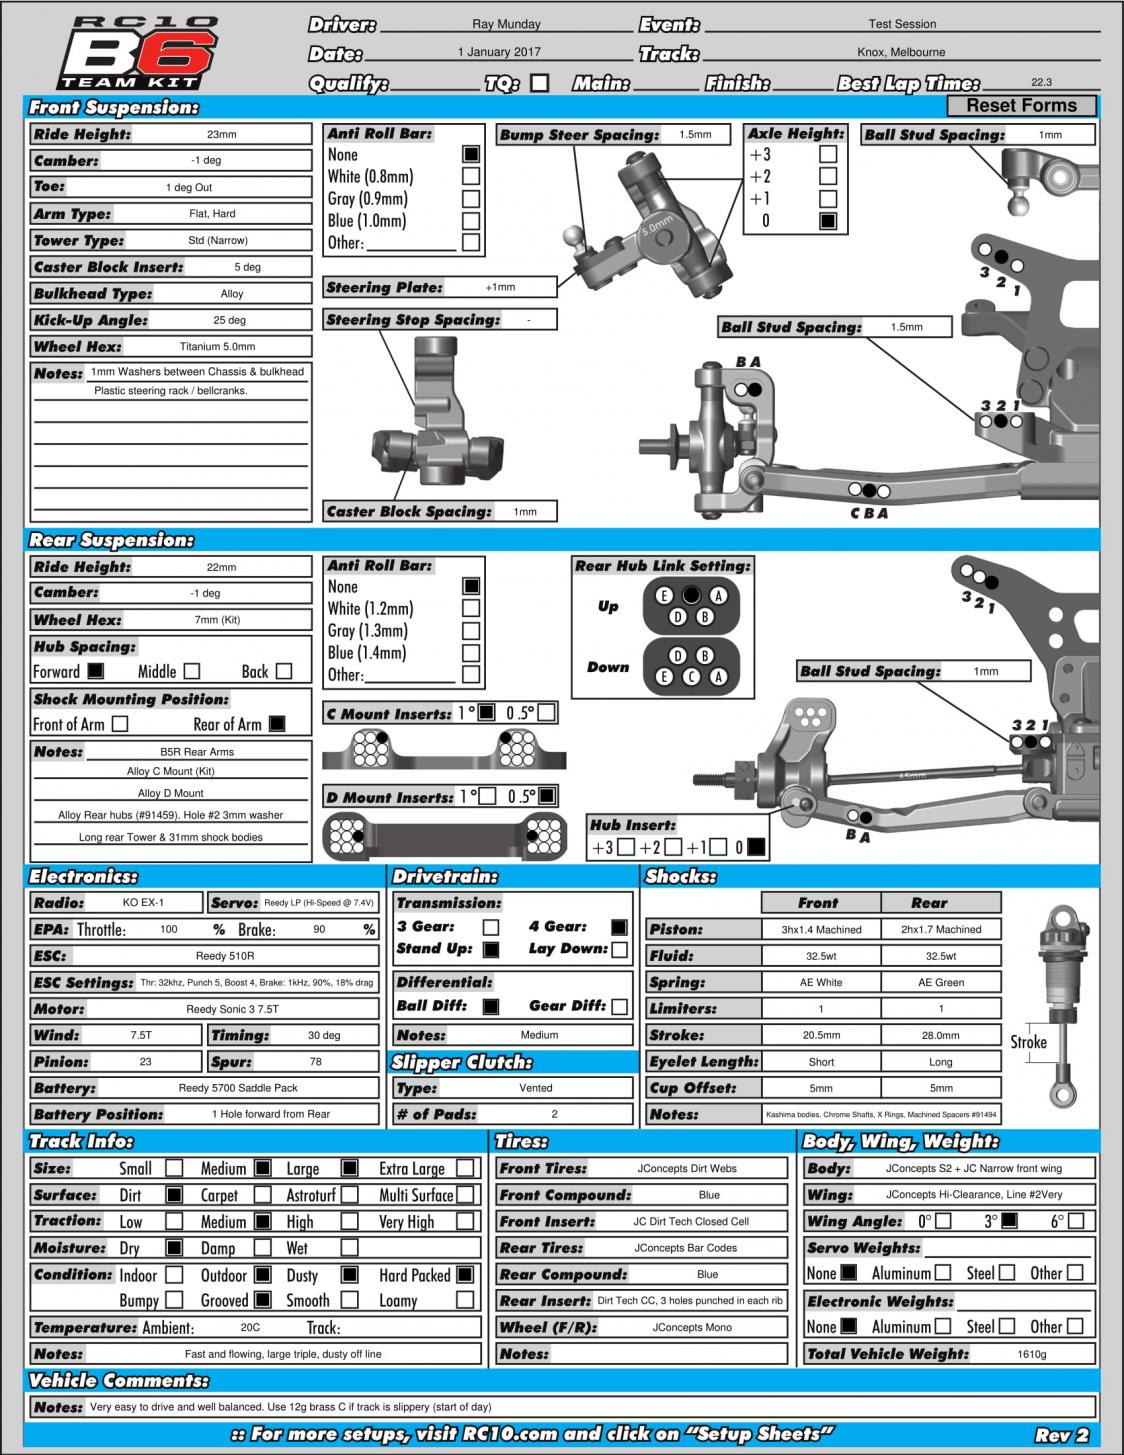
3 January 2017.
ray@rccar. com. au |
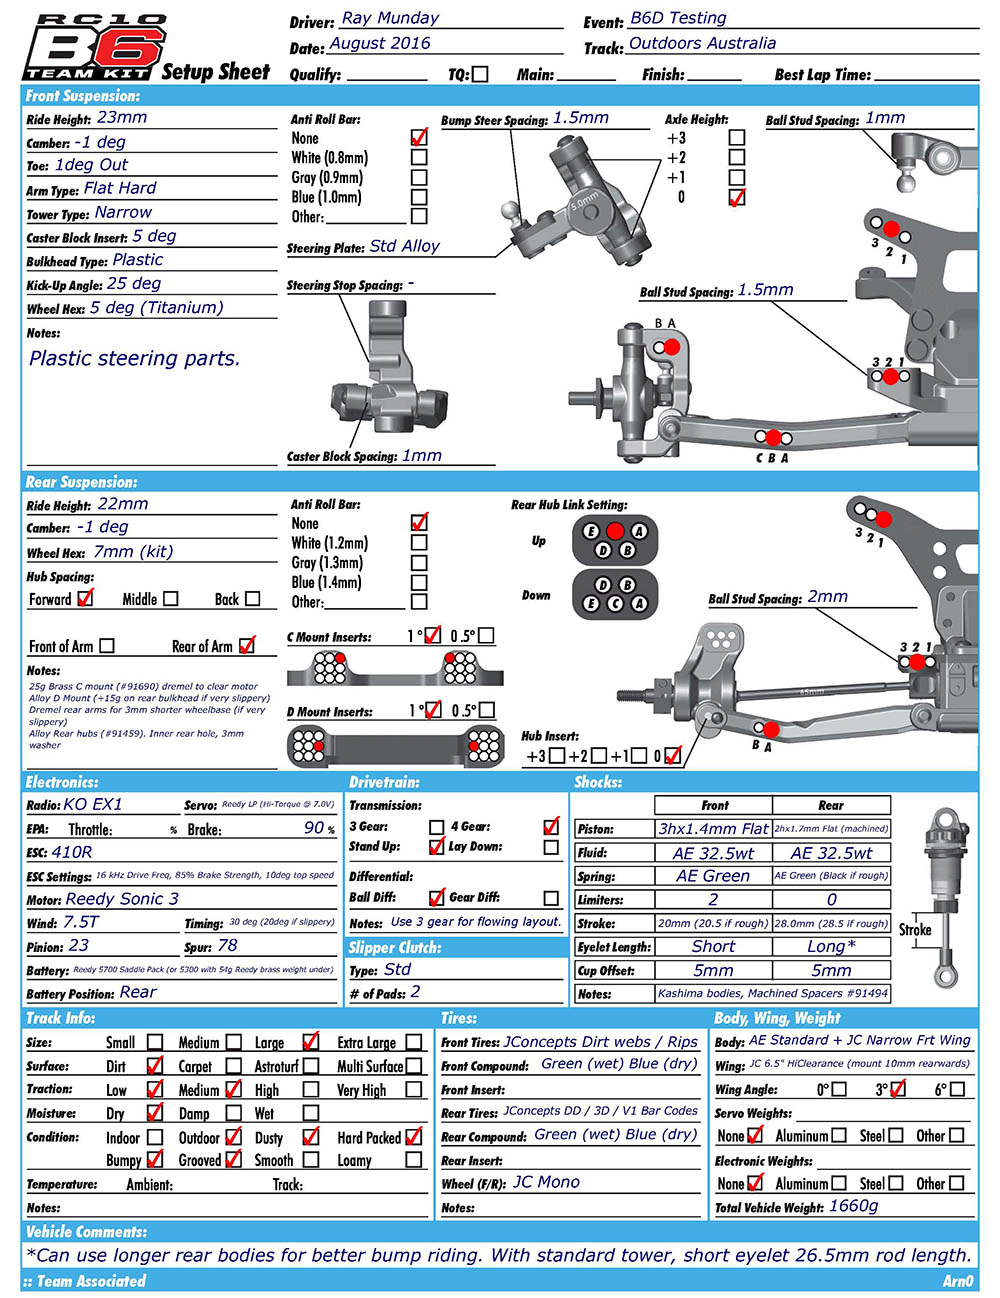
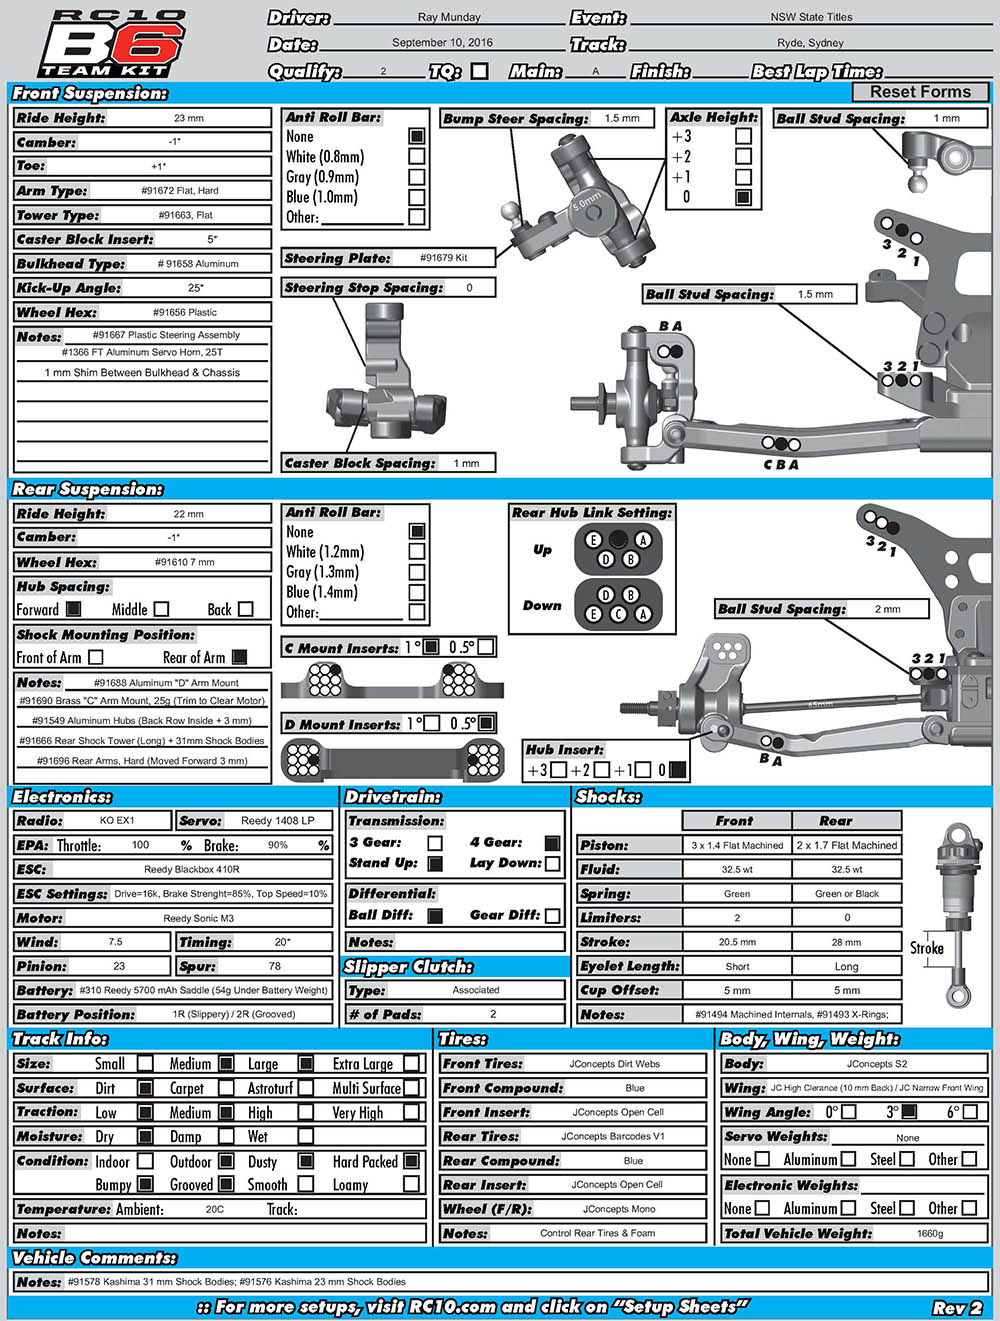
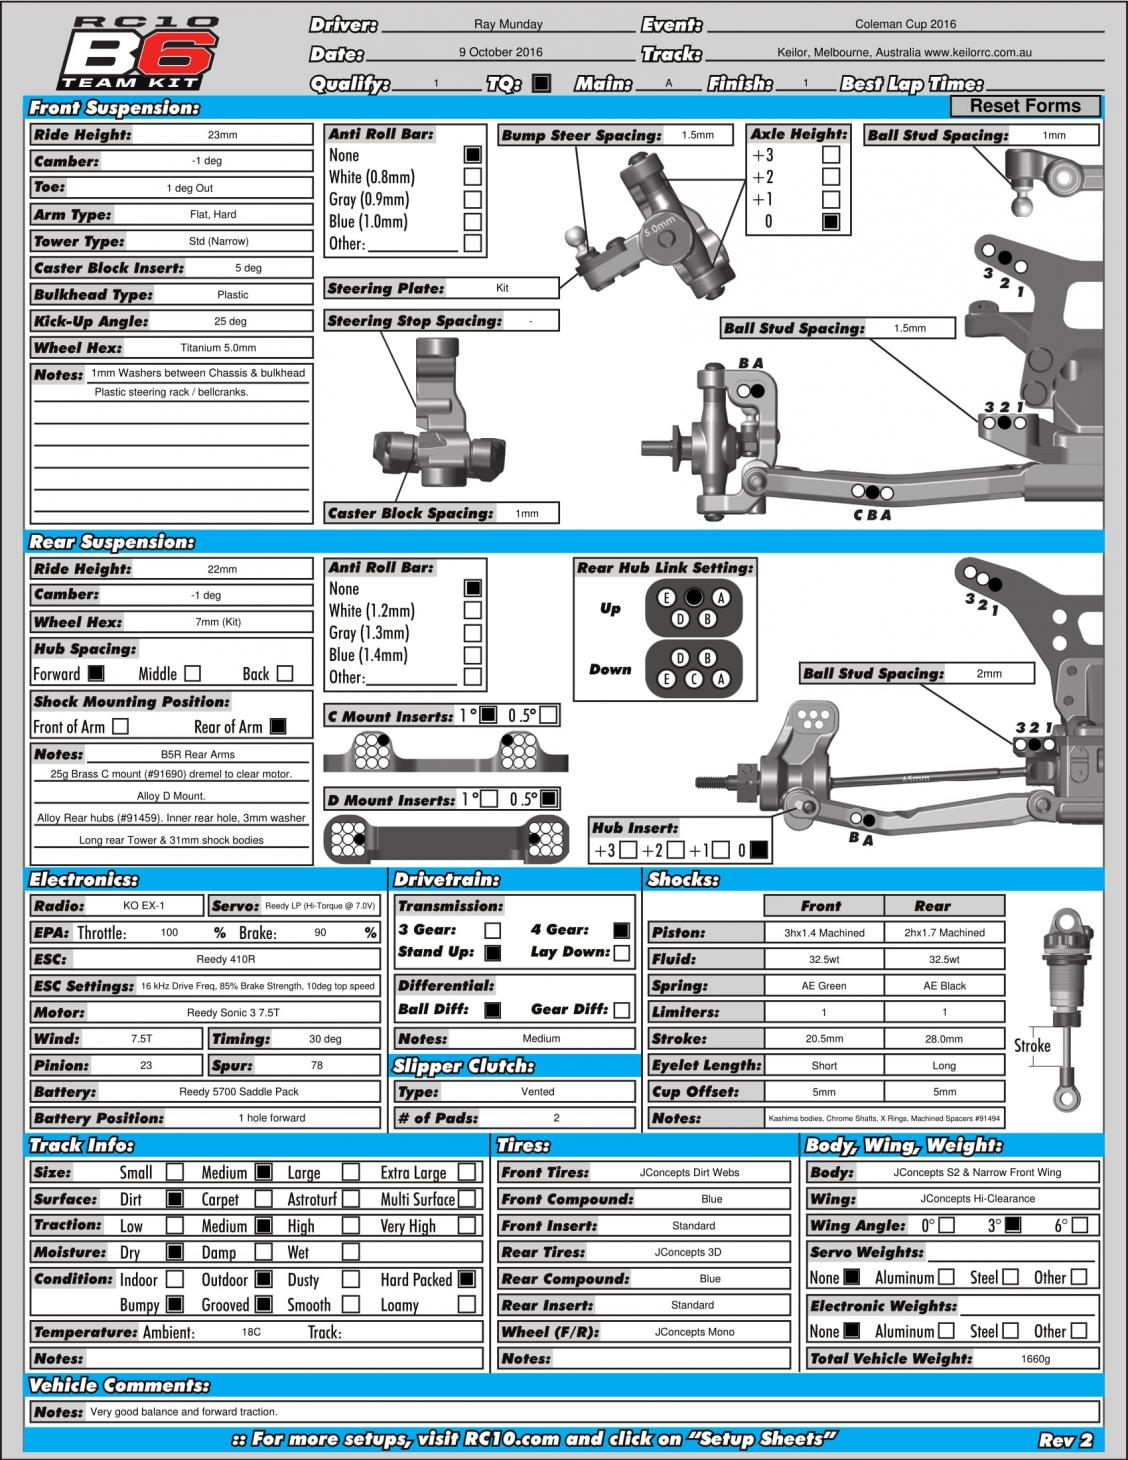
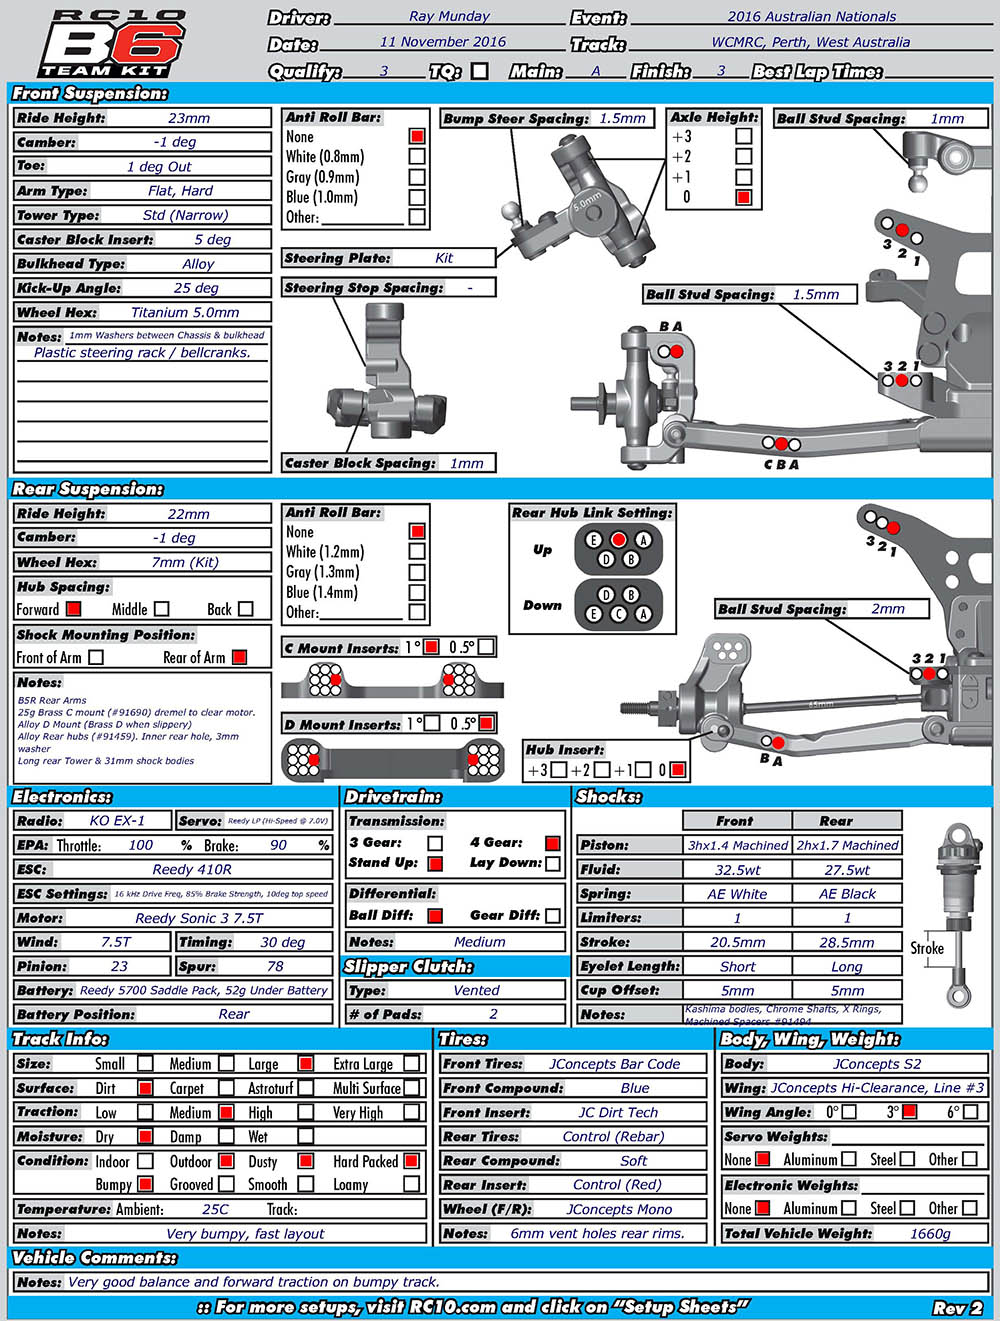
Starting Setup
(Lower Grip, Bumpy) |
Very Low Grip
(change from starting setup) |
Very Bumpy
(change from starting setup) |
Medium Grip / Flowing
(change from starting setup) |
Med~High grip / Flowing Layout (change from starting setup) |
|
| FRONT SUSPENSION |
Shock Mount Top / Bottom |
Mid / Mid |
|
|
|
|
Usually leave middle tower / middle arm. Lean in on tower for smoother steering in high grip. Use outer hole on arm in very high grip (need longer rod end). |
| Camber Link Tower / Hub |
Mid / Inner |
|
|
|
|
Usually leave in this position. |
| Washers Inner |
1.5mm |
|
|
|
|
More washers = lower roll centre
(smoother entry, more mid & exit steering). (Kit= 1mm) |
| Camber / Kickup / Castor |
-1° / 25° / 5° |
|
-2° |
-1.5° |
-1.5° |
More camber smooths out steering, good for bumpy conditions. Rarely change kickup / castor. |
| Ackermann Plate |
+1mm |
|
|
|
|
Sensitive adjustment (option part).
+1mm plate increases low speed steering but keeps high speed smooth. AE #91680 |
| Washers Rack / Outer |
1mm / 1.5mm |
|
|
1mm / 1mm
(if using +1mm axle height) |
1mm / 1mm
(if using +1mm axle height) |
Sensitive adjustment.
Outer (bumpsteer): Less washers= more aggressive mid corner
(Kit=2mm).
Rack (Ackermann): Less washers= more low speed steering (less sensitive than outer) (Kit = 2mm) |
| Axle Height |
0mm |
|
|
+1mm |
+1mm |
0mm for most tracks. +1mm keeps front flatter, smooths out steering off power, but less predictable on power in bumps. Need to adjust bumpsteer to match. |
| Trail / Hub Spacing f/r |
|
|
|
|
|
|
| Toe In / Out |
1° Out |
|
|
|
|
1° out most tracks. More toe out= more initial steering, less exit. |
| Arms |
Flat Hard |
|
|
|
Gull Hard |
Hard arms make steering more precise in lower grip, smoother in high grip. Flat arms more initial response, smoother exit. Gull arms more rotation in mid to exit, better on power steering, but less initial response. |
| Front Bulkhead |
Alloy.
1mm between bulkhead & chassis |
Plastic
(kit).
1mm between bulkhead & chassis |
|
|
|
Alloy bulkhead more durable, slightly heavier.
Sensitive adjustment: 1mm washers between bulkhead and chassis lowers front roll centre, gives much more mid corner and exit steering. Use large diameter washers or aftermarket carbon plate. |
| Anti-Roll Bar |
- |
|
|
|
|
Only used on high grip carpet |
| Ride Height |
23mm |
|
|
|
|
B6D likes lower ride height than B5M. 23mm most tracks. |
| Spring |
AE Green |
|
AE White
(if front diving in bumps) |
AE White |
AE White |
Sensitive adjustment.
Green front spring
(softer) helps front steer in lower grip and still stable as grip increases. Use white spring (kit) for more flowing / higher grip tracks - allows higher corner speed. |
| Oil / Piston |
AE 32.5 / 3 holes x 1.4
(or 32.5 / 2 holes x 1.6) |
|
AE 37.5 / 2 holes x1.7 |
|
|
Usually use 32.5wt / 3 holes x 1.4mm. Smooths out steering and lands well. Use 2 holes x 1.7 in very low grip for extra traction. |
| Limiters / Length / Rebound |
1 / 20.5mm
(Short Rod End) |
|
|
|
|
(Kit=20mm). Longer shock = more droop. More droop is better in bumps, but less steering on exit and can feel wandery. |
| REAR SUSPENSION |
Shock Mount Top / Bottom |
Inner / Inner |
|
|
|
|
Using inner hole on tower adds rear grip in sweeping corners. Use most of the time
(kit= middle). Always use inner hole on arm. |
| Camber Link Inner / Hub |
Mid / Alloy Hub #2
(upper mid with kit hub) |
|
|
|
|
Rarely change. Alloy hubs AE#91549 add strength and more rear grip. |
| Washers Inner / Outer |
2mm / 3mm
(Alloy Hub) |
|
|
1mm / 3mm |
1mm / 3mm |
Sensitive adjustment.
More washers (inner)= Lower roll centre. Lower roll centre gives more rear grip mid corner and exit. 2mm used most of the time. Use 1mm on flowing tracks for less rear roll and more exit steering. Try 4mm outer on higher grip tracks. |
| Camber |
-1° |
-0.5° |
-1.5° |
|
|
Sensitive adjustment for bumpy tracks. More camber= less side grip but smoother sliding and less catching in bumps. -1° most of the time. |
| Hub Height |
0mm
(Alloy) |
|
|
|
|
Use 0mm hub pivot height on dirt. (Alloy hubs AE #91549). |
| Anti-Squat / Toe |
2° / 3.5° |
|
1° / 3.5°
(0° squat if severe bumps under power) |
1° / 3.5° |
1° / 3.5° |
Sensitive adjustment.
More anti-squat= more on power grip, but worse in bumps and less braking grip and turn in. Less squat= less traction under power but smoother in bumps and less wheelstand in higher grip. Toe-in: 3.5° seems good balance on most dirt tracks. |
| C Pivot / D Pivot |
1mm In & Up / 0. 5mm In |
|
1mm In / 0.5mm In |
1mm In / 0.5mm In |
1mm In / 0.5mm In |
Sensitive adjustment (need Alloy D or Brass D to make these changes).
Narrower pivot spacing (narrower rear track) = better stability under power, better rotation feel mid corner. Wider rear spacing more on power steering, better stability mid corner. Raising pivots raises rear roll centre (can help in higher grip). |
| WheelBase |
Short
(B5R Arms or dremel 3mm off std arms) |
|
|
|
|
Sensitive adjustment.
Shorter wheelbase = more weight over rear wheels. Use B5R rear arms (or dremel 2~3mm off front of B6D arm) for shorter wheelbase. Improves rear traction under power and braking. In higher grip,Standard arms (short wheelbase) is OK. |
| Anti-Roll Bar |
- |
|
|
|
|
Only used on high grip carpet |
| Ride Height |
22mm |
|
|
|
|
B6D likes lower ride height than B5M. 22mm most tracks
(run rear 1mm below front) |
| Spring |
AE Black |
|
|
AE Green
(White for more corner speed) |
AE Green |
Sensitive Adjustment.
Black spring (softer than kit) rides bumps better and gives better rear traction in lower grip.
Green (kit) keeps rear flatter and gives more corner speed on more flowing / higher grip. Stiffer spring gives more nose down jumping / further distance jumping and better landing. |
| Oil / Piston |
AE 32.5 / 2holes x 1.7 |
AE 30wt / 2holes x 1.7 |
AE 27.5wt
(if no big jumps) |
|
|
2 holes x1.7mm gives best traction. I use machined pistons AE#91627 for slightly better response. 32.5wt standard. 30wt ride bumps a bit better. 27.5wt rides bumps better but landing worse. |
| Shock Length / Position |
Long
(31mm Body) /
Behind Tower |
|
|
|
|
Optional 31mm body / longer rear tower: Big improvement in rear traction on very bumpy tracks, slightly plusher landing on jumps. Laydown: Shocks behind tower most dirt tracks unless very high grip. |
| Limiters / Length / Rebound |
1 / 28.0mm
(Long Rod End) |
28. 5mm |
28. 5mm |
|
|
Sensitive adjustment.
More droop= more rear traction in bumpy corners and bigger bumps, better jump landing, but less responsive handling in higher grip / flowing tracks. 28. 0mm good balance (kit= 27. 5mm). |
FRONT
TYRES |
Tyres |
JC Dirt Webs
(Blue) |
JC Rips |
JC Bar Codes |
JC Dirt Webs |
JC Dirt Webs |
Front: Typically JConcepts Rips if the track is damp, Bar Codes if dusty, and Dirt Webs if grooved. Rear: JConcepts 3Ds if hard packed but dusty / loose on top, Bar Codes if grooved, Flip Outs if wet.
Blue compound most of the time, with orange if it is very hot and green if damp.
Seehttp://www.rctech.net/forum/10587840post2.html for more detail. |
| Inserts |
Open Cell |
Open Cell |
Dirt Tech CC |
Dirt Tech CC |
Dirt Tech CC |
| Wheels |
Jconcepts Mono |
|
|
|
|
REAR
TYRES |
Tyres |
JC Bar Code V1 |
JC DD |
JC 3D |
JC Bar Code V1 |
JC Dirt Maze |
| Inserts |
Open Cell |
Open Cell |
Open Cell |
Close Cell
(punched 3h each rib) |
Close Cell
(punched 3h each rib) |
| Wheels |
Jconcepts Mono |
|
|
|
|
DRIVE
TRAIN |
Motor |
Reedy Sonic 3 7. 5T |
|
|
|
|
Use 7. 5T most of the time on outdoor tracks. 8.5T a little smoother, but 7,5T helps to clear jumps easier. |
| Timing / Rotor |
30° |
15° |
20° |
|
|
Sensitive adjustment.
Decrease timing for low grip / bumpy tracks.
Increase timing for more power feel. |
| Pinion / Spur |
23 / 78 |
|
|
|
|
Use 24 / 75 for 8. 5T. |
| 3 Gear / 4 gear |
4 Gear |
|
|
3 gear |
3 Gear |
Critical Adjustment
Standup = more weight over rear. 4 gear= better stability under power, but less steering. Use for lower grip and
tracks with straights after slow corners. 3 gear standup= more on power steering than 4 gear, better braking. Use on more flowing layout.
Laydown = weight further forward. Big increase in corner speed and on power steering, better jumping, but lose forward traction. Use on flowing tracks where corner speed is critical. Worse if big jump directly after hairpin corner (can be harder to clear). |
| Standup / Laydown |
Standup |
|
|
Standup |
Laydown |
| Ratio |
8. 8:1 |
|
|
|
|
|
| ELECTRONICS |
Radio |
KO EX-1 |
|
|
|
|
|
| EPA Steer / Brake |
100 / 90 |
|
|
|
|
Set brake EPA to just lock up wheels at speed. Adjust track by track. Set steering EPA for full lock. Reduce on super high grip
(e. g. astro use ~85%). |
| EXPO Steer / Throttle / Brake |
0 / 15 / 0 |
|
|
|
|
Adjust for personal feel. -15% throttle expo most tracks. |
| Servo |
Reedy LP Hi-Speed @7. 0V |
|
|
|
|
Low profile servo used to reduce front weight bias. |
| ESC |
Reedy 410R |
|
|
|
|
510R now released. |
| Drag Brake Y / N, Initial % |
18% |
|
|
|
|
18% drag brake used most tracks. |
| DeadBand % |
3% |
|
|
|
|
|
Drive / Brake Freq
(kHz) |
16kHz / 1. 6kHz |
|
|
|
|
Sensitive adjustment:Increased drive frequency smooths out power delivery at low RPM. |
| EXPO Throttle / Brake |
0 / -20 |
|
|
|
|
Set for personal preference |
| Boost Timing |
No boost |
|
|
|
|
No boost used |
| Top Speed Timing |
10° |
No timing |
|
|
|
10° top speed timing used for longer straight. Disable for very low grip unless long straight. |
| Battery |
Reedy 5700 Saddle
(or shorty with 50g under) |
|
|
|
Reedy 5300 Shorty |
Prefer feeling with heavier pack
(usually use saddle, can also use shorty with Reedy brass weight plate underneath). |
| Battery Placement |
Rear |
|
|
Forward 2 holes |
Against Waterfall |
Rear for slippery tracks, forward as grip increases. Bumpy track:Battery rear more traction, battery forward will keep the car flatter in the bumps. |
| Battery Ballast |
- |
|
50g under battery |
|
|
Ballast under battery improves stability and bump riding, but slows response |
| AERO / CHASSIS |
Body |
Jconcepts Silencer |
|
|
|
Jconcepts S2 body improves stability and jumping. |
|
| Wing |
Narrow JC Front Wing
JC Hi-Clearance Rr Wing |
(no front wing) |
|
|
Front wing improves on power steering in med / high speed corners. |
|
| Wing Position |
Standard |
10mm Rear |
|
|
|
Moving wing 10mm rear makes huge difference to rear traction from medium speed, but more nose up jumping. Very good in low traction. |
| Wing Lip / Angle |
Line 2 / Mid |
Line 3 / Max |
|
Line 1 |
|
Wing angle change is less effect than moving wing backwards |
| Fr & Rr Arms |
Hard Front /
Std B5R Rear |
|
|
|
Hard front / Hard Rear |
Hard front arms used all tracks. Hard rear arms help rear stability in high grip / high temp, and land from jumps better, but reduced traction in bumps. Hard arms more brittle in very low temps. |
| Steering |
Alloy Servo horn, kit bellcranks |
|
|
|
|
Alloy servo horn less chance of breakage. Kit plastic bellcranks more forgiving steering than alloy on most tracks. |
| Ballast |
25g Brass C
(Dremel to fit)
Alloy D |
Brass D |
Brass D only if very slippery |
Alloy C & D block |
25g Brass C
Brass D |
Important adjustment. Weight bias is critical for 2wd. More weight @ rear= more forward traction, but more oversteer in high speed corners, oversteer at corner exit and jumping more nose high. If poor forward traction, add weight to the rear. Use 25g Brass C and dremel to fit standup transmission. Corner speed is higher and jumping better with no brass at the rear. Use Brass D if forward traction is very poor (with laydown transmission, use Brass C and Brass D on dirt). |