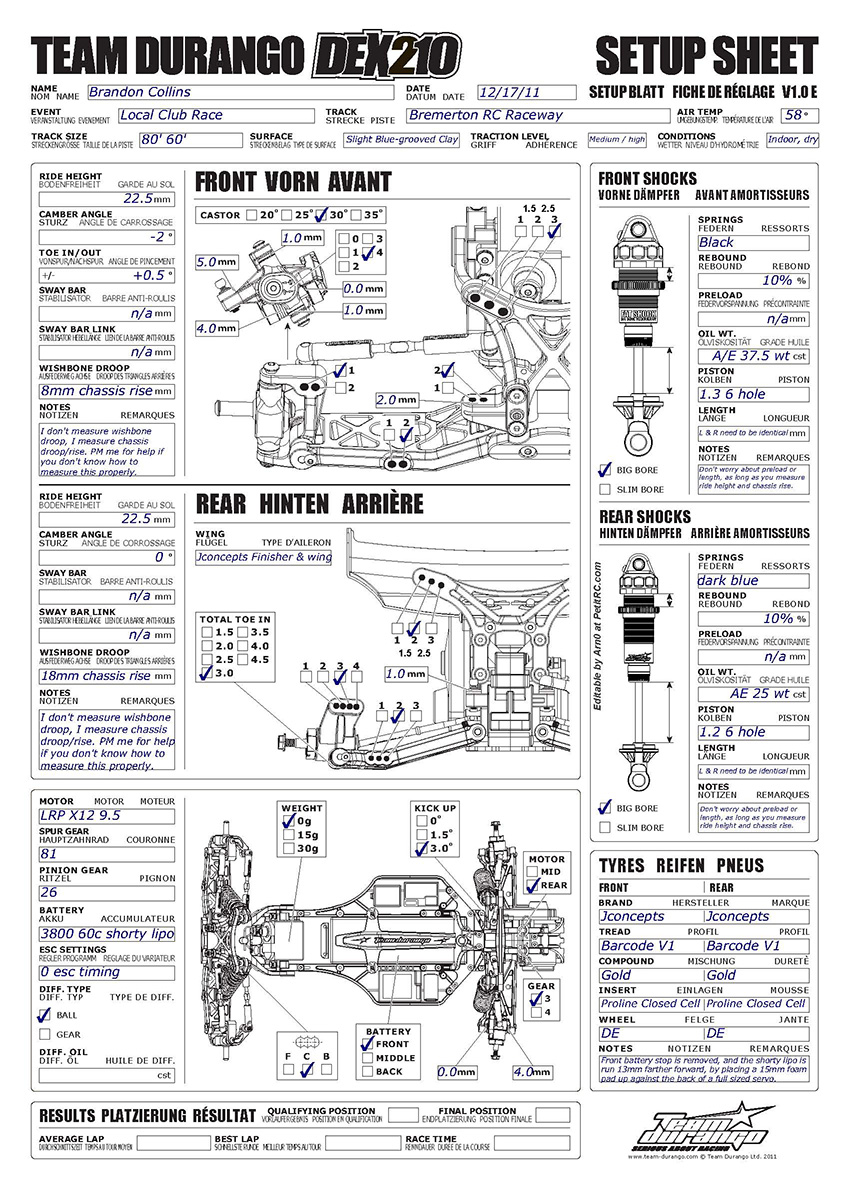
OK, for those of you that have been waiting, here is my final setup sheet. Final that is until I find a way to improve upon it. The ultimate goal of this setup was to balance the car for a typical rear-motor setup, and to greatly increase the amount of on-power and off-power steering. There is limited space on the setup sheet to type notes, so I will preface it with some information here. The link to the setup sheet is at the bottom.
1. If you run on a different type of surface, with a different level of overall grip/traction, you are going to want less roll stiffness than I am running here. When traction levels are up on my track, it's not uncommon to traction roll. One setup cannot work for all track conditions, so this setup may not work for your track. Just keep that in mind. If you want to run this general setup, but run with different levels of traction, don't hesitate to PM me. Id be happy to help you with some subtle changes to tailor the setup to your track.
2. My track is pretty smooth, so I typically don't have to keep my suspension soft, to handle lots of small bumps or ruts. The shock setup here is designed to handle medium sized jumps.
3. Pay attention to my pistons, oil weight, and spring choice. I spent a LOT of time balancing the front and rear chassis rising frequency ... first by spring only, and then damped. This keeps the car very predictable coming in and out of turns as the front and rear of the car work together, instead of fighting each other. This allows you to push the car harder than you could otherwise, and the car will resist becoming unsettled.
4. Steering on and off throttle can be changed quite a bit by droop. Pay attention to my notes on how I measure droop. I don't measure wishbone length as that that method is an inaccurate way to measure droop. I measure actual chassis droop/rise instead.
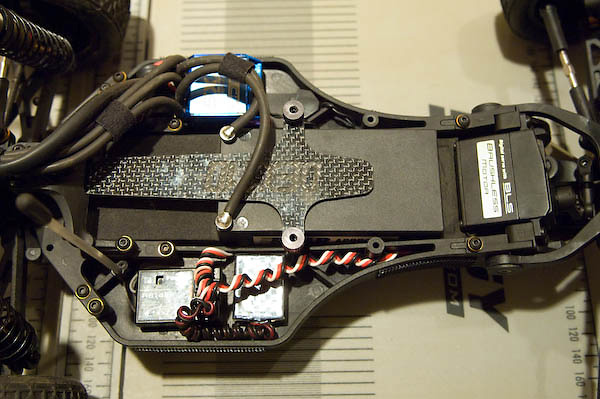
5. Chassis weight balance is a bit different with this car I found. The rear of the car is quite a bit heavier than any other buggy I have driven, and therefor found the shorty lipo moved forward beyond the normal battery stop was the best way to achieve front to rear balance. I used foam pads to precisely place my battery. Instead of adding weight to the front of the buggy, I subtracted weight from the rear by running the short lipo farther forward than allowed normally. This keeps the buggy lighter and more responsive. I found the buggy to a) be too heavy, and b) have too little steering with a full sized lipo. Here is a picture of my battery placement. For placement, I removed the normal battery stop, and ran a 15mm foam pad up against the back of my full sized servo, which moved the lipo 14mm farther forward.
Moving from a full sized lipo to a shorty lipo put the car into a whole other league, and at least for now, I consider it an absolute must have for this buggy.
6. Even though I am running the Akura front carbon tower, the roll center placement matches what I have dictated on the setup sheet for the factory front shock tower.
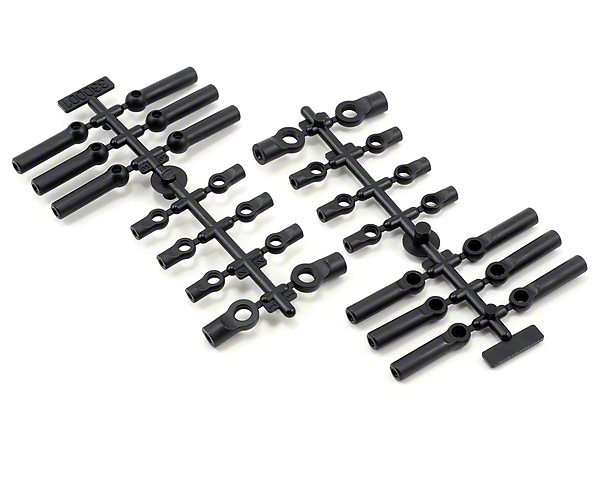
7. I am running the original ball cups (TDR330001) found on the 4wheeler and SC trucks. I found the HD ball cups (TDR330293) to be too hard, resulting in a lot of unnecessary popped ball cups.
What benefit was there in using the shorty lipo that put it in "a whole other league"?
Have you ever driven a B4.1? In general, there is a MUST have for your setup amongst the AE team drivers, and that is the weight placement in the rear of the buggy. You add a 1/4oz in each side pod, 1/2 under the shock tower, and 1/2 next to the receiver. Without it, the buggy drives like butt because the rear of the car is too light. The weight there transforms the traction balance of the car, to a balanced state. The same thing happens with the short lipo. in the 210... in using one, you are able to remove weight from the rear of the car, and shift it forward where this buggy needs it. And considering the buggy needs a diet as well, the lost weight overall is beneficial. With a heavy lipo, I found the car rolling a bit too deep, lifting inside wheels, and felt a little like a pig. Lightened up, the car comes alive. YMMV.
Generally speaking, what types of steering results did you get from experimenting with droop? More steering with more droop, vice-versa, etc? Thanks for the sheet.
Most of the steering I was able to pull out of the car was done with the shock setup, battery placement, and front camber. Droop is set front and back to compliment it. Too much droop gets the car rocking too much front to back making the car overreact to throttle and braking inputs.... too little, and you don't get enough weight transfer front-back... its the middle ground that makes the car easy to drive. I was able to eliminate about 80% of both the on-power and off-power push.
In general I found the car to have PLENTY of forward/rear-tire traction, in almost all circumstances, so the setup has a lot of room to shift traction to the front tires. That includes plenty of rear droop, and a nice limited amount of front droop.
What is droop and how do you adjust it? New to the whole buggy thing and I'm getting my kit this week
Droop is the difference in chassis height, at each end of the car, between ride height, and the moment the tires begin to lift off the ground.
Make sure the car is at the exact desired ride height first, and is sitting on a flat surface in ready-to-race trim. Next, settle the car, and hold a ruler up to the nose of the car and measure some arbitrary landmark, somewhere directly down the centerline of the car. In the 210s case, I just used the very top of the front bumper. Next, lift the front of the car up until the tires are JUST touching the ground, and remeasure the same spot. In my case, there is an 8mm difference. So, the front droop is 8mm.
Then repeat for the rear.
My front droop screws work great but the rears seem to back out during a run. I tried some ca in the arms but it did not work. I'm thinking about trying some very thin washers under the droop screws. Whats your method for limiting rear droop? I still think the rear shocks are too long. You could add 3-4 mm of internal limiters and still be riding on the droop screws.
I use normal ol long metric set screws. The heads on the stock ones broke a long time ago, so I just used some set screws I found in my pit box. I put the allen wrench side of the screw facing down, so i can easily compress the arm to expose the screw, to make adjustments. They are very tight in the arms, and don't move at all. I imagine a bit of locktite would help if you are getting movement.
You CAN use limiters, but when playing with droop back and forth 10 times a day, I can't afford to be doing that with limiters. I have zero issues with my droop screws, so they work great. Also, I am running the gold colored shock shafts, which the rears are shorter than the stock ones. But I have the eyelets unscrewed a few turns to compensate. As long as you measure droop instead of wishbone length, it won't matter if the shock is a little long (as long as it isn't too short)
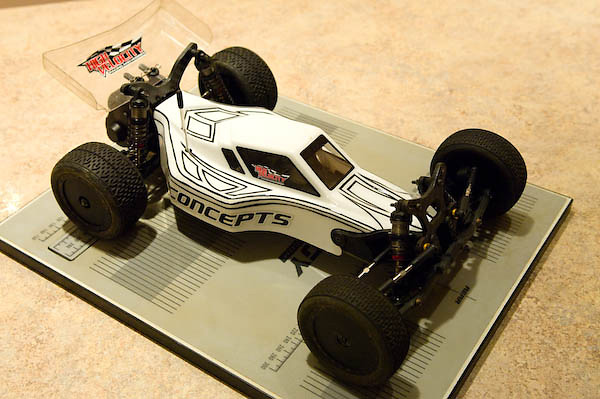
For those of you that would like to see this setup in action on a hard clay surface, here is a good video of me running in our local club race last Saturday, running in the 17.5 no-boost class.... this is the same day I drew up my setup sheet. I'm out front in the white finnisher shell durango, with the black wheels.