|
XRAY
T2 Tips and Tricks from Nexus Racing
Every racing kit can be a little better with a few personal modifications. Xray provides a lot of great information for the T2 at their XRAY T2 Knowledge Base. We'll try to provide some more unique tips and tricks here. Check back often for updates! MODIFICATION TO
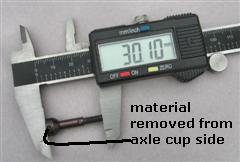
REDUCE UNIVERSAL "CHATTER" WHEN RUNNING A SPOOL While it is very common to refer to universals such as those on the T2 as "CVD's," there is nothing "constant velocity" about them. The universals actually fluctuate in speed when any angle is applied. These fluctuations are especially burdensome when running a spool up front, because the constant positive drive essentially gives no "relief" for the noise created, and the universals can chatter at larger angles. The universals that come stock on the Xray T2 tend to bind up and chatter in standard operation when certain setups are applied (with certain ackerman, track width, and/or toe settings). A little bit of grinding can make the universals operate more smoothly at larger steering angles. After the following modification, the universals will be able to operate an additional 5 degrees from its previous limits. They will also operate more smoothly at these higher angles. All of the grinding is performed on the wheel axles. First grind the outside of the axle cup to reduce the overall length of the axle. The best and easiest way to do this is to mount the axle into a drill press and push it down on a flat grinding stone or piece of sandpaper. Be careful not to overheat the axle, because excessive heat can alter the wear characteristics of the steel. Continue to grind until the overall length of the axle is reduced from the stock 30.55mm to 30.1mm.
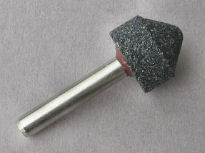
After removing some of the excess material from the outside of the cup, there will still be plenty of material outside of the pin holes, so reducing the durability of the axle should not be a concern. Next, bevel the inside of the cup where the driveshaft make contact at full throw. This is best and most easily accomplished by using an angled grinding stone bit available anywhere that sells air compressor accessories. Stick with a bit that has close to a 90 degree angle at the tip like this one:
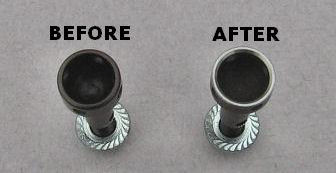
Continue to bevel the inside until you get close to, but not on the edge of, the axle's pin hole. A completed axle will look like this:
OTHER TIPS TO REDUCE
UNIVERSAL "CHATTER" -The most obvious way to reduce chatter is by utilizing a setup with more inherent steering. This way, you will not need to steer the car at the higher angles that can produce chatter. -Try to incorporate a setup with inboard toe-out on the front suspension. This would entail putting a thicker track-width shim on front-front lower suspension holder than on the front-rear lower suspension holder. When inboard toe out is used, the steering knuckle actually has to toe-in in relation to the arm to get the proper front toe. As a result, when the steering is at full-throw, there is less of an angle placed upon the universal and steering will be able to operate more smoothly. -Install the outdrives into the Xray Multi-Dff at different angles. Though the net overall chatter effect will not be reduced, the two front universals have the potential to "bind" at different points in time, reducing the negative "feel" that can result on the track. -Keep your universals clean! A little dirt present in the front universals can cause a lot of universal noise. -Never run bent driveshafts up front. If you get into a bind, install a straight universal from the back of your car on the front. The bent driveshaft will cause fewer problems when installed on the back of the car. KEEPING OUTDRIVE
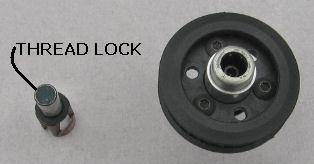
CUPS FROM COMING OUT OF THE MULTI-DIFF Two problems can arise when the outdrive cups move away from the center of the Multi-Diff. First, negative handling effects can result from the changing harmonics caused by the driveshafts' fluctuating angles. Second, the Multi-Diff actually has the potential to strip the hexes out of the outdrives because of the reduced contact between the outdrive and the locking axle. Xray suggests placing an o-ring inside of the outdrive before inserting the driveshaft. We do not recommend this for two reasons: 1) the outdrive still has the potential to move outward and 2) an o-ring can bind the suspension by hindering the inward movement of the driveshaft in certain circumstances (such as certain roll center and track width settings). To keep the outdrives from moving outward, we suggest "gluing" the Multi-Diff parts together with blue thread lock (or similar). The best thing about this solutio is that it is not permanent; you could always still physically pull or tap the outdrives out of the Multi-Diff if you wanted to remove them. All you have to do is pool a little bit of thread lock into the outdrive before inserting it into the Multi-Diff (with the locking axle already installed).
PREVENTING THE T2
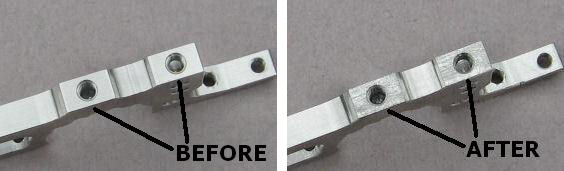
BULKHEADS FROM SHIFTING The aluminum bulkheads can shift either when you tighten them into the car or when you have collisions on the track. When they do shift, the drivetrain can bind and the car can tweek. To reduce this effect, scuff the bottom parts of the bulkhead that make contact with the chassis. The easiest way to do this is to use a simple file. It is most effective to Scuff the pieces in two directions.
Immediately when you re-install the bulkheads in the car, you will notice that they begin to "grab" the carbon fiber instead of slide on top of it. PREVENTING THE T2
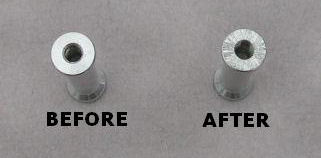
CHASSIS POSTS FROM SHIFTING The T2 chassis posts can shift in a similar way to the bulkheads (explained above). Also, these posts can become difficult to tighten because they sometimes twist in circles while you attempt to tighten them. Scuffing the bottoms of the chassis posts can prevent both of these problems. The easiest way to scuff them is to use a simple file. Move the file back and forth over the surface while you twist the post in a circle.
Immediately when you re-install the posts in the car, you will notice that they begin to "grab" the carbon fiber instead of slide on top of it. REINFORCING THE
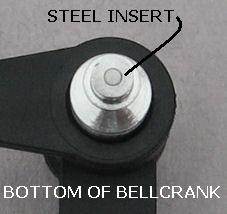
STEERING BELLCRANK POST FOR MORE DURABILITY The stock steering bellcrank post on the Xray T2 is dangerously thin towards the bottom (for belt clearance). Because it is made of aluminum, it is possible that the post can bend during some impacts. It is not very easy to notice when the bellcrank post bends because of its position on the chassis. When it bends, the tweek that it creates is not always noticeable through conventional methods of checking tweek. Also, the bent post creates awkward and constantly changing ackerman settings. To prevent the post from bending, we recommend this modification. For best results, you should definitely use a drill press. Use the upper-deck with the bearing holder and bearing installed as a jig for the bellcrank post. Set the post upside-down in the upper deck and hold it with your hand. Mark and indent an area in the center of the bellcrank post with a centerpunch. Drill a 1/16" hole a little past the thin part of the bellcrank post. Try to drill as close to the center of the post as possible. Do not allow the post to wobble as you drill, because you want the hole to be "tight." After you drill the hole, clean both the hole and the drill bit with rubbing alcohol or motor spray. Lightly coat the smooth part of the drill bit with JB Weld (or similar) and push it into the hole. Allow a full 16 hours for the JB Weld to dry and harden. Afterwards, cut off the portion of the drill bit that sticks out from the bellcrank post. Be sure that the bellcrank post remains flat at the bottom. It is best to use a drill bit as a steel insert becuause drill bits are hardened and will usually break before they ever bend. A modified bellcrank will look like this:
After performing this modification, you will be able to work on and drive your car with confidence that the aluminum bellcrank post is straight. TAPPING SOME OF THE
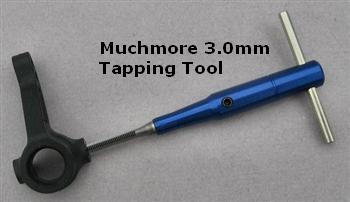
T2'S COMPOSITE PARTS Some of the T2's composite parts can benefit from being pre-tapped before inserting a screw. Tapping some of the parts has three benefits: 1) the screws will be much easier to install (even at awkward angles), 2) you will be less likely to cross-thread screw holes, and 3) you will be less likely to strip the holes from overtightening. The most obvious parts that can benefit from being tapped are the steering blocks. The steering blocks are probably the most stripped part on any touring car. After pre-tapping the screw holes, you are more easily able to determine when the screw is tightened (it is sometimes difficult to ascertain whether a hole is tight or whether a screw has been tightened, causing one to overtighten a screw and strip the threads). Much More offers a 3.0mm Tapping Tool that is perfect for tapping holes on the T2.
MARKING PARTS FOR
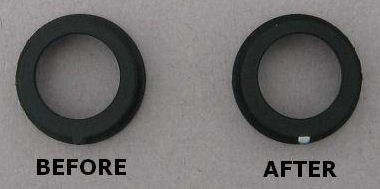
EASIER IDENTIFICATION AND ORIENTATION The Xray T2 has eccentric bearing holders for the diff bearings that allow for belt tension adjustment. It is difficult to see where the eccentric bearing holder is keyed into the bulkhead due to its color and placement in the car. To be able to identify the orientation of the eccentric holder more easily, mark the keyed portion of the holder with a Silver Sharpie (available at Wal-mart and many drug stores).
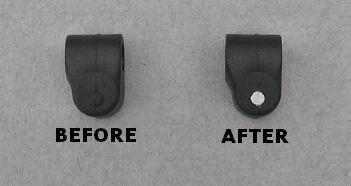
The Xray T2 lower suspension holders have molded-in dots to indicate their setting. The dots, however, are very difficult to see when the car is assembled. Checking to see if your settings are uneven, therefore, is not very easy. Coloring the dots on the lower suspension holders with a Silver Sharpie (available at Wal-mart and many drug stores) is one way to make identification easier and avoid this problem.
The mark made with the Silver Sharpie is more resistant to being cleaned off than most permanent markers, but it can still be removed with alcohol or motor spray. Source:
|