|
- Tamiya TRF101 - Review -

When Tamiya announced the TRF101, people initially thought it was a typo, and the first rumour was that it would be a 1/12th based on the RM01 chassis. However it soon became apparent that it would be a Tamiya Racing factory developed F1 chassis.
RC F1 was really popular in the 90's and then it faded away. Over the last few years there has been a gradual renaissance of the class with kits like the 3Racing F109 and the more modern 180mm Rubber class, started by Tamiya with it's F104 cars. The recent ETS races have had very good attendance in the F1 class and it seems that its popularity has started to rise again over here in the uk.
The combination of scale looks and close wheel to wheel racing is really quite unique in today's racing scene, and it has got a great community of RC racers obsessed with scale and speed.
We are big fans here of the formula, and when the car was announced it was one for the list. We've had the TRF101 for a while, and with the TRF102 coming soon we thought that we would take a closer look at the car.
Initial impressions
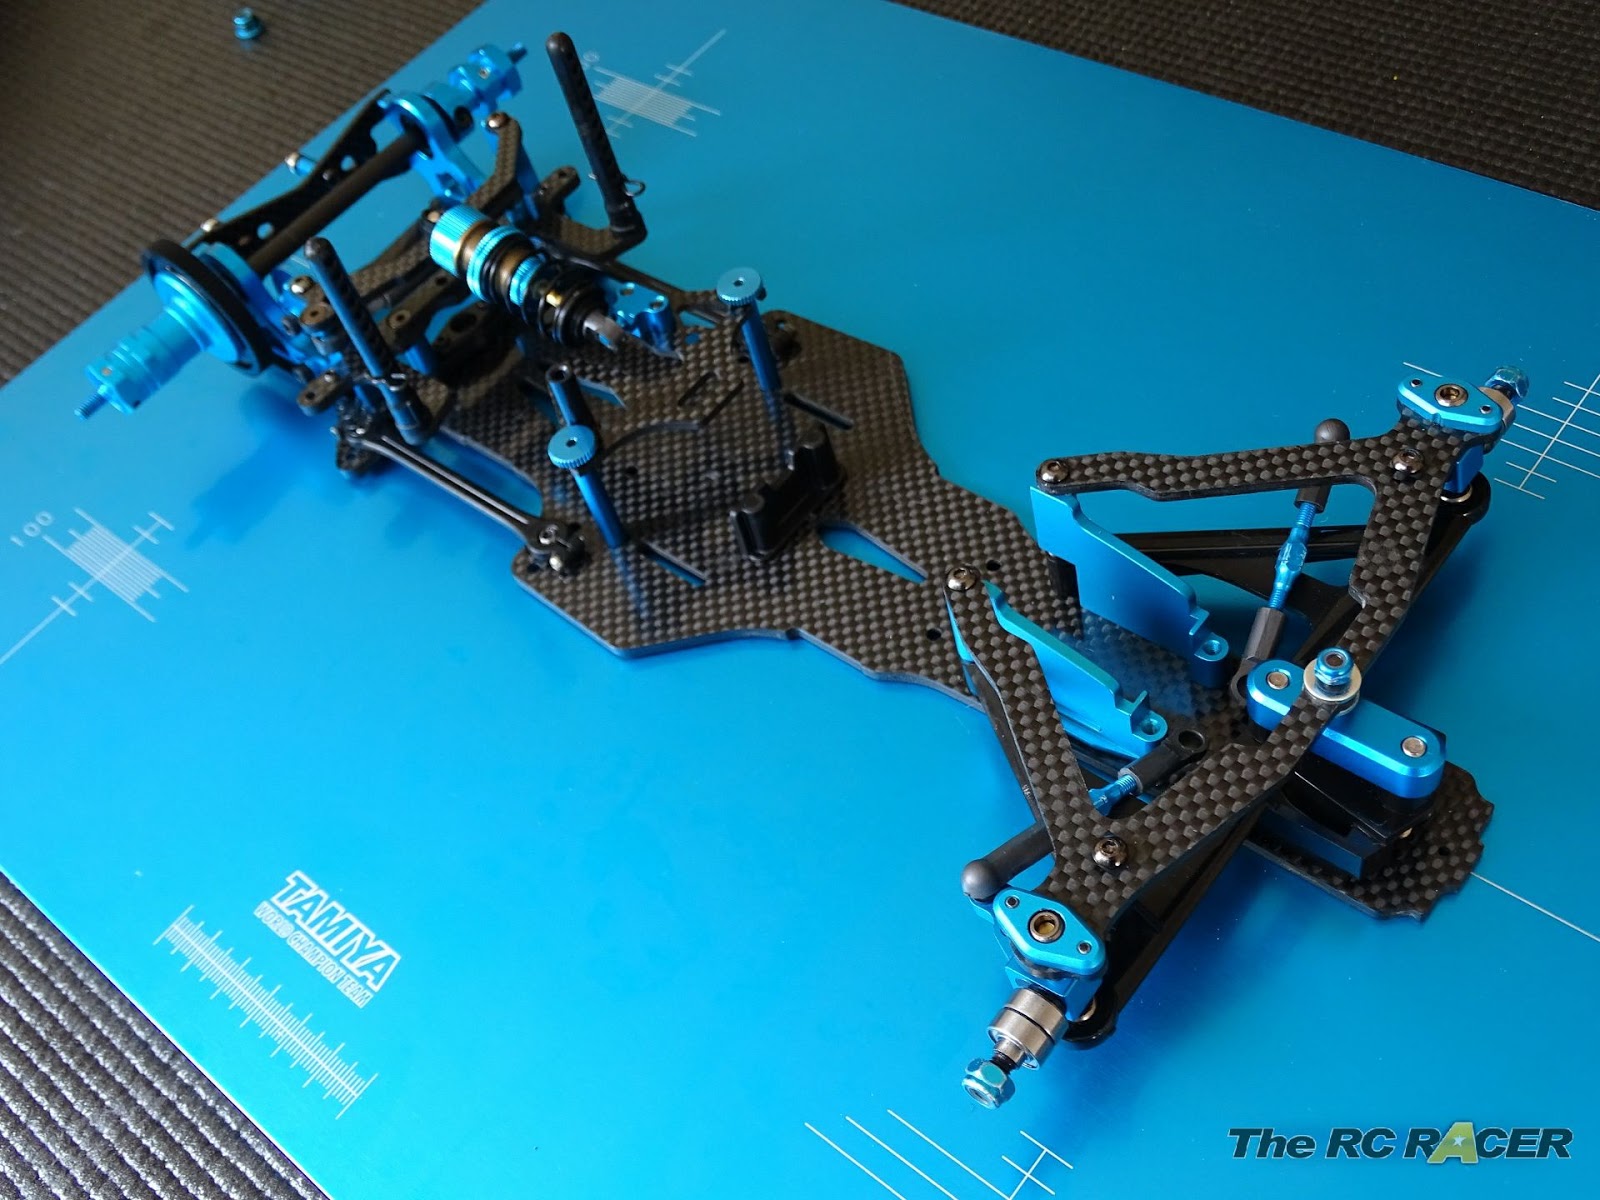
The kit is typical TRF quality, the rather large box contains the carbon fibre parts for the build along with a lot of the typical Tamiya TRF blue aluminium parts.
The carbon parts are typical Tamiya quality. The lower plates are 3mm thick and they feel pretty stiff. The new carbon upper arms are 2.5mm thick to have a little more flex but they are still very sturdy as they will be subject to some pretty tough knocks when racing.
After the carbon has been prepared with CA glue, it is time to start with the build.
Rear End
When building the rear pod you will want to ensure that it's all straight and true, so take your time. Once assembled you and adjust the ride height with the plastic S-Parts that allow you to change the ride height of the rear axle.

The rear pod allows you to adjust the ride height with axle spacers
The kit included rear axle is different to the F104 version, it is similar to most LMP style axles with the rear diff plate integrated to the shaft moving the diff approx 5mm closer to the motor pod. The diff now also has diff rings that are now the larger TRF417 versions.

The kit included carbon shaft is light, but many replace it with the steep hop-up part.
The kit 96t spur uses 12 balls, twice as many as the F104, and this gives you a really smooth and consistent diff action.

I use ceramic 3mm diff balls for a reliable and smooth diff action.
The whole diff assembly is great, much like the F104 pro set-up you assemble the diff and you use an internal nut to change the tightness.

Adjust the diff resistance with the internal nut
This is much better than the old F103/F104 style where the wheel nut also adjusted the diff tightness. Now you can set your diff and forget about it and change tyres to your heats content, knowing that they diff will stay how you last set it.

The rear axle is light and moves freely in the rear pod.
The whole rear axle assembly spins on a couple of 1060 bearings and here you can check that the rear pod is assembled correctly as the shaft will spin for ages on it's own weight.
The wheel stopper fits on the opposite side of the axle and the car is ready to take any std F1 tyres with a 14mm hex.

The motor spacer adds more cooling as well as the ability to balance the rear pod with shorter motors
When it comes to fitting a motor, there is a motor spacer included in the box that can act as an extra heat sink and also help you balance the rear pod weight. Using this I was able to fit the ETS F1 standard 21.5 Hobbywing into the rear of the car, although I did file down one of the plugs closest to the rear of the pod to stop it rubbing if I fitted a large pinion. A standard brushless motor would be fine, although you would have to remove the spacer for a Silver can.

The whole rear pod and axle assembled.
The rear pod is good, but it would have been even better if there was provision to fit a small fan on the pod. Many F1 series do run blinky and the temps can be high so having some screw hole were you can fit a fan would be a great addition to the design.
Front end
The front end is noticeably different to most other cars in the class because of the carbon arms adorning the car.

The new hubs give 3 ackermann settings and the choice of trailing or inline axles.
The aluminium front hubs allow you to have an in-line or trailing axle which you can easily change. The trailing axle is less aggressive than the in-line axle (seen above) so is good for a wide sweeping track, in-line for tighter technical tracks. You can also change the ackermann of the steering with 3 different settings, along with adding shims on under the ball nut to change the bump steer.
The other change is that the spring is now back above the axle much like the F102. I'm running the softer silver spring here to ensure that the car can get the steering I need on a tight track.

These can be swapped around to change the camber of the front wheels.
The upper carbon arms hold the aluminium pivot balls. You can change these around to adjust the camber of the car. There are two settings high and low which are 1 and 2.5 degrees.

The Carbon upper arm made the TRF101 look very distinctive when it was launched
The front end is very different to the F104. There is no adjustable caster setting, and the stiffness of the arms relies on how you set up the nut at the front of the car. As you can see above the std kit settings has 2 washers, you can adjust it by simply loosening the nut. This adjustment is actually very effective, and you can also substitute the washers for O-Rings to change the feel.
Chassis
The main lower decks are 3mm thick carbon, and they do feel very stiff compared to the wobbly TC chassis that I am used to.

The roll damper is a great tuning aid
The roll damper just needs grease to be fitted inside. These basic dampers work well in the car as it's very easy and quick to change the grease.

TRF shocks always feel smooth as silk
The chassis stiffness is to ensure that the pivot ball suspension works effectively. This utilises left and right side links that you can adjust to change the chassis roll. Move the links in to make the car roll more at the expense of less steering, and out to free up the rear and allow the car to rotate better in the corner.
The pitch damper is a typical TRF unit, you can use this to help adjust the amount of rear droop

The final fully built chassis
Once the whole chassis is assembled I weighed it and it comes in at 289g nice and light and fitting with the whole ethos of Formula One.
The car looks fast even when on the bench
The lightness of the chassis doesn't mean that the car feels delicate. The quality of the components is great, and the car is very strong on the track

Need to get this racing next
As pretty as it looks, it's time to fit the electrics.
Electrics and body
Not the tidiest wiring as I like the option to move the esc in the car for tuning.
The TRF101 allows you to fit either a standard or low profile servo.

The arms here are straight reducing bumpsteer
The arms will rest differently depending on what servo type (Std or low profile). This will change the way the steering feels. I opted to fit a low profile servo in the car. This allows you to get the steering arms aligned straight to the hubs, and it also doesn't need you to cut away at your servo case.

I had to file away the connector to use the ezrun and the motor spacer in the pod.
Next up I fitted the Hobbywing 21.5 motor and Justock esc. This is a popular combo for the F1 class in Europe and the ETS races. A shorty lipo was then fitted along the middle of the car. To fit the battery you need to remove a couple of screws from the top deck. I changed these screws for some thumb screws that I had in my pit box.
The battery position can help change how the car will feel on the track. The battery forwards will make the car feel pretty stable, and the battery at the back will aid traction when pulling away but will make it less stable on the corners. I prefer it towards the back as I like a lot of steering.

This shell is actually pretty quick to make up
Next up it's time to fit the body. Tamiya have a few fantastic bodies available, although it would be good to have a more up-to-date F1 soon. I opted for the the Mclaren MP4/24 shell. Part of the appeal of this class is the scale looks and Tamiya always delivers in that department.

You need to trim around the front for the arms and the rear to clear the side links
Some of the striking differences of the TRF101 over the F104 such as the lower links, front carbon arms and rear pod, ensure that you need to do a little extra trimming on the shell to make it fit and allow the chassis to move freely.

Scale looks and close racing make this a great RC class
The final result looks amazing, almost too good to race.
At the track
With the car all ready I took it to the Halifax track to try it out. I had not raced an F1 for some time so I was a little nervous.
I prepared the tyres with additive (Full front and rear) and took the car out for a spin.
I was amazed at how responsive the car felt from the off, the gearing was a little off so I didn't have much speed at first but that worked well as I got used to the car's handling. I soon felt confident with the car and I was able to smoothly get the power down and even manage to get it around a few corners at full tilt.
I was surprised at how stable the car felt over the F104 that I had last used. The steering was much calmer and the car felt easy to drive. If anything there was not enough steering.

Ready to hit the tarmac
In the pits I changed the car to have softer springs up front and moved the links out from the inner position. Gearing was also changed and once the battery was charged I took it out again for a spin.
The car was much quicker now thanks to the low FDR, and when I got to the first corner the car had much more bite on the initial turn in. So much that it took me a little by surprise. I soon got used to the extra steering and the car was feeling fantastic. The extra speed did seem to make the car feel a little less stable on the way out of the corner, so I came back in to the pits and loosened the diff a notch and drove back out. This solved the issue and the car felt fantastic.
Next up I took the car to a local indoor track to test the car on carpet. I ran less additive on the tyres anticipating the extra grip of the carpet and when the car raced away I was staggered at the traction that it had. The issue I had however was that It was quite difficult to actually get the car to steer when I was at a high speed.
I moved the front camber to the high setting and this did help for the next race, however the car still did not have quite the amount of steering that I wanted. For the final attempt I raised the spring adjusters over the side links a little to tweak the settings. This helped and the car felt better at the track. The final quick test was to stiffen the pitch damper to reduce the rear weight distribution, this started to give me more steering when leaving the apex.
A definite improvement but there is still a lot of performance that I want to get out the car when I get more track time. Luckily some other local clubs are starting to run a F1 heat so I can take the car there and see how far I can push it.
Set-up
Here is the final set-up that I went for.
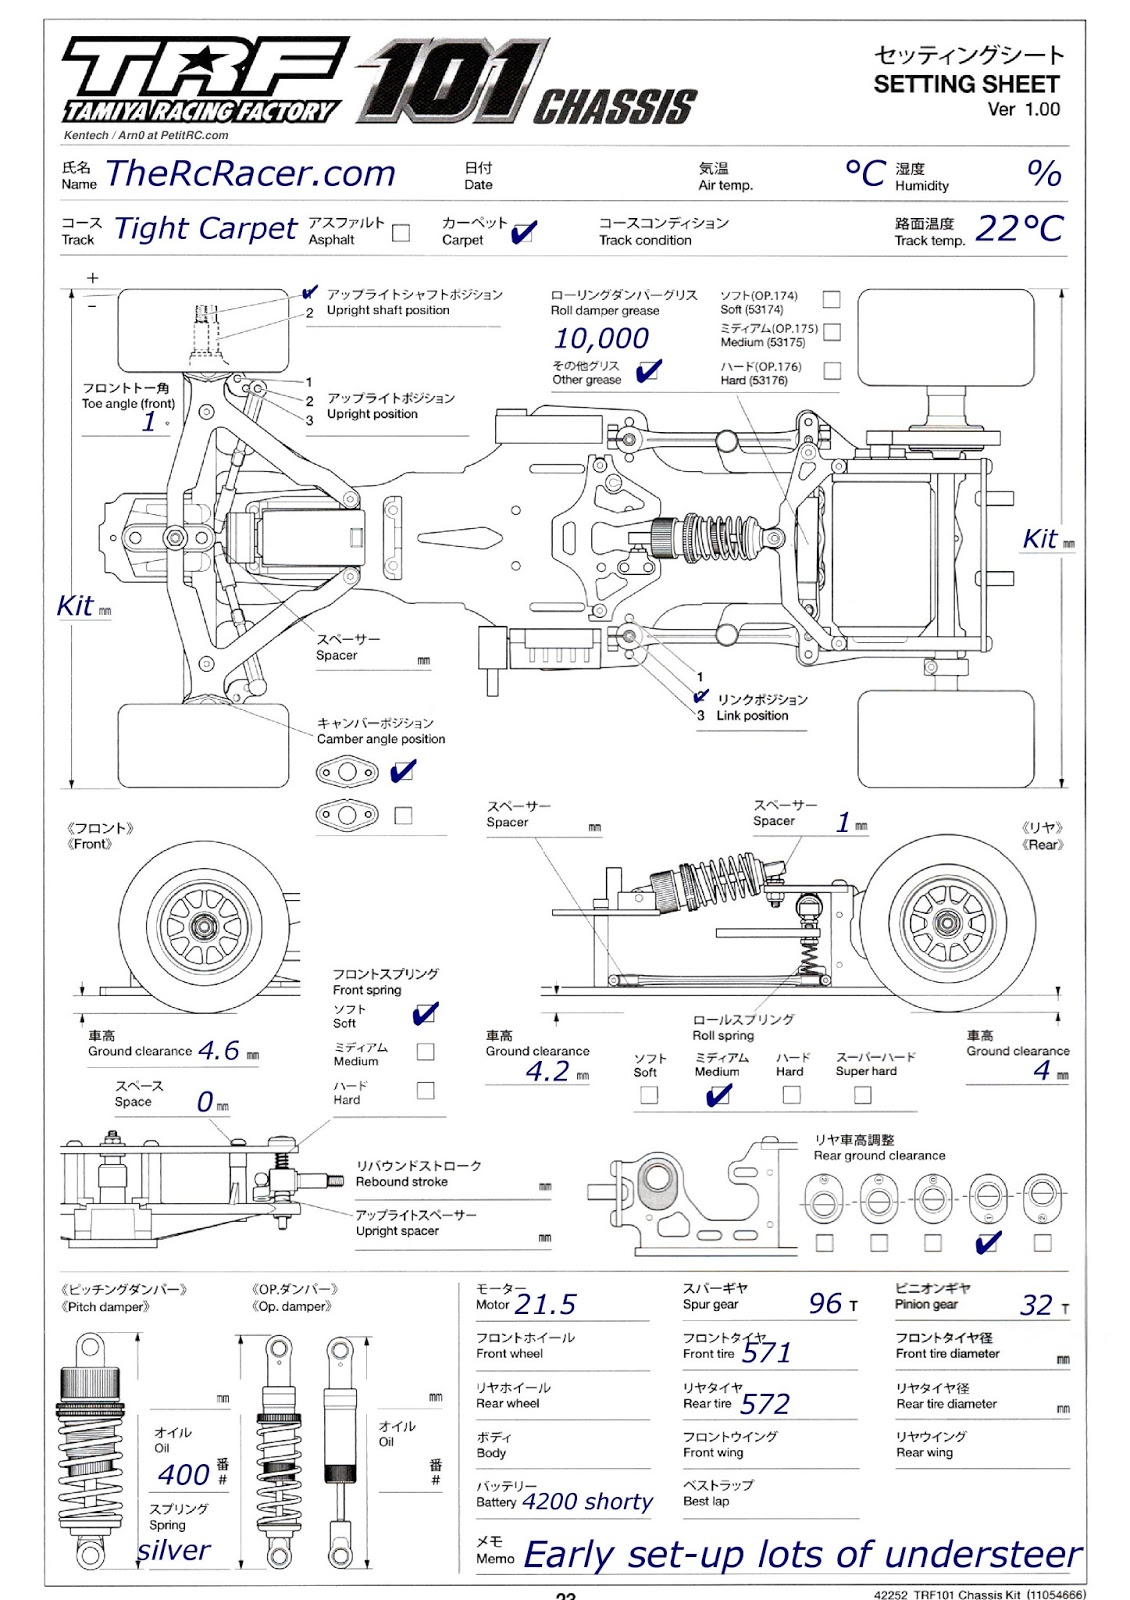
It is not optimal in any way but it is where I currently sit with the car,
Overall
The TRF101 is a great car, it's very stable to drive and the Tamiya quality ensures that despite being open-wheeled the car is able to take some large knocks and still keep running.
The kit comes with a range of different springs so there are a lot of tuning options in the box, and you will not need to buy any other option parts to make it a competent race car.
There are a few things that would be good such as being able to fit a fan on the rear pod, and maybe some caster adjustment. However that is being really picky.
Overall though I'm really excited about the car. It makes a nice change to the touring car and it has rekindled my affection for this class of racing. Expect a few more F1 updates over the summer months.
|

