|
|
 |
|
|
| Issue 133 (December 2006) |
Words: Jeff Eveleigh |
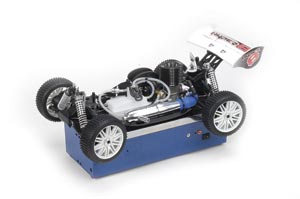
A properly set up starter box is essential to good track performance,
but many people overlook this vital step and are unable to get their
mill started in a timely manner. We've all seen it before in the pits
at a race: some guy fumbling around trying to line the engine's
flywheel up with the starter donut of the starter box. He's bent over
looking through the small crack between the box and the chassis hoping
the flywheel will make contact with the spinning rubber. The driver is
yelling at him to hurry up and all the other cars are extending their
lead as precious seconds are lost. All of this can be avoided by taking
just a few minutes to properly setup your starter box to
authoritatively erupt your bucket of nitro power into a screamer in
seconds. Check out this mess of words to find out how you can setup the
ultimate starter box.
|
|
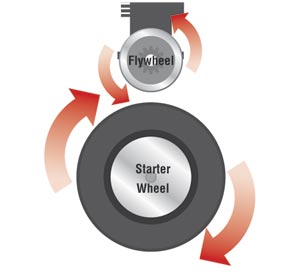
Setup
The basic criterion that must be fulfilled for your starter box to work
perfectly is that your chassis must fit onto the box without excessive
movement, allowing the flywheel to align perfectly with the starter
donut. This ensures that when you push your vehicle down on the box to
engage the switch and begin the rotation of the starter motor, the
flywheel and rubber donut will make immediate contact and start your
engine. Here are the steps necessary to attain this outcome.
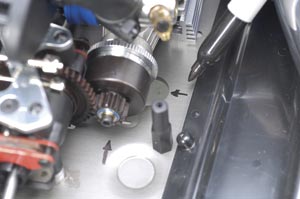
1. Your first step is to mark where your engine flywheel is in relation
to the flywheel hole in the chassis. The simplest method is to use a
permanent marker to scribe two marks on the chassis, to indicate
whether the flywheel is offset from left to right or from front to back
of the flywheel hole. If your engine's flywheel is directly in the
center of the hole, then this step is easy. You should end up with two
markings on your chassis after this step: one mark will extend straight
out from the pilot shaft or clutch nut, and the other mark will be
centered perfectly with the knurled part of the flywheel. You may need
to remove some components such as your fuel tank or side guards to get
complete access to your chassis, so you can make the markings.
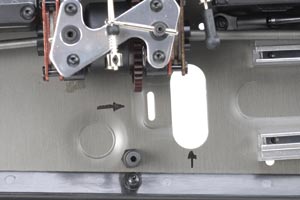
2.Remove your engine, clutch, and exhaust from your vehicle so you have
a clear view of the flywheel hole in your chassis. Be sure that all of
the other components to the chassis (such as suspension arms, shocks,
turnbuckles, etc.) are still installed. This will ensure that the
vehicle remains exactly as it will be when starting the engine, except
for the absence of the engine.
3.Place your rolling chassis less the engine onto your starter box and
line up the markings from step one around the flywheel hole with the
rubber starter donut. You want to be sure that the highest point of the
rubber starter donut will make contact with the lowest point of your
engine's flywheel. You also want to be sure that the mark that extended
along the knurled portion of the flywheel lines up perfectly in the
center of the rubber starter donut. This is the most vital step, as it
determines how accurate the alignment is between the flywheel and
starter wheel.
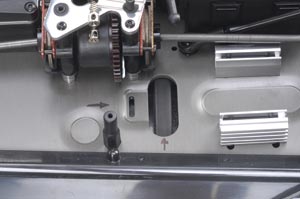
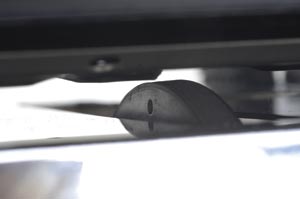
4.All starter boxes come with some sort of adjustable guide pegs that
allow you to key your chassis onto the starter box. Now that your
flywheel is lined up perfectly with the starter donut, you can mark
where these guide pegs will mount onto the top of your starter box. The
most common place is between the chassis and suspension arms on all
four corners of the car, with two at the front and two at the rear.
This is not carved in stone, so you can mount the guide pegs anywhere
you feel necessary to ensure that the flywheel is lined up with the
rubber starter donut, and your vehicle will not shift and cause
misalignment. Once the guide pegs are accurately marked, remove your
car and install the pegs securely in place. Most starter boxes are
universal and provide an infinite number of mounting positions for the
guide pegs. If the options provided meet the needs of your mounting,
then use them, but if they don't it may be necessary to drill new holes
for your specific vehicle's needs.
5.Once you have the guide pegs in place, double check that the chassis
fits slop-free into the guides and that the markings on the flywheel
hole match with the rubber donut within the starter box. If there are
slight differences in the alignment, now is the time to fix them. Move
the guide pegs along the universal mounts, or slot the holes you
drilled to provide the perfect alignment. Now install your engine,
clutch, and exhaust system onto your chassis again.
6.Alignment is the key to a speedy working starter box, but there is
more to starter perfection than just the fit of the chassis. If the
switch that starts the electric starter motor is engaged too early or
too late, there is still more setup to be done. If your starter motor
switch connects too early, the mass of the vehicle simply sitting on
the box may trigger the motor and cause the starter box to run
continuously. If the switch connects too late, the compression of the
engine may be too high for the electric starter motor to overcome from
a static position. The ideal time for the switch to make contact and
rotate the starter motor is after downward pressure has been placed on
the vehicle on the starter box but just before the flywheel actually
comes in contact with the rubber donut. The starter box switch is fully
adjustable and adjustments are usually made simply with a small screw
accessible externally. Read through your starter instructions to learn
more about switch adjustments, then give yours a quick look to be sure
it is connecting at exactly the correct time.
7.Now it's time to test the setup. With your starter box turned on,
drop your vehicle into place and press down on it. If the previous
steps were followed properly, the flywheel should be aligned perfectly
with the rubber starter donut, the motor should switch on just before
the engine flywheel makes contact with the rubber donut, and the engine
should turn over immediately without having to move the chassis or
tweak the pressure downward in any way.
Before we wrap up there is one final issue that needs attention, and
that has to do with the direction of starter donut rotation. When you
are looking at your engine from the front, and the first thing you see
is the clutch assembly with the carburetor directly behind it, the
direction of flywheel rotation is counter clockwise. Make sure to
double check that your starter box is rotating your engine in the
correct direction before you try to start it; nitro mills can start
backwards ,and this usually doesn't give you the holeshot once the race
start tone sounds.
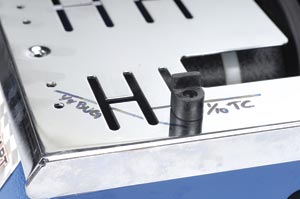
Multiple Chassis
Some people use the same starter box for many different vehicles.
Because of this they don't properly set up the alignment pegs, making
engine starting sketchy at best. A simple solution to this is to make
markings on your starter box for all of your chassis and re-adjust the
pegs for each chassis you use. It is rare that you'll be using many
different vehicles in one day so take the extra few seconds to move the
alignment pegs to their pre-marked positions for a given chassis before
you hit the track.
These steps are not hard to follow, nor are they time consuming for
that matter, but these extra measures will get you onto the track where
you belong faster. Now that everything is lined up, when your glow
igniter is attached and your vehicle is pushed down on the starter box,
you will have consistent engine starts even when the high pressures of
racing are put onto your pit crew. Late race starts and flameouts will
be tackled with ease and the pressure will be put back where it
belongs, on the driver.
Starter Box Quick Tips
1. Ensure your battery is secure within the starter box. Use heavy-duty
tie straps, fiber tape, or even "Goop" (Shoo Goo) to be sure that the
battery doesn't come loose during use.
2. Always charge your battery the night before you will need the
starter box. Some batteries cannot be quick charged, so if you forget
on race day, it may be too late.
3. Ensure that all exposed connections are fully insulated with shrink
tubing or electrical tape. Most starter boxes are made of metal that
can easily cause a short circuit if wires or battery terminals are
exposed.
4. Make sure that your engine flywheel is perfectly aligned with the
rubber starter donut and that the trigger switch is engaging at the
correct time.
(read the article, ya dough head)
5. Keep your starter box clean. Dirt, fuel, and oil can build up on the
outside and inside of your starter box so open the sucker up every once
in a while and wipe it down.
6. Be nice but don't always share. Mom taught us that sharing is the
kind thing to do, but if everyone is using your starter box, it may not
be ready when you need it, such as when a "flameout" occurs while
leading the A-main. Dead batteries don't start engines too quickly
(refer back to tip #2).
7. Regular inspection and maintenance is wise. Rubber donuts wear out,
motors get tired, and electrical connections can weaken. If you find
these problems and replace or repair them before they affect you your
starter box, it will always be there when you need it.
|

|
|
Subscribing to XRC is easy! Just fill out the form below, and you will be invoiced for $24.99 for your first year.
Offer is valid for US residents only. |