Revo Performance Set-Up Guide (part 3)
Engine, Clutch & Drivetrain
by Steve Slayden 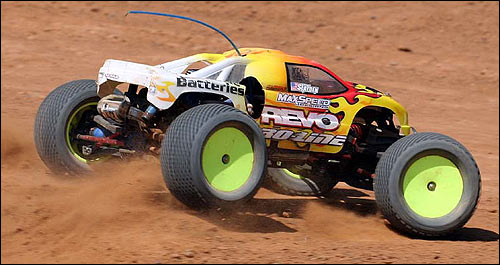
Photo Courtesy of Cliff Hudson
Welcome
to the third and final installment of my Traxxas Revo performance
article series. Like my previous articles, I will be shedding some
light on the tips and tricks that I perform on my own personal race
trucks. In part 1, I showed you my complete guide to tuning the Revo suspension, and in part 2, I explained many of my steering and chassis tricks.
In this installment, I will focus on the drive train along with getting
the most out of your engine and transmission. Racing the Revo is a lot
of fun. There are many ways to tailor the Revo to your driving style,
so be sure to check out the previous two Revo performance guide
installments located above to catch up on everything that I do to my
own Revo race rigs. 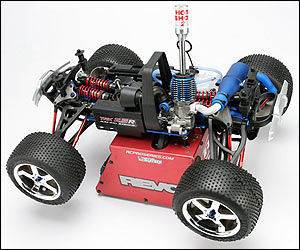
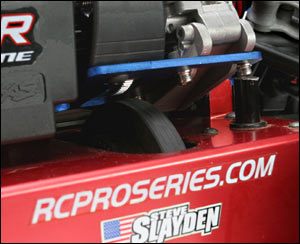
The starter box in this pic is the Revo
starter box from RD Racing Products.
Converting to bump start
|  | The
term “bump start” refers to starting the truck with a starter box. A
starter box is a box with a motorized rubber wheel powered by one large
12V battery or two smaller 7.2V battery packs. The rubber wheel engages
with the flywheel of the engine (while spinning) and turns the engine
over. While the engine is turning over, a separate battery powered glow
igniter is used to heat the glow plug. |
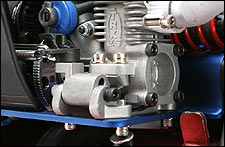 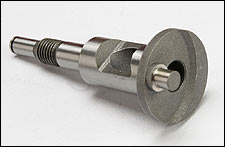
Parts needed for bump start: back plate #5274R,
non p/s crankshaft #5219R, large flywheel #4142X
This
starting system allows the removal of the EZ-Start onboard starting
system so that weight can be reduced from the chassis while also
reducing rotational weight from the crankshaft. This takes load off of
the engine, which will increase acceleration and allow the engine to
run more efficiently. | Install larger 1/8-scale Air filter | | The
stock air filter delivers exceptional performance keeping the air that
enters the engine clean. However, on dusty tracks, the entrance into
the air filter’s housing is a little small for long races. This area
can become clogged with dirt, so I use a large cylindrical air filter
like the ones found on 1/8-scale buggies. Check with your local hobby
shop for the different 1/8-scale buggy filters that are available. |  |
 | Use
shoe-goo to bond the air filter housing to the Revo air filter base.
There are also pre-filters available for this style of air filters
which collect the bigger dirt particles while the main filter catches
the fine stuff. Check with your local hobby shop for available air
filter systems that will work with the Revo filter base. |

Don’t forget to secure the base of the air filter to the carburetor with a zip-tie.
| Single or dual chamber pipe | | I
generally use the dual chamber (stock) pipe for most applications for
its smooth power band. The Traxxas single chamber pipe (#5490) is good
for a little extra power in the lower to mid rage of the power band.
This is useful on high–bite tracks or anywhere a little extra grunt is
needed. Plus, it comes in this beautiful hand-polished finish. |  |
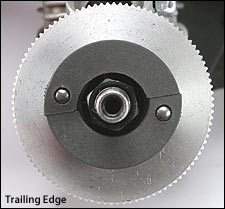 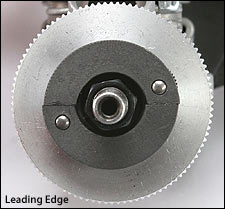
I
install my clutch shoes in the trailing edge (stock) configuration.
However, the clutch shoes can be installed in reverse for a snappier
bite and/or modified for a different engagement feel. The clutch shoes
can be shaved for a later engagement. This can be useful for getting
more punch out of your engine. Make sure that you take the same amount
of material off of both shoes, and be careful not to take off too much
material as this will soften the engagement too much and accelerate
shoe wear.  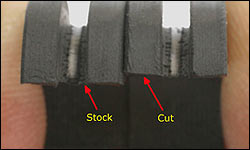
Use
a hobby knife to shave the material off of the clutch shoe. Only shave
a small amount at a time and make sure that each shoe is cut identical
to each other. This will level out the wear and provide better clutch
performance.
Traxxas clutch shoes (#4146X) are already cut
from the factory, but you can experiment by shaving off a little more
material for later engagements. The stock shoes (#4146) are uncut and
will engage a little sooner than the cut ones. These can be helpful on
a slick track with a lot of loose dirt on top of the surface. Be
careful not to remove too much material from the shoes, as this will
leave the shoes too “light”. They will not engage the clutch bell
firmly, defeating your purpose of getting more punch out of the truck.
Trim a little, and then try them out in the truck to see what works
better. 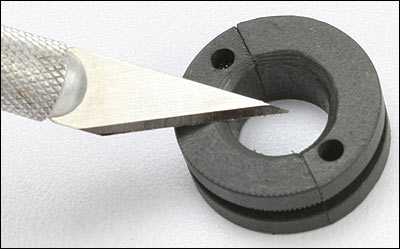
Here’s a tip: Trim off the corner of the inside diameter of the
assembled shoes. This will allow better clearance around the clutch
nut and will allow your clutch shoes to operate more freely.
There
are quite a few different gear combinations available for the Revo. The
chart below will give you a good idea of where to start for your local
track. Remember, these are only suggested gear ratios. The actual track
layout, jump specifications, surface conditions, etc., will ultimately
dictate what ratio is best for your track. | Gear Choice Guide | | Clutch Bell | Spur | Track Size (length end to end) | | 14t (#5214) | 40t (#3955) | 50ft to 75ft (small & tight tracks) | | 14t | 38t (#3954) | 75ft to 100ft | | 15t (#5215) | 40t | 100ft to 125ft | | 15t | 38t | 125ft to 175ft (typical track size) | | 16t (#5216) | 40t | 175ft to 200ft | | 16t | 38t | 200ft+ (large & open tracks) | | NOTE:
A 36t spur gear (#3953) is also available for the Revo but is better
used as a fine-tuning option. Use it to attain just a little more top
end when combined with any of the combos above. |
Your
gearing should properly match the size of the track for fast and
consistent lap times. You want to be able to efficiently use all of the
power available from the engine. Being over-geared will put more load
on the engine and clutch causing the engine to run hot with less power
out of the corners. The idea is to get the engine to clear out before
you get to the next corner. The engine produces its best power when it
is burning the cleanest mix of air and fuel (not too rich & not too
lean). This is normally found in the mid to upper RPM range. 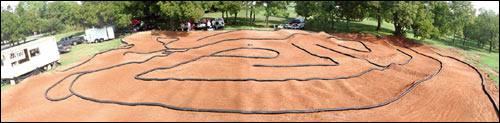
Big off-road tracks, such as Johnny Cool Guy Raceway in Euless, TX
(shown above) is a perfect example of a modern, nitro off-road track
that Monster trucks are raced on. Choosing the right gear ratio is very
important on a track this size.
On larger tracks it is ok to
gear a little higher because the truck's cornering speed is usually
greater. This keeps the engine in the best RPM ranges as described
above. If the truck is geared too low on larger tracks, the engine will
spend too much time in the upper RPM range. This will cause the engine
to run hot, increase the danger of fouling the plug, and will affect
top speed. 
The
placement of jumps on the track can also have an impact on your gear
choices. A lot of tracks will have a set of jumps coming out of low
speed corners so good bottom-end punch is important to clear the set.
What this means is that you may have to gear down to make certain jumps
effectively. Your truck may be a tad slower down the straight, but it
is now getting from apex to apex much more quickly. This set-up will be
more desirable when your truck spends the majority of its time in the
infield. Of course, this may change if you are on a more open course,
with either smaller jumps or easier jump sets. | 1st gear jump set | 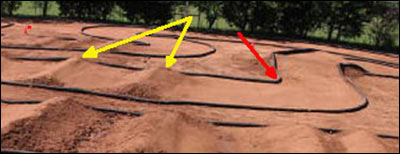
Here
are two good examples of doubles that will need to be negotiated in 1st
gear. There is simply not enough room to utilize 2nd gear efficiently.
Make sure that your truck is geared low enough in 1st gear to get out
of the hole (red arrow) with enough punch to clear the double set
(yellow arrows). 
| | | | 2nd gear jump set | 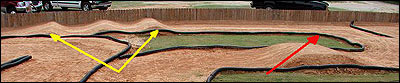
There
should be plenty of room before this jump to hit 2nd gear, which would
propel the truck over the third jump. Without 2nd gear this set would
otherwise be a double-single, meaning that you would have to jump the
first two jumps as a double then immediately take the last one by
itself. This will take a bit longer to get through, so tuning the
2-speed along with choosing the right gear ratio to clear the whole
triple set would be the way to go. |
It
is ideal to utilize a gear ratio that works best for the majority of
the track. If the track has a long straight but a tight infield, then
gearing up to be the fastest truck on the straight is not necessarily
going to be the best move. You will need to maintain a fast pace
through the infield as well. If you are coming up short on doubles, and
bogging slightly out of the corners, then you can bet that all of the
time lost in the infield will never be made up by the fraction of a
second that you stand to gain on the straight. 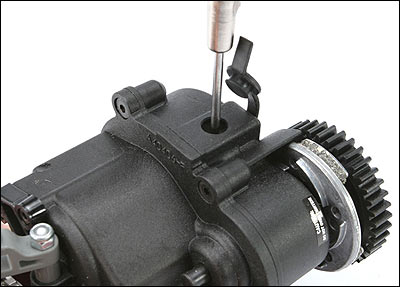
Two-speed
adjustments are necessary when changing the gear ratio between the
clutch bell and the spur gear. Changing the gears on the clutch bell to
a higher number of teeth and/or changing your spur gear to a smaller
number of teeth will give you a higher top speed. This will also take
away a little bit of low end punch. This will affect your shift point
by making your two-speed shaft turn at a higher RPM, thus causing the
two-speed to shift sooner. If you are going to a clutch bell gear that
has a lower number of teeth and/or a spur gear that has a larger number
of teeth, then the two-speed will react just the opposite. Turn the
adjustment screw clockwise for a later engagement or turn the
adjustment screw counter-clockwise for an earlier engagement, depending
on the need. Adjust the two-speed in small increments. Never turn the
adjustment screw more than 1/8 turn at a time before testing the shift
point. This is a fine adjustment and can get off base very quickly if
large adjustments are made. 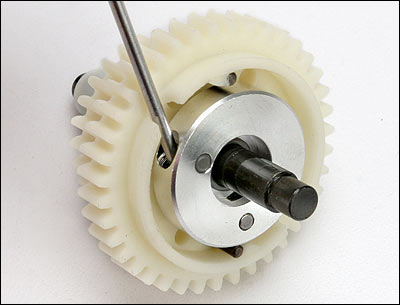
This pic shows what you are actually inserting the driver into.
The 2-speed hub is located within the 2nd gear of the 2-speed assembly.
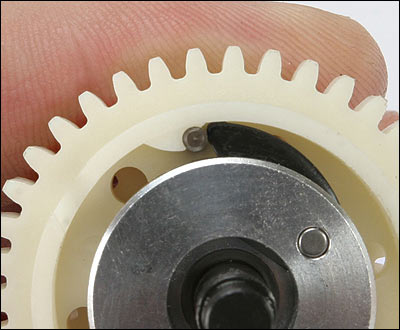
Notice the lever reaching out to lock into one of the 2-speed pins located
inside of the 2nd gear. The preload set by the 2-speed adjustment screw
determines the speed in which the 2-speed hub has to rotate to release
the lever. Lighter settings will allow the lever to engage sooner
and tighter setting will hold it back for later shift points.
The
shift point of the two-speed is not only important for optimum
performance on the track, but it is very important for long engine
life. If the transmission is shifting too soon, power will be lost and
the engine will over-heat quickly. If the shift point is too late, the
engine will be allowed to rev too high for too long. This condition can
cause many problems like accelerated wear between the piston and
sleeve, plug damage, poor fuel economy, and very hot engine
temperatures. The prime time for the transmission to shift is at the
point before the engine is just about to “wind-out” or “peak”. You
don't want it to actually reach its peak rpm, but you will want it to
get close. This will allow the engine to clear out (burn clean) and
continue to produce good power on through the next gear ratio. | Optional Close-ratio two-speed (#5383) |
Now
that you know how important the timing of the shift is, it is now time
to learn what is happening to the truck when it shifts and how it
affects handling. When the two-speed shifts there is a noticeable
“instant” boost in speed. This boost can upset your truck's handling
before and through the turn. This can cause a greater chance of you
over-shooting the corner, which adds seconds onto your lap times. For
instance, if you're racing on a medium-sized track that has a long
straight but the rest of the track consists of many turns and switch
backs, then there is a good chance that first gear will be able to
handle all of the infield duties on its own. There is really no need
for the transmission to shift until you're on the straightaway. In a
situation like this, allowing the transmission to shift in the infield
will more than likely hurt your lap times by increasing the chance of
the shift throwing your truck wide in a corner. If the engine is really
revving out in an area or two within the infield, then it is ok to
allow your transmission to shift; just use good judgment. You may also
benefit from gearing up a couple of teeth on the clutch bell to get the
rpm down through the infield portion of the track. This, of course,
will depend on the track size and layout. 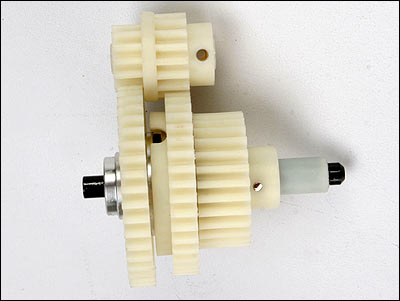
The second gear (lower middle gear) in the close ratio gear set is
molded with 40 teeth. This is one more tooth than the stock 39T 2nd
gear. This means that the engine will have an easier time pulling the
truck around the track in second gear. Note that the top gear cluster
must be changed to match the new 2-speed gear combo.
The close ratio gear set comes with this gear.
The
best solution for getting smooth shifts is to install a close-ratio
two-speed kit. This brings the second gear ratio closer to the first
gear ratio. This helps with several things. Shift points are less
critical in keeping the engine in the proper power-band. There is less
of a ratio change when shifting which makes for smoother shifts. This
is what attributes to better chassis balance when shifting through a
corner. A small amount of top end will be lost, but for most tracks,
there is still plenty of speed with the close-ratio gear set. Also, the
attitude of the truck is much easier to control when airing out on
high-speed jumps. | FWD Only gear shaft (part# 5394X) |
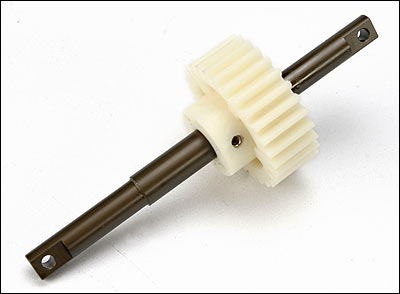
Removing
the reverse system is a big step towards reducing rotating mass inside
the transmission, along with reducing the weight of the extra servo
that is used to shift the system. A lightweight single-gear shaft
replaces the entire system and is located where the main output shaft
used to be. This set-up eliminates reverse (which is not used during
racing anyway) and provides quicker acceleration. 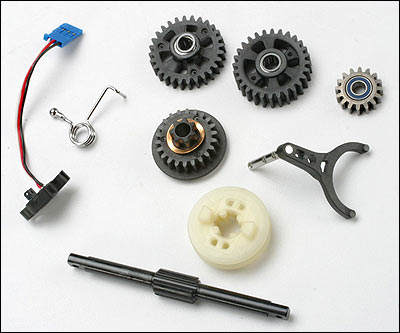
Look at what all is removed just from your transmission
alone when converting to the FWD-only set up.
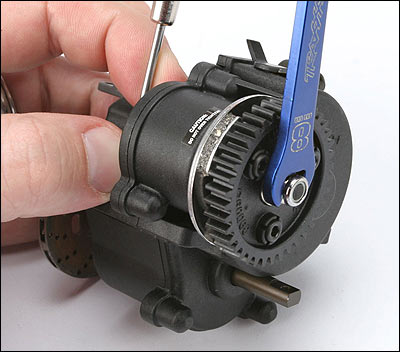
Slip a 2.0mm driver into the slipper shaft that exits the front of the
transmission to lock the shaft for adjustment. Next, use the 8.0mm
tuning wrench to adjustment the slipper nut. Be careful to
only use small adjustment changes at a time. The slipper
clutch is very sensitive to adjustments.
High Bite TracksOn
high bite tracks that offer a lot of grip, a properly adjusted slipper
can help prevent the front end from lifting up when accelerating out of
a corner. This will keep the front end down, preventing a push or under
steer. Low Bite TracksOn slick tracks or
surfaces that do not offer much traction, the slipper can be loosened
enough to limit wheel spin to keep the truck stable under acceleration.
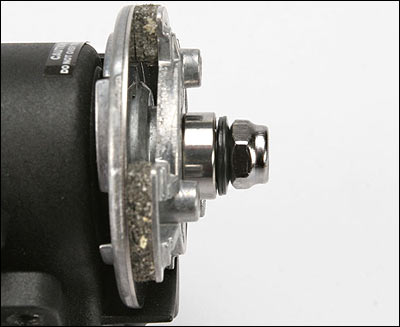
Note the orientation of the bevel washers located between the slipper
nut and the bearing within the spur gear. The outer edges of the
washer should touch each other in the middle for proper operation.
A
good starting point for the slipper setting on the Revo is threading
the nut to where there is only about 1/16-inch of the slipper shaft
sticking out from the nut. Experiment with different settings for your
track conditions to obtain optimum traction with as little wheel spin
as possible. Caution: Be careful not to run the slipper extremely
loose or tight. If the slipper is set too loose, this can cause
excessive heat build-up and could result in a melted spur gear. If the
slipper is set too tight, not enough slip will be allowed to protect
the spur gear from violently engaging with the clutch bell. This can
chip the teeth of the spur gear and will eventually strip all of the
spur gear’s teeth. The
differentials of the Revo are filled with a thick lube to slow down the
diff action. This will help prevent the diff from unloading when
powering out of the corners. Any of the hobby-class differential lubes
out on the market should be fine; the thicker the lube, the slower the
diff action. Slowing the diff down will make the truck's traction more
positive on throttle. This will typically reduce steering entering a
corner but will actually increase the steering coming out of the
corner. Heavier fluids are also beneficial for higher bite surfaces.
Loose and bumpy tracks will want thinner oils in the differentials.  | I’ll
generally start with 10K in the front and rear. Experiment with
different thicknesses to see what works best for your driving
style/conditions. Thicker fluids can be used to mimic thinner fluids by
not using as much of it in the diff case. If you only have 30K diff
fluid in your pit box and you need the feel of 20K, then you can just
fill your diff cases 40-50% full of 30K fluid to get the same diff
action that 20K would give you. |
| Picking the right fluid for the track conditions |
Thicker fluids – high-bite, smooth, high-output engine Thinner fluids – low-bite, bumpy, lower output engine Traxxas offers diff lube in three different thicknesses:
10K (#5135), 30K (5136), and 50K (5137).
They also offer them in a 3-pack (5136X). 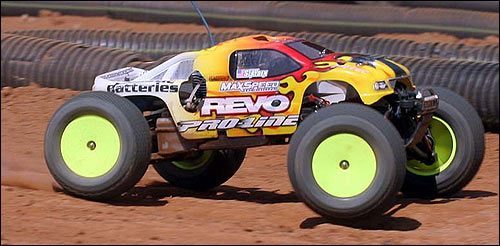
Photo Courtesy of Cliff Hudson
| 


