|
All
right; you've picked up a new set of tires and a new set of
rims to go with them. Now you need to put the two together.
This is an important jobdon't worry, though; in four simple
steps, your tires will be glued tightly for stay-stuck
performance.
|
 Step 1.
Prep the rims and tires
Before you slide
those new tires onto the rims, take a few moments to
make sure that the glue will stick to the tires and
rims properly. With a piece of Scotch-Brite pad, scuff
up the rim where the bead of the tire will go. If the
rim is chrome plated, you will have to completely
remove the chrome plating from the rim where the bead
meets it, and this task will take extra time and
effort. To remove any remaining dust caused by the
Scotch-Brite's scuffing, wipe the bead area of the rim
with a rag and some motor spray, denatured alcohol, or
a degreaser. Removing the inserts from the tires will
make it easier to clean them. Spray cleaner on another
rag, and wipe down the inside bead of the tire. The
tires are coated with a mold-release agent to free
them from the mold after the manufacturing process has
been completed, but if the agent isn't removed, it
will prevent CA from sticking properly to the tire.
|
 |

CA glue.
Scotch-Brite pad.
Motor spray/denatured alcohol/degreaser.
Lint-free towels.
Tire balancer with weights.
Safety goggles.
|
Step
2.
Place the tire on the rim
When the rims and
tires have dried, replace the inserts in the
tires. If the inserts are the open-cell type,
be careful not to bunch them up inside the
tires. After the inserts have been installed,
pull the tires onto the rims. Work each tire
back and forth on the rim until the bead sits
on the rim properly. A high spot on the bead
will cause a high spot on the outside of the
tire, and that will cause unwanted vibration.

|
|
|
Step
3. Apply glue
 You can use one of two
methods to glue your tires. The first is to use a tire
fixture such as those sold by RPM and Tamiya. They
both sell fixtures for sedan tires, and RPM also sells
a larger one designed for off-road use. They work
similarlyby pulling one of the beads of the tire
away from the rim. Apply a light coating of glue
around the bead, and release the pressure on the
fixture to allow the tire to mate with the rim. A bit
of glue oozing out from between the tire and rim is
ok, but too much glue is not a good thing, as it can
seep onto the inserts and ruin them. Use a napkin to
wipe any excess glue off the face of the tire. When
one side of the tire has dried, flip it over and glue
the other bead.
You can use one of two
methods to glue your tires. The first is to use a tire
fixture such as those sold by RPM and Tamiya. They
both sell fixtures for sedan tires, and RPM also sells
a larger one designed for off-road use. They work
similarlyby pulling one of the beads of the tire
away from the rim. Apply a light coating of glue
around the bead, and release the pressure on the
fixture to allow the tire to mate with the rim. A bit
of glue oozing out from between the tire and rim is
ok, but too much glue is not a good thing, as it can
seep onto the inserts and ruin them. Use a napkin to
wipe any excess glue off the face of the tire. When
one side of the tire has dried, flip it over and glue
the other bead.
 You
can also glue your tires by hand. Hold a tire in one
hand, use your thumb to pull the bead away from the
rim, and apply a drop or two of glue. Rotate the tire
and apply glue every 1/4 inch or so using the same
technique as before. When the bead is coated with
glue, use a few rubber bands to secure the tire to the
rim until the glue has dried. You
can also glue your tires by hand. Hold a tire in one
hand, use your thumb to pull the bead away from the
rim, and apply a drop or two of glue. Rotate the tire
and apply glue every 1/4 inch or so using the same
technique as before. When the bead is coated with
glue, use a few rubber bands to secure the tire to the
rim until the glue has dried.
|
Step 4. Balance
the tires
 |
 An unbalanced tire can have the same effect
on your car's handling as a bent axle. In fact, an unbalanced tire can
bend an axle if the vibrations are bad enough. Trinity's Matt Francis
Tire Balancer tool is easy to use and will help prevent unnecessary
vibrations. Put the wheel on the balancer and give it a slow spin. If
the tire is balanced, it should slowly come to a stop at various points
every time you spin it. If the tire seesaws at the same place every time
you spin it, it needs balancing. Apply a small piece of lead tire tape
straight across from the low point, and spin the wheel again. Keep
applying small pieces of lead tape until the tire is balanced.
An unbalanced tire can have the same effect
on your car's handling as a bent axle. In fact, an unbalanced tire can
bend an axle if the vibrations are bad enough. Trinity's Matt Francis
Tire Balancer tool is easy to use and will help prevent unnecessary
vibrations. Put the wheel on the balancer and give it a slow spin. If
the tire is balanced, it should slowly come to a stop at various points
every time you spin it. If the tire seesaws at the same place every time
you spin it, it needs balancing. Apply a small piece of lead tire tape
straight across from the low point, and spin the wheel again. Keep
applying small pieces of lead tape until the tire is balanced.
|
|
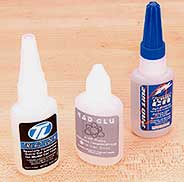 Selecting the right CA
Many thicknesses and brands of CA are
available, but for gluing tires, use one with a fast-acting formula.
Though a quick-drying glue won't give you much time to reposition the
tire on the rim before the glue cures, a slow-curing glue will allow the
tire to squirm on the rim until the glue has dried. With the simple
steps described here, you shouldn't need a ton of time to reposition the
tire on the rim once you've applied the glue. Team Losi, Pro-Line,
Trinity, Acer Racing and others offer high-quality tire glues. Always
use RC brands; stay away from "crazy" glues. Some good advice
when using CA is to use a small extension on the end of the bottle (Losi's
glue includes one). This will allow you to control the flow more evenly
and accurately because when it comes to CA, too much is not a good
thing.
|
A fresh set of tires can have a huge impact on your
racing machine's overall performance. If you take your time when you glue your
new meats, you will be rewarded with long life and consistent performance. As an
added benefit, you won't need to reglue your tires as often because they'll
adhere better to the rim to begin with. Keep in mind that proper preparation
prevents poor performance.
|