|
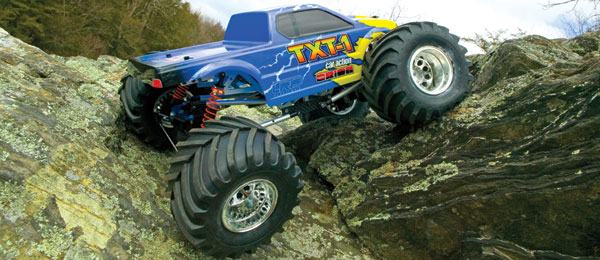
Rock crawling
is becoming increasingly popular, and many crawling enthusiasts
build custom creations by using parts from several vehicles or by
making new parts. If ya dont think ya have the skills to build
a custom rig, dont be discouraged. You can start rock crawling
easily, and you dont have to spend a lot of cash to do it. The
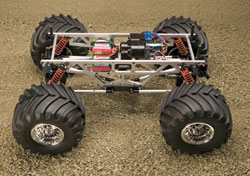
budget-build rock crawler featured here is based on a Tamiya
TXT-1. Out of the box, the truck is a pretty good rock crawler,
but you can cheaply make many easy mods that will allow it to
crawl with the best of them. Youll need a few parts, the basic
tools and time. Lets rip!
|

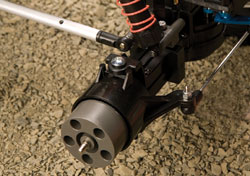
Rock-crawling-specific lathe motors
or truck-specific ones such as this one from LRP
are perfect for the job because they produce tons
of torque. The motor is attached to a Tamiya
gear-reduction unit. Its from their Monster
Drop truck.
|
Low-turn
motor
For rock
crawling, torque is king, and one way to get that torque
is by using a high-turn motor like the LRP Truck Puller II
I used in my truck. The more turns it has, the stronger
its magnetic field will be, and the truck will have more
power. If you dont want to spend any money, the motor
that comes with the TXT-1 will work for you. But if you
have a few bucks, you can pick up a lathe motor thats
designed for rock crawling. These suckers have winds in
the 55-turn rangeway more than any stock motor, and
they arent too expensive.
|
|
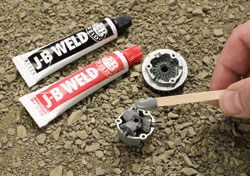
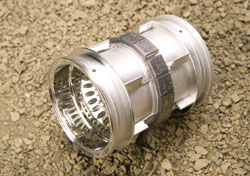
You dont need a lot of J-B Weld
epoxy herejust enough to coat the gears.
|
Gear
reduction
Another way
to turn this truck into a torque monster is to reduce the
gear ratio as much as you can. You can install a smaller
pinion gear, but that takes you only so far. Your best bet
is to install a gear-reduction unit. This basically adds
to the number of gears in the transmission and reduces the
gear ratio. You can fine-tune it by changing the size of
the pinion gear that drives it and the pinion gear inside
the transmission, depending on which gear reduction you
use. Tamiya produced a dump truck based on the Juggernaut
2, which uses the same transmission as the TXT-1, and it
came with its own gear-reduction unit. You can use this
gear reduction if you cant find another unit like the
two offered by RC4WD. To make that happen, youll need
these Tamiya parts: nos. 0225092, 9335344, 9415714.
|
|
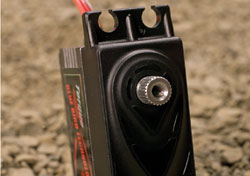
My Blue Bird servos 150 oz.-in.
of torque is plenty for rock crawling. Dont use
a servo-saver here. You need total control of the
tires at all times.
|
Get a
high-torque servo
Torque is
important for steering, too. Buy a strong, high-torque
servo for the job. Dont install a servo-saver; it will
make the steering spongy, and you need it to be as tight
as possible here. You dont have to worry about
stripping a servo because the truck moves so slowly that
most hits that the servo takes wont damage it.
|
|
Lock
the diff
Traction is
very important for getting over rocks, and your trucks
stock diff isnt up to the job. The stock diff will
allow the tires with the least traction to spin, and if
this happens, your truck wont go very far. The front
and rear tires should pull the truck equally at all times,
so you have to lock the front and rear diffs. This is a
simple mod. Remove the diffs from the axles, and clean all
the grease off the gears. Put the gears back in the diff
and coat them with an epoxy to set them in place and lock
the diff. I use J-B Weld because it holds up well to
abuse. Assemble the diff and turn it to coat all the gears
with the epoxy before you set the diff aside to let the
epoxy cure overnight. You dont need much epoxyjust
enough to coat the gears.
|
|
Get rid of the lower front bumpers
and skidplates. Theyll get hung up on the
rocks. Cut bumper at dotted line and remove
forward section.
|
Ditch
the lower bumpers & skidplates
The lower
front bumper and skidplate do a good job of protecting the
axles but will get hung up on the rocks and limit the
TXT-1s maneuverability, so well have to remove thembut
not entirely. Youll need the upper mounts for your
shocks and suspension links. Remove the front and rear
bumpers and skidplates from the axle. Ditch the skidplates,
and cut the front bumpers off at the points where they
just meet the axles. You basically want to save the upper
and lower mounts used for the shocks and lower links.
|
|
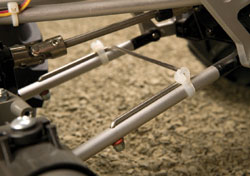
Mounting the shocks upside-down
lowers the truck and its CG. Mount them directly
from the axle to the chassis, and use lighter
springs for better articulation.
|
Shock
mods
Remove the
shocks, the shock mounts, the cantilevers and cantilever
links, and set them aside. The shocks are what youre
after here. Now ditch the shock-shaft spacers and the
springs. Removing the spacers will give the shocks more
travel, and youll need that for better axle
articulation. The stock springs are way too stiff, so
replace them; softer springs are ideal here. I used a set
of Losi orange springs on my truck. Losi offers springs in
several rates, and they will allow you to fine-tune your
suspension. Now mount your shocks directly on the axle to
eliminate the cantilevers. Thread the pivot ball from the
shock side of the cantilever into your chassis, as shown
in the photos. Youll mount the shock-shaft side of the
shock here and screw the other end to the upper mount on
the front bumper. You want to mount the shock body as low
as it can go to lower the trucks center of gravity
(CG). Youll have to cut the chassis to make room for
the shock.
|
|
Swaybars help the TXT to corner but
are worthless on a rock crawler. You can ditch
them.
|
Remove
the swaybars
The
swaybars on the lower links allow you to increase or
decrease the TXT-1s axle articulation. For rock
crawling, you want maximum axle articulation, so remove
the front and rear bars from the links and toss them.
|
|
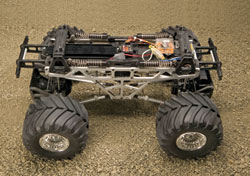
A lot of unnecessary material can
be removed from the chassis to lighten it. The
front and rear bumpers, battery tray and some
cross-members can go.
|
Lose
the weight
To trim
fat, I removed the front and rear bumpers. I also removed
the lower front and rear cross-members for axle clearance.
The middle third of the chassis also has two cross-members
that hold the chassis plates together. You can remove both
of them because the transmission does the same job, and
removing the cross-members will give the upper links more
room to move when the suspension is compressed. Remove the
stock battery holder. It weighs a lot, and you wont
need it because youll mount the battery pack much lower
on the chassis.
|
|
Stick lead weight to the front rims
to help lower the CG and increase front traction.
Reverse the direction of the tires treads for
even more traction.
|
Reverse
tires & weighted wheels
Keeping the
CG as low as it can go is the key to having a crawler that
handles well. An easy way to do this is to stick lead
weights around the front rims. Cut off the plastic support
pieces from the center along the rims outside diameter.
Clean the rim with motor spray to remove any mold-release
agent or oil from your fingers. Now wrap the stick-on lead
weight around the center of the rim. Some think that for
better traction, you should reverse the direction of the
tire treads when you put them back on the rims. Remember
to glue the tires to the front and rear rims.
|
|

Custom-build a side-by-side pack
that you can mount wherever you want. I mounted my
Orion pack on the inside of the chassis.
|
Side-by-side
battery pack
A truck
like this doesnt have enough room for a typical stick
pack. Build a side-by-side pack to fit a lower mounting
position. People usually mount them on the axles, the
upper links, or the chassis. I went with the chassis. I
used two of the cross-members that I had removed, drilled
the chassis in a new place and mounted the pack on them.
Secure the pack with Velcro or wire ties.
|
|
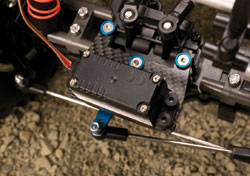
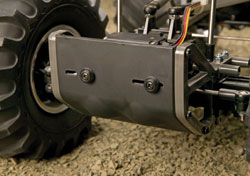
Since you cut the only servo mounts
off the axle, youll have to make new mounts. A
piece of carbon fiber or aluminum plate will do
the trick.
|
Steering-servo
mount
You removed
the lower front bumpers and skidplates, so theres
nowhere to mount the steering servo. You can easily make a
mount out of carbon-fiber plate or sheet aluminum. Follow
the template provided to cut your mount out. Cut out the
template, glue it to your material, and follow it to drill
your holes and cut the plate to the correct size. Attach
the servo to its mount using screws and nuts, and youll
be able to attach the assembly to the top of the axle
using screws to hold the top cover down. Do the same at
the rear. If you only plan to use 2-wheel steering, use
the servo plate as a place to attach the rear links to
lock the rear wheels. Removing the washers from between
the hubs and axles will strengthen the rear lock because
the tabs will pinch the hubs when you tighten the screws,
and they wont be able to move.
|
|
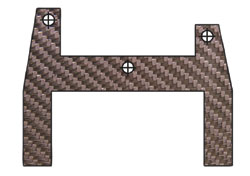
The full-size servo-mount template.
You can copy it and use it as a template to make
your mount. When youve finished cutting the
mount out, position your servo on it, mark the
mounting-hole locations, and drill the holes.
|
There
you have it!
Now youre
armed with everything you need to know to turn your TXT-1
into a rock crawler without spending a lot of money. I
took my TXT-1 to a local rock-crawling comp, and it
actually did pretty well against some high-tech and
high-dollar machines. This is just the beginning. You can
make many other mods to take it to another level, but thats
another article. As you run your truck, youll probably
make further tweaks, and before you know it, youll have
a new truck. Enjoy!
|
Sources
Blue Bird
distributed by BP Hobbies and Nitro House; bphobbies.com;
nitrohouse.com
LRP distributed by Team Associated; RC10.com
Tamiya America Inc. tamiyausa.com
Team Orion Inc. teamorion.com
|

BEFORE
|
|
AFTER
|
|
This modification is easy to
make. Take your time and pay attention to where you drill and cut
because you only have one shot at getting it right. Take a look at
the after photo and youll see that the lower links are level
and the center of the chassis has been cut.
Increase ground
clearance
Until now, the mods I
describe have been easy. This next mod gives your TXT-1 truck more
ground clearance, and its more difficult because you have to
cut the chassis, but it greatly improves ground clearance. Remove
the transmission mounting screws so you can move the transmissions
upper mount to the hole above the stock location. Before you do
that, drill a new hole for the lower mount. Measure the distance
between the centers of the stock top mounting hole and the new top
mounting hole. Use that measurement to find how far the center of
the new lower mounting hole is from the center of the old hole,
and drill an 1¼8-inch hole there. Modify each chassis plate in
this way. Now draw a straight line on the chassis from front to
back and about 1¼4 inch below the new lower hole. Use the line
you drew as a guide to cut off the lower part of the chassis.
These modifications are easier to make with the chassis plates
removed from the truck. Having made these mods, put the chassis
plates back together. Mount the lower links in the upper to the
top mount on the axle as shown in the photos. Cut a strip of
carbon fiber or aluminum plate, and attach it to the bottom of the
chassis to give you somewhere to mount the lower links. Swing the
free side of the link up to the chassis while keeping the axle
level. Mark the chassis where the link contacts it, and drill an
1¼8-inch hole. Do this for all four links. If you want, you can
finish the bottom of the chassis with an aluminum skidplate.
|