|
- Team Losi Racing Double X4WE - Dan "Dyno" Hissam - Tech Tips -
Dan worked for Team Losi Racing and designed the 22. Dan left TLR to move to the motorcycle industry and more precisely MX & SX.
For the record, Dustin ran an out of the box XX4 WE addition. I built him a new old stock car on Wednesday night for practice on Thursday. The car was built EXACTLY to the WE edition kit set-up. There were no special braces or unotainable parts. If you find the kit set-up from the WE edition, that is the exact set-up Dustin ran. The only mods to the car were grinding the chassis on the inner tunnel to accept the lipo packs, and a .050" rear sway bar. The only difference in set-up to the kit set-up was 27.5wt in the rear, and ride height was 16mm front and 24mm rear.
------------------------------------------------
I am currently driving the XX4 WE platform. In light of this, would you mind letting me (us) know which is the best way to set-up the front/rear diffs properly, please?
I hope I am answering your question on the diff set-up by my reply, but here goes:
1) I use the old XXX steel outdrives with the "D" shaped drive ring engagement. Hence the Dive plates will have the female "D" hole in the center.
2) all else is current stock, balls, thrust etc. I use black grease on the thrust and Dow111 silicone grease for the diff balls. (good grease btw and very affordable)
3) Diff break-in is very very critical. The idea is to have the drive rings develop a small groove during run-in which increases surface area to the balls. Never fully tighten the diff prior to break in. If the diff is over tightened, the balls can leave indentations in the drive rings and it will be impossible to obtain a smooth diff. Leave the diff relatively loose during break-in and break the diff in by turning up the trim on your transmitter so the wheels turn slowly. Set the car on one side for five minutes allowing the opposite wheels to turn;repeat for the other side. Then turn the diff in 1/8th turn increments and repeat the process until you sneak up on the optimal diff tightness.
4) The optimal diff setting is more of a feel thing. I usually flick the tires in opposite directions and take note of how far the diff will spin. If I flick the rear tires, the diff will turn about 1 full revolution from its starting point. I run the front the at the same tension. Put a silver sharpie mark on you tire and put it at 12 'oclock. Flick the tires in opposite directions, and the diff will turn one revolution from the original starting point. It sounds crude, but works well
5) slipper: I run the different slipper pads, grey in the outermost (rear drive) and the orangish yellow in the inner front drive position. I hold the rear wheels between my legs to stop them from turning (insert inappropriate comment here) and turn the front wheels. I tighten the slipper to where for front belt will just barely "pop" or skip, then I loosen it 1/4 turn. This is my final slipper setting as I do not run a loose slipper that perpetually slips around the track. I do like a tighter slipper for sure
6) I run the rear belt tesion in the "B-back" position. This is the "B" bearing block with the arrows pointing backwards.
I hope this helps! PS I always run the universals in the the front and rear. CVDs are blasphemous and create too much mechanical bind and prohibit the car's suspension from working to its fullest. The car simply flows around the track with the old school uni's.
------------------------------------------------
We have been running the XX4 purely as a development exercise. In my opinion, the XX4 still to this day is very competitive and one of the best handling, easiest cars to drive. We decided to race it at the Spektrum race to see how it compares to today's 4wd cars. There are so many things that the XX4 does so well and even better than today's current 4wd cars. I have enjoyed running mine for the last few months and it has earned my respect
------------------------------------------------
Was the "clicker" locked or WE setup
The clicker was run extremely loose on our cars. We use the softest clicker spring (standard in the WE kit) and reverse the 4-40 mini lock nut on the clicker spring preload adjuster so the nylon portion of the nut threads on first. This allows the lightest preload setting on the slipper. We were running the softest "blue" belt. The freer to front clicker assembly, the better.
Well guys after about 10 years i ran my xx4 tonight. DAMN. with little setup time but complete go through on the car. It ran damn good. I was grinning ear to ear. And then. click clicl click. my xx4 has the non slipper setup. So it runs a differant spur gear with a pin on the one side and three holes on the other. Where the heck can if find this spur gear???? I have looked everywhere. Or where can i find the entire slipper setup? I have the shaft and the front plate but nothing else. The car was amazing until it broke the one pulley that connects to the spur gear with three prongs.
You need to find the complete slipper assemmbly that uses the current Losi spur gears. All parts should still be available on Horizon's web site except for the steel rear slipper plate. I see them all of the time on ebay. Check out the exploded view of the WE kit on losi's website and examine the slipper assembly. I wish I had part numbers handy.
------------------------------------------------
The clicker will absolutely click under braking and corner entrance. This is normal and gives the car its fluid corner speed. If your clicker was locked and you were hearing the belts pop, I would be cautious. I have listened very closely to my car (the only car on the track) and was intrigued by when and where the clicker was working. I heard it clicking at the end of the straight which lead to a long sweeping corner. It continued to click at a ver slow rate around the whole sweeper. Interesting for sure
------------------------------------------------
The WE kit came with 25 wt. I run 25wt w #57 pistons in front, 27.5 wt w #54 in rear.
------------------------------------------------
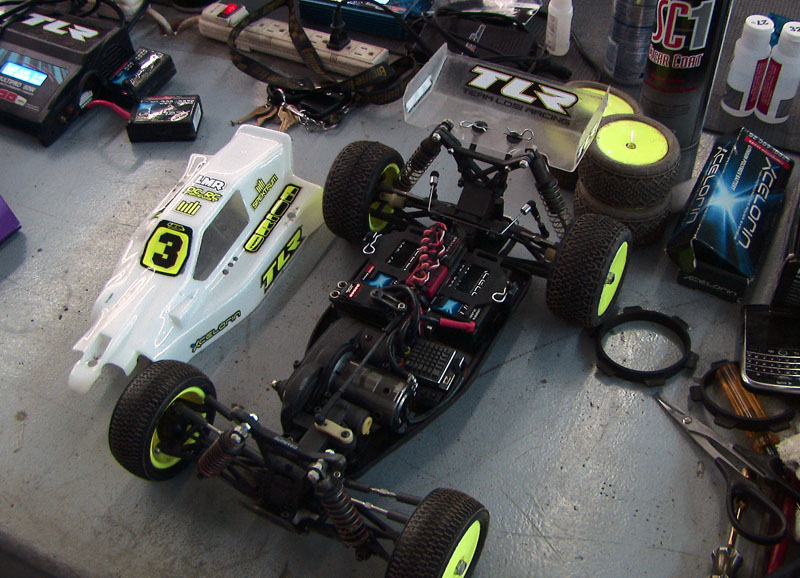
Dustin Evans setup @ Spektrum Race 2011: Dustin ran the WE kit set-up with 27.5 in the rear, a .050" rear swaybar (using outside swaybar hole in the newer VLA arms and 3 degree anti squat (added .020" washer under forward portion of rear pivot). all else in exactly WE kit set-up. Tires wer Losi pink tapers in front, Pink BK Bars in rear. foam was AKA red closed cell.
------------------------------------------------
If the clicker is locked (don't know if yours is) it places alot more load on the front belt under braking. One thing to keep in mind on the belts is that the urethane belts (standard kit belts) have a limited shelf life and deteriorate/dry rot after about 2 years. I feel this is why some people struggle with the belts breaking even after replacing with a new belt (which could be 5-6 years old) depending on where it is purchased. I know supply is short, but fresh belts last so much longer. I go on some of the Euro websites and forums to see what belts they run as it seems they have continued to run the car long after it was discontinued. The rear belt tension I run is the B block with the arrows pointing backwards. This is a medium tight setting. Also, the chassis over time will slightly bow up in the back and lessen tension and lead to rear belt skipping. I run my rear belt very very tight, its actually more efficient that way.
------------------------------------------------
The blue belt is a softer durometer (stiffness) than the green. The green belts are a tad more durable at the urethane is stiffer than the blue and resists racheting and skipping. The blue belt (softer/freer) was used to free up the front drivetrain if a looser clicker setting was used. I prefer the loosest clicker setting possible and the front wheels pretty much spin like a one-way bearing. For those of you running a stiffer clicker setting, you can use the green belt in the front as the freeness of the blue belt is not needed.
------------------------------------------------
Steering arm postion:
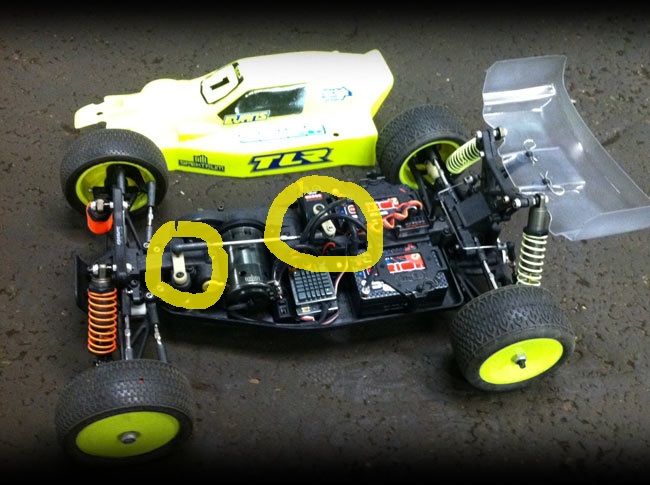
When yoou use the innermost holes on the bellcranks (WE kit set-up), you must reposition the steering arm thatbolts onto the bell crank by one tooth of the spline. With the wheels straight, position the bell crank exactly perpendicular to the centerline of the car. I usually apply a small amount of CA glue to the spines of the bell crank to prevent stripping in a hard impact. This is the correct position of the horn on the steering bellcrank if you are using the inner holes for the drag link (WE kit ackerman set-up). Then adjust the long tie rod so that the steering horn is also perpendicular to centerline and parallel to the forward horn. Dustin's steering horns were not set-up correctly for the photos.
------------------------------------------------
We ran the standard kit set-up from the WE kit set-up sheet. I will try and find a .pdf of the sheet. I am sure you can find it online as it is in the manual. The only difference is 27.5wt in the rear instead of the standard 25wt in the kit set-up. Universals up front
------------------------------------------------
West Coast R/C Raceway in La Mirada, CA - Jan 2012
------------------------------------------------
In regards to the front diff pulley flange, I have been running the flange on the right side (passenger side if you drive in the US). It really doesn't make a huge difference, but the belt "walked" the the right a bit on the latest chassis I have been running so I decided to put the flange on the same right side to keep the belt centered. The manual does show it both ways, but I recommend running the flange and adjustment screw on the right side.
------------------------------------------------
I know you have mentioned you are running the box WE setup, but I would like to confirm the shock setup.
Front: 57 piston, 25 wt, orange spring, internal spring limiter, no other limiters inside/out.
Rear: 54 piston, 27.5 wt, yellow spring. The limiters I would like for you to confirm. The kit setting is 'A' internal spacer, and 2 'B' outside spacers. What is the size of these spacers and are you running internal/external as it suggests?
You are correct on the shock piston, oil and front internal spring limiters. I run the same internal limiting and external limiting as the WE manual. Internal = qty 1 of A spacer (.120") and external qty 2 of the "B" spacer (.140" each x 2 = .280"). I hope this helps.
My rear pivot blocks have 2* stamped on them. I purchased my WE used, so I am tearing it down, but want to get back to the stock WE setup with the right parts.
Assuming the 2* represents the anti squat built into the pivot block. If so, how does one differentiate b/w the 3* and 0* pivot blocks? I do have the WE block, as it manually grinded down. The detailed description for LOSA2213 on the exploded parts list for the WE indicates "Rear Pivot Block Set 3-deg, & 0-deg toe in, (XX-4 WE)"
LOSA2213 comes with 2 sets of pivots. A 3 degree inboard toe, 2 degree anti-squat and a 3 degree inboard toe with 0 degrees of anti squat. you want the first one (3 degree toe, 2 degree anti squat hence the "2" molded into the pivot blocks. The 2 stands for anti squat. The original XX4 came with 0 degrees inboard toe and 2 degrees anti squat. The toe (3 degree per side) was in the hub angle. Generally toe inboard is more effective and helps the car flow more. Conversely, the outboard toe tends to square up a tad better. Hope i didn't confuse with the history banter.
------------------------------------------------
I set my slipper in the following manner:
1) make sure you are running the two different slipper pads (tan color for front drive and gray for rear drive)
2) Start with the slipper in a generally loose position and hold the rear tires between your knees and twist the front tires. you will feel the slipper slip. If you feel the front belt "pop" and skip, immediately loosen the slipper one turn and start over.
3) increase slipper tension by turning the the slipper nut in 1/8th turns and repeat holding the car as above and twist the front tires. you want to iterate this process until you get the front belt to just barely skip.
4) once you have found the tension where the front belt will pop, loosen the slipper nut 1/16th to 1/8th. This is the useable range I have found to be very good. I run my slipper on the tighter side so be aware that if you like a looser slipper, you settings will be about 1/16th more looser on the nut.
Running too loose of a slipp will generate a trmendous amount of heat and can damage (melt) the rear drive pulley on the slipper assembly. This pulley is the one located directly next to the steel flat slipper plate. Finding the correct window and balance of the slipper is the key.
------------------------------------------------
The check screws (to hold the jack shaft and the slipper shaft are meant to check diff tightness since you have to hole either end solid while spinning the diffs to check tightness. I rarely use them only to troubleshoot if ther is a belt problem and I want to see which end is the culprit.
Source:
Beau S

|

