|
- Method to Measuring and Setting Droop - By David Jun -
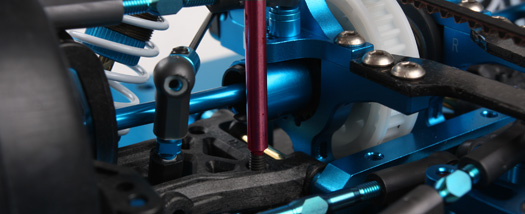
Droop is one of those settings that somehow end up being difficult to transfer from person to person because everyone seems to measure it differently. There is one method I have found to be the most consistent. This method uses the top of the wheel axle as the reference point. To set droop with this method, remove all four wheels and rest the chassis flat on your tweak board. Then, using a vernier caliper with a depth gauge, measure from the top of your wheel axle to the tweak board.

This tends to eliminate error that would otherwise occur when changing anti-squat or anti-dive or even raising or lowering your suspension blocks. Regardless of what you adjust on your suspension, your droop reading will remain consistent this way. It's not 100% perfect because it can be affected if you make wild camber changes but for the most part it's the least problematic.
How to Get a Consistent Droop Measurement
Most people tend to relate the droop measurement by the actual distance from ride height that the suspension is allowed to extend and there is nothing wrong with that because it does make sense to think of it this way. Measuring from the top of the axle reflects a totally different number and it does take a little getting used to. However, to get the number you're looking for, measure the diameter of the tire you plan to use.
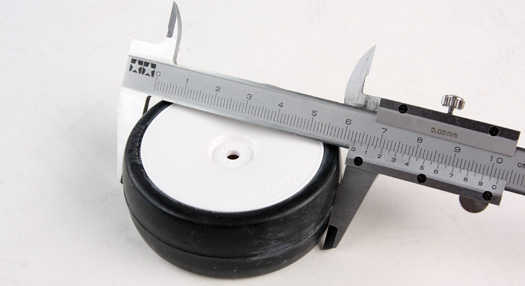
Let's say its 63.2mm (Tamiya type A) now divide that in half and you get 31.6mm. Now add 2mm to that (2mm is half the thickness of the wheel axle) and you get 33.6mm. Then take your droop measurement from the top of the axle and subtract it from the 33.6mm. Let's say you're running 24.5mm from the top of the axle, your subtracted number is 9.1mm. Finally, subtract your ride height. If you're running 5mm of ride height, you actual droop is 4.1mm. This is good to know if you're switching from a Tamiya tire to a Muchmore tire that has a different diameter, you can precisely account for the change accordingly.
So:
- Remove wheels and tyres
- Place flat on setup board, and measure to top of axles.
- Then using; [((Td/2) + 2) - Ha] - Rh = Droop (in mm)
Where Td = Tire diameter, Ha = height to top of axle, Rh = Ride Height
How Do I Prepare My Car to Measure Droop?
I only detach the sway bar during the initial setting of droop and if I haven't set up the sway bars yet because it can affect droop. If you're setting up a new car, you want to have the sway bars and shocks disconnected and set your droop first. This insures that your left and right arms are set exactly the same height which is critical in order to properly set up you sway bars. Your actual operating droop setting doesn't even matter at this point as long as the distance from the top of the axle to the tweak board is the same left and right. Once this is set, you can set up you sway bars.
Once your sway bars are set, you shouldn't have to disconnect them every time you check or set your droop. It is a good idea to check your sway bars periodically though.
How Do I Setup My Swaybars?
Sway bars are a nice way to control weight transfer. If you decide to use them, begin by disconnecting them and remove your shocks. Then set your droop or just make the axle heights equal. Your suspension is now equal and you can connect the sway bars. To set them, slowly compress either arm as you watch the other to see the amount of free play before the opposite arm rises.
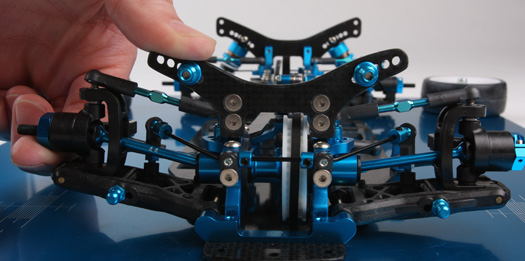
More than likely, one side will have more free play than the other so you want to adjust the length of the linkage rods accordingly until the amount of free play is equal. You can also adjust the free play on the sway bar mounts as well by rotating the sway bar clips enough to reduce slop. Just don't go overboard.
Also, other things to check:
- Shock lengths - make sure the left and right shocks are the same length
- Shock tower ball ends - make sure they are the same distance to the tweak board
- Springs - make sure they are the same length left to right. Sometimes they're not
|
