So, the new season of TCS racing is fast
approaching and your looking to build a new car for the series. You've
decided to race the Mini class because it has always been a fun and
competitive class; the epitome of close racing, tight lines and car
setup. You've always had a soft spot for small British cars, and BMW's
nostalgic rendition of the Mini Cooper has stirred those old feelings.
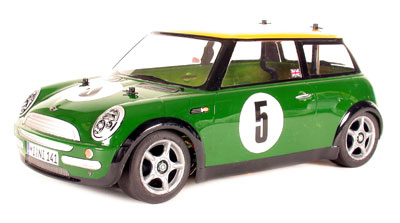
Well Tamiya, once again, is on your side. This summer they released the
1/10th scale R/C version of your dream car, the BMW Mini Cooper on the
M03L chassis.
Building a BMW Mini Cooper for TCS
competition
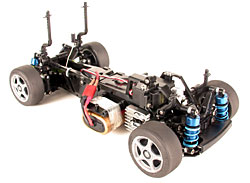 The M03L chassis is the latest offering from Tamiya in their series of
M-chassis'. The new chassis is longer than the previous Mini's, hence
the L in it's designation. This equates to more stability for a
classically twitchy car. It also means more room for your electronic
equipment within the chassis. The best news is that since the chassis is
very similar to the M03, all of the Hop-ups for it will still work!
Tamiya offers a variety of Hop-Ups for the M03, which can turn your
street basher into a TCS winning screamer.
The M03L chassis is the latest offering from Tamiya in their series of
M-chassis'. The new chassis is longer than the previous Mini's, hence
the L in it's designation. This equates to more stability for a
classically twitchy car. It also means more room for your electronic
equipment within the chassis. The best news is that since the chassis is
very similar to the M03, all of the Hop-ups for it will still work!
Tamiya offers a variety of Hop-Ups for the M03, which can turn your
street basher into a TCS winning screamer.
Here's how:
Differential
Building a differential for the mini starts with a TA03 Ball
differential. The diff. parts should be assembled as per the Hop-up
instructions. The only deviation from this should be in your choice of
greases. Don't be afraid to experiment with different greases to tune
your car. Softer grease should help the car turn better on a tight
course, while thicker grease should help the car "bite" more
off the corners. For the M03L at the Tamiya America Test Track, I use
Tamiya's Anti-wear Grease, this provides a lot of lock-up for the
differential. Tighten the differential until it stops, but do not apply
excessive force. Make sure the diff. spins smoothly. A set of
lightweight diff. balls will improve your chances of achieving
smoothness. A differential that is set too loose will not only make the
car slow and difficult to drive, but eventually will come apart.
Parts:
53267 - TA03 Ball Differential Set
53379 - Light Weight Diff. Balls
53439 - Anti-Wear Grease
Drive Train
A free drive train on the M03L is critical because of the relatively low
power and restricted gearing (20T). Here are some important steps you
can take to ensure that your Mini rolls as free as possible.
Installing Tamiya's hollow carbon gear
shafts will help to reduce weight in your drive train, thereby improving
acceleration and handling.
Ball bearings: you must have these to race
competitively. The rolling resistance of the car will be greatly reduced
with a good set of bearings. Although Tamiya bearings are not required,
in my experience Tamiya sealed ball bearings are the highest quality and
will last much longer in your Mini. For an added performance advantage,
remove the seals from the bearings and clean out the factory grease,
then lube the bearings with light oil such as Tamiya's Metal Bearing
oil. Replace the seals. Periodically cleaning and re-oiling the bearings
will extend their life an improve performance.
Do not grease your gears. I know this is
contrary to Tamiya's instructions, but we're building a race car here,
right? Putting grease on the gear teeth in the Mini may make the gears
last longer, but it adds drag to the drive train. Wear is the price you
pay for speed. Be sure to replace the gears as soon as they become noisy
or start to show excessive wear. The use of a good quality pinion that
meshes well will make your gears last longer. Tamiya makes one for the
F201 that is light and hard.
A set of universals in the M03L will also
help drive line efficiency. This is especially true as you steer your
Mini. The angles that universal can achieve are better than the standard
dog bones and their use can reduce or eliminate dreaded wheel-hop in the
Mini. Wheels that don't stay in contact with road don't provide the best
acceleration. Lube the universals with light oil and be sure to keep
them clean!
Parts:
53509 - HFC 0.6 Aluminum Pinion (20T)
53348 - M03 Ball Bearing Set
53390 - M03 Hollow Carbon Gear Shaft
53508 - Metal Bearing Lubricating Oil
53205 - M-Chassis Universal Shaft Set
Low Center-of-Gravity (C.G.)
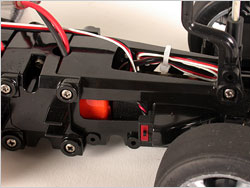 A nice thing about the new M03L is the middle chassis extension. It
provides some much needed room for electronics in the Mini. Previously
electronics either had to be placed on the top (high C.G.) or on the
sides (likely to be damaged) of the chassis. I can't stress enough how
important it is to keep the C.G. of the car low. A car with a low center
of gravity will have less body roll and will also be less likely to tip
over. This is very desirable! I managed to mount a Novak Cyclone TC and
Futaba FP-R113F receiver in my Mini. Shoe Goo is your best friend in
this endeavor. Double-sided tape is unlikely to work, because of the
unevenness in the bottom of the chassis. Be creative when mounting the
electronics, but keep in mind that you should be able to get to the
frequency crystal and be able to adjust your speed control.
A nice thing about the new M03L is the middle chassis extension. It
provides some much needed room for electronics in the Mini. Previously
electronics either had to be placed on the top (high C.G.) or on the
sides (likely to be damaged) of the chassis. I can't stress enough how
important it is to keep the C.G. of the car low. A car with a low center
of gravity will have less body roll and will also be less likely to tip
over. This is very desirable! I managed to mount a Novak Cyclone TC and
Futaba FP-R113F receiver in my Mini. Shoe Goo is your best friend in
this endeavor. Double-sided tape is unlikely to work, because of the
unevenness in the bottom of the chassis. Be creative when mounting the
electronics, but keep in mind that you should be able to get to the
frequency crystal and be able to adjust your speed control.
Electronics
The electronics that you choose for your Mini are a matter of personal
preference and I will list the electronics that I used for comparison
purposes only.
- Servo: Futaba S9404
- ESC: Novak Cyclone TC
- Receiver: Futaba FP-R113F
Keep in mind that the Mini uses a direct
link between the Servo and the steering. This means that the Mini's
servo does not have the leverage that can be achieved by other cars with
bell-crank steering. It is therefore very important, for racing
purposes, that the servo you choose has plenty of torque and speed.
To be competitive in a TCS race you must
use and electronic speed control (ESC). Put simply; buy the best one you
can afford. Size, weight, on resistance (low), ruggedness and smoothness
are key features to look for.
I highly recommend running a good quality FM
radio system. Most racers quickly find out how good their radio
equipment is at a major race. Lots of transmitters means lots of radio
noise and there is absolutely nothing worse than having radio problems
at a race. Read your radio's instruction manual carefully; most contain
excellent tips for routing the wiring on your car to avoid interference.
Chassis Tuning
Before you begin tuning your chassis, be sure that all the parts on your
car are in good condition. No parts on the car should be broken or
binding (especially suspension arms). It's amazing how many handling
problems can be solved, simply replacing a bent suspension pin! Also, be
sure that no parts on the car are excessively worn. Sloppy steering and
suspension arms are typical trouble spots. Fortunately the M03L is well
setup to begin with but there are a few chassis adjustments that can
considerably improve the cars handling.
Steering
Use a high-torque servo saver to protect the investment you made in that
expensive servo. If you choose the Tamiya unit install the longer of the
two servo horns that are included in the kit. This most closely matches
the length of the kit servo horn and reduces bump steer as much as
possible. I installed Tamiya's new Front Upright Set on my car for
strength and steering response. These new uprights include two mounting
holes for your tie-rods. The forward most holes provide quicker and
tighter steering. Another nice feature to have on the steering are
turnbuckles, which Tamiya has now made available in Titanium. These are
stronger and lighter than the stock pieces and allow front toe to be
adjusted quickly and easily. My car is set with a static front toe of 2
degree out. This setting allows the wheels to pull themselves to 0
degrees of toe under acceleration. Your car may differ, so to check this
adjustment, set the toe and push inward on the forward most part of both
front tires. With moderate pressure the wheels should both point
straight ahead (0 toe). On the back of the car I use toe-in rear
uprights for stability and control. The 2 degrees of toe-in that these
provide make the car track straighter and keep the back end in line on
turn-in.
Parts:
50473 - Hi-Torque Servo Saver
53523 - M03 Aluminum Front Upright Set
53527 - 3x32mm Titanium Turnbuckles
53345 - M03 Toe-In Rear Upright
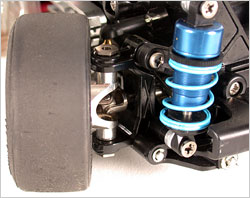
Dampers
Dampers, the heart of your suspension and handling, are often over
looked. Correctly building and adjusting your dampers can turn a good
car into a great car. For the M03L, I recommend using the TRF Super Low
Friction Damper Set. For clearance purposes these dampers must be used
with the Adjustable ball end connectors. The 2mm spacer is required in
this kit to provide the necessary clearances for the adjustable spring
perch. Follow the damper directions, but when installing the internal
spacers use four 3mm o-rings in each damper (front and rear). This will
restrict excessive droop or down-travel in the suspension. I have found
that this makes the car less sensitive to movements on and off the
throttle making it easier to drive. Use the 3 hole Teflon pistons that
come with the kit. The front dampers I filled with 600# Tamiya Silicone
Damper Oil (approx. 60wt) and the rear dampers with 400# (approx. 40wt).
Be sure to remove as many air bubbles as possible from the dampers
before screwing down the cap. Measure the extended lengths of the shocks
and thread the eyelets on until they are all equal lengths. My set-up is
based on a damper length of 56.5mm (measured end-to-end).
Parts:
49198 - TRF Damper Set (Blue/4pcs.)
53488 - Adjustable Ball Connectors (*2 required)
53443 - Silicone Damper Oil Soft Set (#200,#300,#400)
53444 - Silicone Damper Oil Medium Set (#500,#600,#700)
Springs/Ride Height
 The Short Tuned Spring set is the best choice to setup the M03L. It
allows the ride height to be lowered with out the need to excessively
preload the springs. My setup uses the blue springs up front and the
yellow springs in the rear. The threaded spring perches on the dampers
should be adjusted to give you a ride height of approximately 3mm in the
front and 6.5mm in the rear. Set-up should be performed with a battery,
a motor and all electronics in the car. Use the lowest points on the
front (just behind the axle) and the rear (very back) of the chassis to
obtain correct measurements.
The Short Tuned Spring set is the best choice to setup the M03L. It
allows the ride height to be lowered with out the need to excessively
preload the springs. My setup uses the blue springs up front and the
yellow springs in the rear. The threaded spring perches on the dampers
should be adjusted to give you a ride height of approximately 3mm in the
front and 6.5mm in the rear. Set-up should be performed with a battery,
a motor and all electronics in the car. Use the lowest points on the
front (just behind the axle) and the rear (very back) of the chassis to
obtain correct measurements.
Parts:
53333 - Touring Car tuned Spring Set (Short)
Anti-roll Bars
Some people use them some don't. In my opinion this is one of the best
and easiest ways to tune your car. These can be quickly changed or
removed to improve an ill-handling car. If the car pushes, try adding a
stiffer rear bar and/or remove the front bar. If the car is loose, a
stiffer front bar and/or remove the rear bar may be called for. My car
has medium bars installed on the front and rear. In general the M03L is
inherently more stable that the old M03, so you can run the car quite a
bit stiffer in the rear (spring, shocks damping), without making the car
loose.
Tires/Inserts
 With out a doubt 60D Type-A tires provide the maximum grip for the M03L
on a prepared surface such as Tamiya America, and these are the tires I
use there. Your track may not provide as much grip or may be dustier. If
this is the case the 60D Super Grip Radial Tires may be more
appropriate, these tires are generally more forgiving than slick tires.
Some people even mix the tires front to rear to tune the car. Only
testing and personal preference can determine your tire choice.
With out a doubt 60D Type-A tires provide the maximum grip for the M03L
on a prepared surface such as Tamiya America, and these are the tires I
use there. Your track may not provide as much grip or may be dustier. If
this is the case the 60D Super Grip Radial Tires may be more
appropriate, these tires are generally more forgiving than slick tires.
Some people even mix the tires front to rear to tune the car. Only
testing and personal preference can determine your tire choice.
TCS National rules changed last year to
allow any tire insert in competition. This makes choosing a tire insert
an expensive and time consuming proposition. David Jun has written an
article on this topic that is posted on the Tamiya America site and I
recommend reading it. The only additional factor to consider when
selecting inserts is rollout. Since the M03L has limited gearing (20
tooth pinion is basically the only choice for most tracks) it is to your
benefit to make the front tires as hard as possible. This is equivalent
to inflating a tire to its maximum pressure. Anyone who has ridden a
bicycle knows that its easier to peddle a bike when the tires are pumped
up. In addition the diameter of the tire is maximized; a bigger tire
improves the overall gear ratio. All this means your Mini will be faster
on those long straights. To achieve this I used a 24mm insert cut and
taped to fit the diameter of the mini wheels and I also stuffed a foam
insert in to the tire. It can be quite difficult to get all this
material in the tire without bulges so practice it a few times before
you glue the tire. Keep in mind this is only for the front tires. For
the rear tires I mounted them more conventionally with just a foam
insert. It should be pretty easy to tell which are fronts and which are
rears by squeezing them but I recommend labeling them anyway.
Parts:
53340 - M Chassis 60D Reinforce Tires Type-A (*2 required)
53254 - 60D Super Grip Radial Tire (*Optional, 2 required)
50686 - 60D Inner Sponge Tire Set (Soft)
53435 - Medium Narrow (24mm) Shaper Insert (Hard)
Testing
The setup that I have provided here is a result of testing at the Tamiya
America facility under specific track conditions. It is a good basic
setup that has proven competitive with other Mini chassis. Don't be
afraid to make adjustments to the car and to try different options. I
found that through out the day, small changes to car improved its
performance. Remember that out door tracks are very dynamic and require
constant changes to get the most out of a car.
Conclusion
With the right Hop-Ups and careful construction, this is
definitely a car that can win races. Drive train, chassis tuning, tires
electronics are all important factors in making a well-rounded racecar.
The M03L simple construction and fundamentally good handling are a good
platform for this. Additionally, the Mini is a relatively cheap class to
run and even a well hop-up car wont break the bank. I consider my Tamiya
BMW Mini Cooper a great addition to my RC car stable.

