When I first started to do this hobby my cars where like most other’s. They where built … and sort of holding together.
But there is a HUGE difference between a car that is built and a car that is built well.
Not only by the effort you put into the building process but also on track. With a well built car, you will find that you never really suffer from setup issues! It simply works. Everywhere, in every situation, on any tire.
My cars (may it have been Mi4, Mi5 or previous ones) where always good right away. This is important as it enables you to focus on your line, the track, tires and tire prep, power package. The list goes on and on.
So what is the difference between a good and a better car, even if the setup might be the same one?
First of all: binding
Everything NEEDS to move freely. A binding suspension never works. An arm reamer is therefore mandatory. You just need one.
Second but not least important: slop
Slop, and this I have tested on multiple cars, reduces grip, precision and ultimately cornerspeed. It also softens the car’s reaction (might make it easier to driver but at the end of the day also slower).
And there you have the big issue. A conflict of interest. Those can be found in many situations nowadays.
But let’s not get carried away. To let you get the maximum out of your Mi5 here is what I do, when building a new kit / or rebuild my car ahead of / at races:
When I build my shocks, I always run a 1.10mm drill throught the piston holes just to ensure they are perfect in size. I then cut the shockshaft by approx 3mm and glue the piston to the shaft. Since the shaft is Ti-Nitrid you can still easily remove the piston if you really need to. With no glue, you will have slop either right away or with time. It might not be much in the shock itself but on the wheel it can be something like 1mm undamped movement -> why use dampers anyway then?
You could also use a shim to take the slop out, but I prefer the glueing method as it also reduces the load on the E-clips.
When assembling the shocks, I like to add a 0.3mm shim (4mm inner diameter) to the bottom shockshaft guidance. This ensures, that the O-ring is slightly compressed and seales properly. Very important when running little rebound, as otherwise you suck in a lot of air. And again: air ain’t good in dampers :)
I have always liked to use a grub screw in c-hub (well now steering hub bushing ;) ) and rearhub. This reduces slop which might occure with time to zero.
However: As there is no relative movement between hub and pivot pin anymore, you need to ream the holes in the wishbone itself to ensure, the hubs are falling under their own weight. You can either get an armreamer from EDS (correct imperial size) or use a 3mm one and wobble around, or use an old hingepin and add cut-ins with a dremel so it can be used as a reamer. Your choice.
It takes time but it only once, so I classify it as: worth it!
While we are at the hubs: it is important insert the kinpin straight! When screwed in at an angle you will alter the caster which is something you really don’t want.
You can easily check your current assembly by having a look at your ballcup mounted to the top of the steering hub. When you turn the steering wheel it needs to remain in one position. If it is moving back and forth, your caster ain’t right.
There are ways to make this easier like an M4x50 screw which is trued down to 2.5mm on half of it’s threat. This way you can insert it into the top hole of the steering hub and then just pretap the threat. This is how I do it.
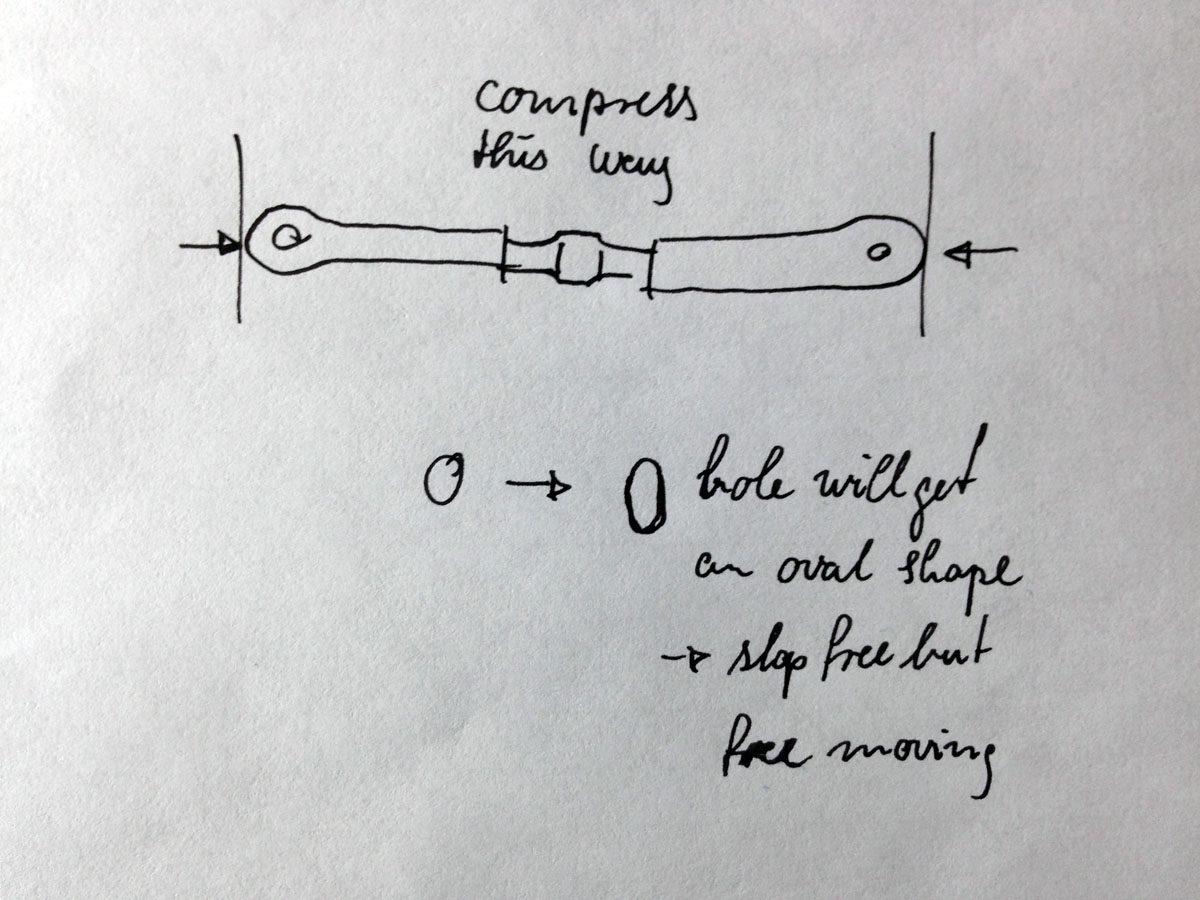
Still on topic: camberlinks
The ballcups fit nicely onto the ballstuds. When slop occurs, there is an easy way to get rid of it (which again is something I have done to pretty much any car I have ever built like tamiya, hb, yokomo, xray … you name it).
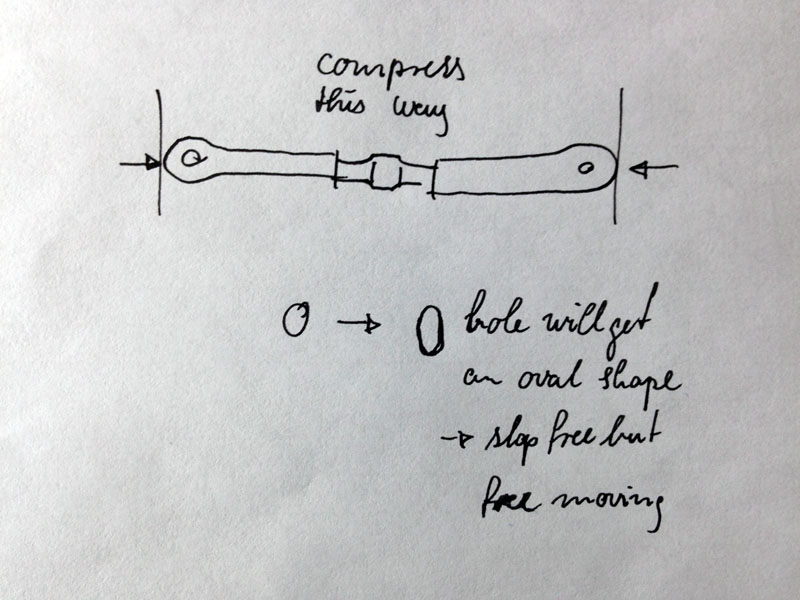
Compress the turnbukle once ballcup installed; hole will get an oval shape ensuring free motion but no slop.
Always take your time with swaybars. They need to be slopfree and fall under their own weight. When you have achieved that, you can make sure it’s neutral -> every side lifts off at the same height added to the other side (shocks disconnected, car flat on setupboard, droop gauge placed underneath the wishbone (where you measure droop)).
The rear (with a 1.2mm swaybar) should lift off at 10.25 – 10.50mm each side. The front at 10.50 – 10.75 with a 1.4mm swaybar (this is also the reason why 1.4/1.2 is my standard swaybars, as they are the same hardness due to geometry). If it ain’t equal left and right, change the length of the swaybar links accordingly.
Drivetrain: black slider inserts
They shrink more when they cool down from the moulding process and therefore they might be a bit tight on the driveshafts. I just use a file and widen them until the ball on the driveshaft can wobble around slightly. Then the slider inserts last like forever (note, they still need grease or oil!)
Rear geardiff
I like to only use 1 of the big spacers per big gear instead of two as according to the manual. The missing big spacer needs to be taken in mind, when adding shims to the outdrive. Therefore I use 3 small ones in stead of 2.
This smoothens up the diff action.
Team tip:
If you want some more steering on brakes, cut the brace on the front wishbones. Softer suspension (flex wise) at the front is better on brakes as it can flex and therefore cope better with changing traction or geometry (caster + wheel angle). It will be a bit easier to drive, and easier to get the car into the turn. You sacrifice some cornerspeed and a bit of sharpness in reaction.
A long to do list. But I promise it’s worth it. Some things might really impact your outright pace, others may be more noticable in track-to-track-performance.
Have fun racing.
Hoffer Mechanical Services ;)