I’ve concentrated recently on comparison testing of some different settings, mainly as what I’m running on my car is a little different to what most of the team drivers are running. Part of my reason for being different is having a slightly different philosophy on the front end setup, having looked at what other cars are doing, and thinking long and hard about what I wanted to do. So this is going to be more of a summary of changes I’ve trialled, and where my base setup is now.
The first main difference, is with the front roll bar, and front link setup. I’m running a 1.3 front roll bar, versus the kit standard 1.4mm. Part of my reason for this comes from, perhaps unsurprisingly, Yokomo BD7 setups. Having tried this back to back on numerous occasions now, I find the softer front bar gives more front end, and holds the middle of the corner better than the harder bar. However, if using a very flat front link, (say 0mm under inner ball, and 0.5 under outer ball), the car rolls a bit too much at the front, and the camber change is such that the front tyres seem to wear in a strange manner, working the outside shoulder harder than the inside. So, to compensate for the thinner front bar, I run (pretty much everywhere) 1.5mm of shims under the outer link position, on top of the steering hub. The extra angle helps improve the camber gain properties, as well as stops the front rolling too much, maintaining better corner speed, without causing the front to push. In terms of laptime, I’ve now tested the two configurations (1.4mm bar/flat link vs 1.3mm bar/angled link) on two quite different tracks, and both times the 1.3mm bar was quicker, by around 2/10ths on fastest, with a similar improvement on average laps.
The second setup change I’ve been working on has been to use 6deg castor blocks. Now, I’ve seen a few setups from other cars using 6deg blocks, and the theory of more castor giving more mid corner is something that I’m always looking for, as mid corner is probably the weakest area of the Mi5. Anyway, having tried just the 6deg castor on their own, I found that whilst the mid and exit was improved, the car suffered on initial, especially in the slower corners, just couldn’t get the front in. So after a little bit of thought, tried the 6deg hubs coupled with a small amount of anti-dive. The idea behind this was two fold. Firstly, reduce the castor on the front end a little, to give back a bit of initial, and secondly, the Anti-dive should helps braking performance, which is very useful in modified racing.
The result? A win-win… theory proved right, and again gained a few tenths on fastest laps, and the improved braking performance coupled with extra mid-corner over the 4deg hubs all made the car faster.
Another thing I also played with was bodyshell position. This is something I kept forgetting about, and had been sitting on my to-do list for ages. Anyway, with the need of a few new bodies for club racing time to bring it up the list. My body of choice is the LTC-R, pretty much everywhere. Previously had been mounting it hard against the front bumper, but for the test moved it forward 6mm. Straight away, the car was just plain faster, but without a massive change in the balance. It wasn’t that the car had more steering or stability, but the lap times didn’t lie.
What was an interesting thing out of that was the previous meeting, I started to struggle with steering as the track came up during the night, and ended up reverting to un-cut rear arms, and a heavier diff. With the track gripping up the same during this meeting, I found that didn’t need to do those changes with the shell forward… so less work needed on a race night… winner :D
So with the general stuff done… now to move onto the track differences. My two latest setups are below
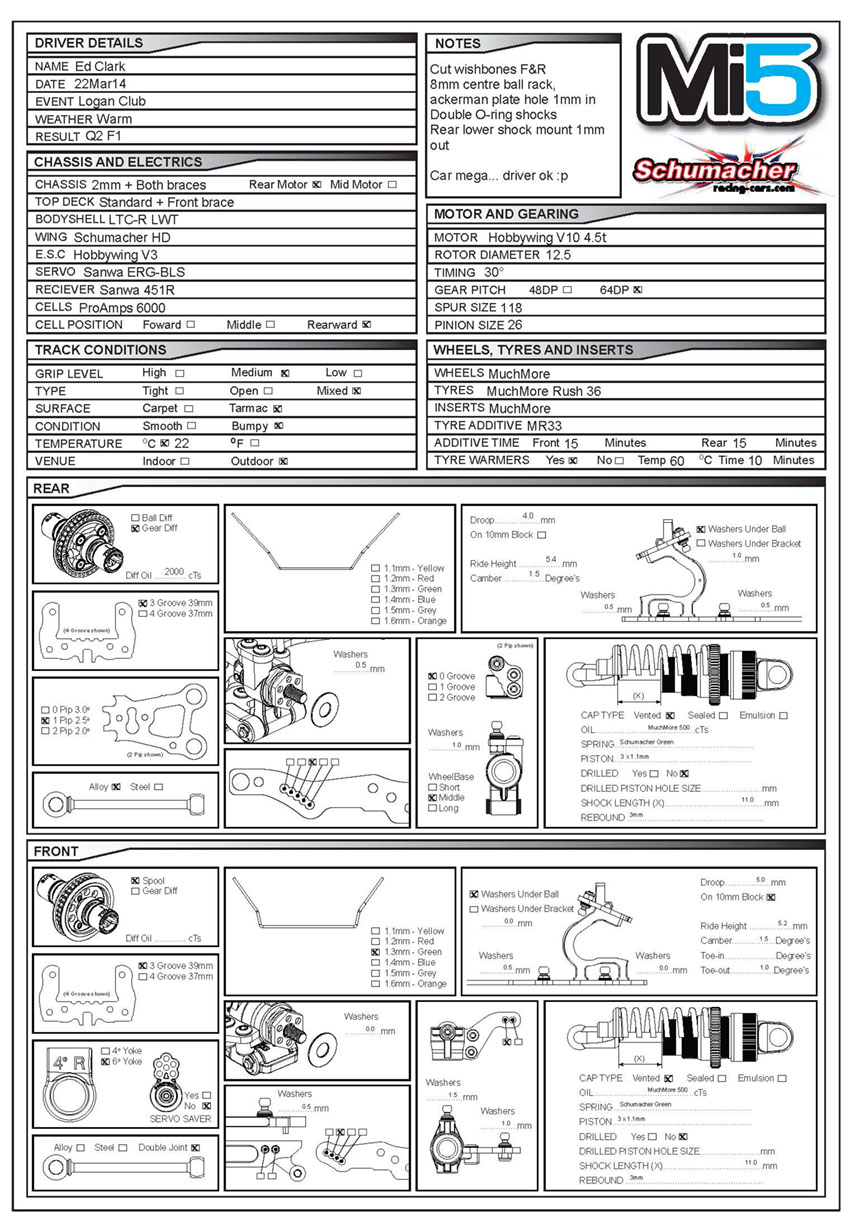
And as you can see, there are some subtle differences to them. Logan is a much faster track, more flowing, but with some tighter technical sections. Sub 19s is a good lap round there. Bayside is very different, much more bumpy, and technical with a succession of hairpins at the end of the lap. sub 17's are the go here.
Getting the first differences out the way, Bayside requires a much higher ride-height, which also accounts for the lower droop figures used compared to Logan. Raising the ride height effectively pushes the wishbones down onto the droop screws, so 1/2mm increase in ride-height should also be done with a 1/2mm increas in droop to compensate.
Next up, diff’s. Again as Bayside has all the tight turns, the gear diff in the front really does help to get the car into the slower corners. I wouldn’t want to go any softer on the oil, mainly as there is a noticeable drop in drive off the turns, which is why the spool seems to work better at Logan.
On the rear, a heavier diff doesn’t work quite as well at Logan, makes it hard to get out of the turns, and hurts the entry into the corners. However, a little contradictory to the statement from the front diffs, the 3K diff works better at Bayside as it a) helps to get the car rotating on power earlier in the slow turns, and b) helps to calm the extra steering in given by the front diff…. short version, it all works in combination… :P
