| |
Article ID: 482 |
Pit Pass » Archives
|
[Pit Pass] Revo Performance Set-up Guide (Part 1) |
|
Suspension
[Click here to download this document as a PDF]

After
tons of testing and many weekends at the track racing the new Revo,
I've come to know our new monster pretty well. I've put the Revo to the
test on many different styles of tracks, with conditions ranging from
hard packed blue groove to soft and loamy. Now, after all this testing
and track time, I've put together a comprehensive, highly informative,
and accurate set-up guide. It's time to let all of you race hungry Revo
owners in on everything I've learned about this killer truck. So as
promised, here is the first installment of the complete
performance-tuning guide for the Revo. The format of this guide will be
similar to the Maxx series of articles where I separated the guide into
three categories: suspension, chassis, and transmission/drivetrain.
Keep in mind, even though many accessories are mentioned for the Revo,
they are not all necessary for competitive track racing. However, each
accessory component does have its own purpose and offers an increase in
performance in one way or another. Some are for strengthening, and some
are for lightening different areas of the truck (some do both). The
Revo is an excellent track performer right out of the box, and with the
many trick factory accessories available, you can custom tailor and
personalize your Revo to be the ultimate race machine. Let's get
started!
Revo's Suspension
The
Revo's suspension system is very unique and offers independent tuning
options that most standard-styled suspension systems cannot. The
geometries designed into the Revo's rocker arms change the way the
shock feels as the suspension is compressed. The 90mm travel rockers
were designed to increase the progessive rate felt at the wheel as the
suspension is compressed. This means that the suspension will get
stiffer as it is compressed. Each rocker set is designed with different
geometries to raise or lower the progessive rate of the suspension.
I'll explain what components I use for track racing along with what
adjustments I make for different conditions. Let's start with tuning
the shocks.
Shock Tuning
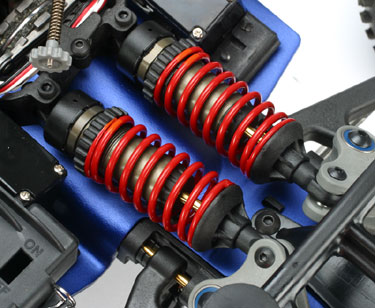
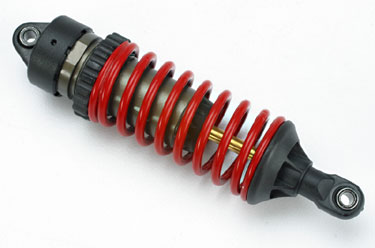
The stock aluminum GTR shock absorbers on the Revo work extremely well.
They
are very smooth and are equipped with threaded bodies to make pre-load
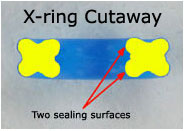
adjustments a snap. They also come standard with x-rings for a perfect
seal and smooth action. X-rings provide two sealing surfaces against
the shaft vs. just one from standard o-ring. Also, the use of just one
x-ring allows for more room for stroke since it takes up less space
than a traditional two o-ring set-up found in most shocks today. The
Teflon®-coated hard-anodized dampers (above #5460X) are even smoother and have TiN (Titanium Nitride) coated shafts to resist wear.
Shock Tuning w/ Fluids and Pistons

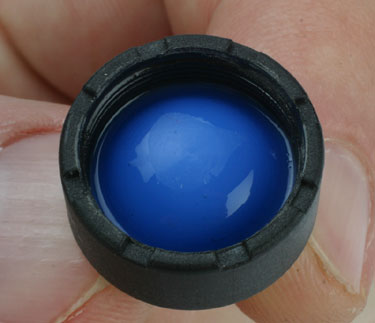
Filling the shocks with oil -
With the bleed hole molded into the cap, anyone can build a perfect
shock every time. Just fill up the shock body close to the top. Next,
slowly move the piston up and down to clear all bubbles. Check to make
sure the shock bladder is seated correctly into the cap. Spread a
little bit of oil around the edge of the shock bladder, then thread on
the cap slowly while the excess oil seeps out of the bleed hole.
Tighten the cap until it stops. Wipe away the excess oil, and it's
ready.
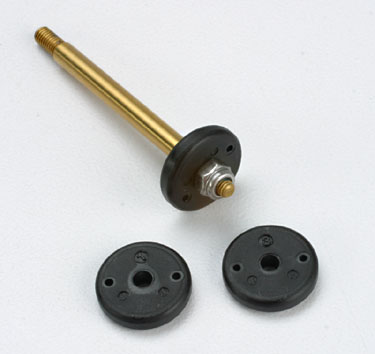
There
are three pistons available for the GTR shocks. All three are made with
two bypass holes. Each one with different hole sizes, piston #1 =
large, piston #2 = medium, piston #3 = small. Smaller holes provide
more damping (slower action). Out of the box, the stock GTR shocks come
assembled with #1 pistons in the front and #2 piston in the rear. The
#3 piston is more suited for heavier springs such as the springs
designed for the long travel set-up.
Selecting the right viscosity
Base Rocker/Oil Chart (stock pistons) |
P1 Rockers | 60wt |
P2 Rockers | 50wt |
P3 Rockers | 40wt |
My
base shock oil choice for the P2 rocker set is around 50wt for most
tracks, using the stock piston arrangement. For P1 rockers start with
60wt shock oil. P3 rockers work well with 40wt shock oil. These are
base settings and may need to change due to varying track conditions.
Shock temperature
The
fluid inside of the Revo's dampers gets a little warmer than with
dampers found on traditional suspension systems, due to the extra work
they perform. This will loosen the damping up a bit after the truck has
made a lap or two around the track. Ambient temperatures also affect
damping fluids. Hotter days will make the fluid feel a little thinner,
so on very hot days, you may need to step up 5wt to 10wt in the dampers
for more desirable performance. Keep this in mind when selecting the
right fluid for your conditions.
Shock oil for track surfaces
On
smooth tracks with a lot of bite, the damping should be increased for
better response. With the stock pistons and P2 rockers, 50wt to 65wt
fluid is a good starting point. Another option is to move the rear
shocks (with #2 pistons) to the front and install the #3 pistons into
the front shocks, which will now be mounted in the rear (Be sure you don't mix up your front and rear springs). This
set-up will allow you to run thinner shock fluid than with the stock
piston arrangement, or it can be used with thicker fluids for firm
spring applications.
Proper
springs are a vital part of a good handling truck. Traxxas offers 11
pairs of springs to get your set-up dialed-in for any surface. The
stock springs (white dot/front, green dot/rear) work well in a wide
variety of applications, especially extra rough terrain. Sometimes when
changing to a firmer spring, it's a good idea to also change shock
fluid to a thicker viscosity and vise-versa. This will help prevent the
suspension from becoming over sprung or under damped. A good
rule-of-thumb is to adjust approximately 5-10wt up or down
corresponding to each rate level change in spring selection.
Spring Chart
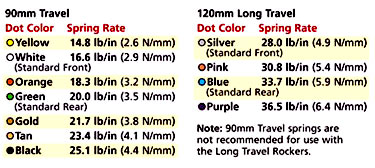
My
base choice of springs is the orange dots up front with the gold dots
in the rear. These springs are one step firmer (front and rear) than
the stock springs, and provide a little extra response for negotiating
corners quickly on the track. It's important to note that due to the
design, the Revo requires a 20% stiffer spring for the rear to be
balanced with the front. This is part of the reason why there are so
many different spring sets available for the truck. The springs can
still be changed out independently front and rear for your particular
driving style and conditions. I'll go to a softer spring set-up for
very rough tracks.
Vehicle weight
Reducing
the weight of the Revo can affect spring selection. My Revo weighs in
at close to 8lbs. This is approximately 1.5lbs. lighter than stock
weight. However, since the Revo's suspension system works so well at
absorbing rough track surfaces, I still choose to run springs that are
a step firmer than stock. This provides the quick response I'm looking
for in most track conditions. For Revos close to stock weight, try
green dots up front and tan dots in the rear.
Choosing
the right rockers for your track condition is easy. There's a rocker
set for any kind of surface imaginable. This is not to say that each
rocker set won't handle a wide range of surfaces, but each one is
designed to better suit each type of surface you'll encounter.
P1 Rockers (standard) -
For rough terrain use such as rocks, curbs, branches, and tracks with
jagged and uneven surfaces. This is the rocker set best suited for the
roughest tracks out there. The long travel rockers can also be used for
extreme conditions, but they do not handle jump landings as well as the
P1 rockers. Use the P1's for really rough tracks.
P2 Rockers (#5358) -
This is my favorite rocker set for most racing conditions. The P2
rocker set combines just the right amount of progressiveness for quick
response on the technical sections of a track, without sacrificing the
suspension's ability to handle the rougher sections. The P2's are the
most well-rounded rockers for the majority of today's nitro off-road
racetracks.
P3 Rockers (#5359) -The
P3 rockers work extremely well on smooth tracks with smaller jumps.
Small tracks with tight turns will appreciate the quick response
delivered by these rockers. Be careful about changing track conditions,
and keep a close check on the track's surface throughout the course of
the day to see if the surface becomes pitted and broken up. If this
happens, it would be advisable to switch back to P2 rockers. Use the
P3's for smooth high-bite tracks.
LT (long travel) Rockers (standard) -
I haven't really found a rough enough track condition that the P1
rockers couldn't handle. The LT rockers offer an insane amount of
travel and plushness that works best on super chunky surfaces like
those found at a construction site. The LT rockers lack the progressive
bump handling traits of the 90mm rockers sets, which makes them a
little more sluggish in the corners, and jump landings can be pretty
harsh if landing from anything larger than a medium-sized jump. This is
not to say that they won't work well for you on the track, but I prefer
a more progressive feel to the suspension. I would stick to bashing and
rock climbing with the LT rockers. Note that the LT
rockers can be used for jumping, but require much heavier shock fluids
to soak up the landings. These thick fluids are generally not ideal for
track use.
This
adjustment allows you to change the ride height of the Revo without
changing the damping force or the progressive rate of the suspension.
Changing to the Outside hole will lower your chassis roughly 10mm. You
can make fine-tuned adjustments with the threaded pre-load collars
located on the shocks. I generally run my pushrods in the middle
location, and set my pre-load collars to where the truck sits with the
front and rear lower arms close to being level with the surface (see below).
The use of the inner positions on the arms will raise the trucks ride
height too high for most racing applications, and is generally reserved
for extreme off-road bashing and rock crawling
Ride
height is an adjustment that I check and adjust every time I make a
change to the suspension set-up. Always double-check ride height after
changing rocker sets, adjusting pushrod locations, swapping springs,
etc. Small adjustments can easily be made with the pre-load collars.
Revo Performance
Set-up Guide Part I
A
lower ride height is better suited for smoother terrain while the rough
stuff will want a higher stance. Set the ride height in both the front
and rear to where the lower suspension arms are level. Try that first
and see if the truck will negotiate all of the rough sections without
upsetting the handling. I like to set the ride height on my Revo up
just a little bit higher in the rear for a little more weight to
transition to the front when entering a corner for more steering.
Extra pushrod tuning tip
The
multiple pushrod locations on the lower suspension arms also change the
relationship between the tires and the bottom of the front and rear
skidplates when the chassis is lifted off of the ground. This means the
distance between the bottom of the tires and the lowest point of the
chassis (skidplates) can be adjusted to three different settings (see pic below).
The outer position decreases the distance which works very well for
smooth tracks. The inner position is best for tracks with huge jumps
and/or extremely rough surfaces. The middle position will cover
everything in between. In most situations, I use only the outer two
location.
 |
| Notice how the bottom of tire to the left (pushrod located in the inner hole) is further from the skidplate than the tire to the right (pushrod located in the outer hole). Note that the middle pushrod location would position the tire between the two shown here. |
Think of it as a way to further tune within a particular rocker set. Important:
If the pre-load collars on the shocks are set too far up or down on the
shock, this will affect where the rocker is positioned (at rest) in its
progressive rate curve (see pic below). This means
that if you locate your pushrods in the outer position to limit the
travel in relation to the chassis for smooth surfaces, but still want
to run a higher ride height, you must remember that the rocker will
start it's compression stroke at a lighter progressive rate. The owners
manual refers to the pre-load collars only being adjusted in small
amounts for this reason.
| This pic shows the affects of using different pushrod locations while setting both shocks' pre-load collars to attain the same ride height. The pushrod on the right is located in the outside hole, and the pushrod on the left is located in the inner hole. Notice that the rocker on the left is in a higher rate of its progressive range. |
| Using
the spring pre-load collars for large ride height adjustments can put
your rockers in a different area of the rockers progressive rate range.
This can affect handling, but may actually work to your benefit. Try
different settings to see what improvements you can attain for your
track. Important: The use of different pushrod locations
(left to right) is not recommended for the Revo. The above photo is for
demonstrative purposes only. |
I
keep the front toe set around 0 to 1.0 degree of toe-out for improved
steering and response. Toe-in will tone down steering response and make
the truck less aggressive. On tracks that are really tight, I will run
as much as 2 to 3 degrees of toe-out.
I
start the rear at 2.5 degrees toe-in for most conditions. For high bite
tracks, I'll reduce this to as little as a 0.5 degree. I'll tune in as
much as 3.0 degrees toe-in for conditions that are rough and slick.
Reactive Toe (bump steer) |
|
Bump
steer is associated with the tie-rod and suspension arm relationship
concerning active toe angle. This condition is detected if the front of
the wheels point inward or outward as the suspension is compressed.
Traxxas
engineers worked hard to eliminate bump steer in the Revo's suspension.
There is less than 0.1 degree of bump steer through the entire range of
travel. That's pretty amazing considering that the Revo offers the most
suspension travel of any monster truck.
For best
performance, it is ideal to dial bump steer out of the suspension so
that handling is as precise as possible. However, it can be used as a
tuning tool for different handling characteristics while entering and
exiting turns. Bump in : The front of the wheels point inward when the suspension is compressed. Bump out :
The front of the wheels point outward when the suspension is
compressed. There are offset hollow balls along with different shims (#5355)
available for moving the outer rod ends up or down to tune 'bump in' or
'bump out' into the toe angles. The front bump steer adjustment can be
configured so that no matter what caster or roll center setting is
used, bump steer can be eliminated by shimming the outer toe link rod
end up or down to compensate for the caster/roll center change (see chart).

Front: For
my personal set-up, I position the front toe links in the upper
position (highlighted above) to counter the 15 degrees of caster that I
typically run (note that this is subject to change with different track conditions).
This eliminates bump steer induced by my aggressive caster setting.
Adjusting bump in or bump out into the front suspension is usually not
recommended. Rear: I start with the middle
position in the rear, and then tune up or down if needed. 'Bump in'
will increase rear bite under acceleration with an increase in steering
off throttle. 'Bump out' will do the opposite.
I
usually keep my camber set around -1.5 degrees (set at ride height)
front and rear. I normally won't change this until I get to a very
high-bite track where camber can actually be used as a tool for adding
or taking away traction. On high-bite surfaces adding negative camber
(tilting the top of the tire in toward the chassis) will make the truck
a little more aggressive and improve traction. Standing the tires up
(perpendicular to the surface) will tone down the traction by
decreasing the contact patch between the tire and the surface in the
corners. Always measure your camber with the truck ready to run and at
ride height.
Caster
directly affects the steering of the truck throughout the entire turn.
More caster (upper arms moved back) will generally yield more steering.
I like to get as much steering as I can out of my monster trucks
because of their bigger wheels and tires. This is why I generally run
the maximum amount of caster (arms to the rear/all shims to the front).
This is also an adjustment that suits my driving style a little better
(I wouldn't recommend automatically using max caster). Try it in the
stock position first and decide if you need more steering in the
corners or not before you make a change.
I
generally mount the front in the stock (upper) position. The lower
position makes the front end more responsive, but takes away some
steering. Since I like a lot of steering in my truck, I tend to keep
the front roll center set a little more relaxed than the rear.
I
like to use the lower position in the rear when I can. This keeps the
chassis flatter in the corners and helps rotate the truck quickly when
entering turns. This will also make the truck feel a little more
aggressive and a little less plush in the rear, but since the
suspension works so well in that department, it ends up working out
nicely. If the track is really rough and rutted in the corners, I will
switch back to the upper roll center location in the rear. This will
allow the suspension to be more forgiving over the ruts, and the truck
will be easier to control.
Lightweight 7075-T6 aluminum accessories to further enhance the performance and look of your Revo
I
use the following pieces on the suspension of my Revo to save weight
while maintaining excellent durability. 7075-T6 series aluminum is
stronger than most steel materials and weighs only 1/2 the weight of
Titanium and 1/3 the weight of steel.
Aluminum Rocker Posts (5354X) - Super light hard anodized rocker posts to drop even more weight. Saves 16 grams. Posts (5354X) - Super light hard anodized rocker posts to drop even more weight. Saves 16 grams. | Aluminum Pushrods (#5318X) - These push rods are very strong and weigh next to nothing. Saves 31 grams. |
 Aluminum Hollow Balls (5355X) - Aluminum Hollow Balls (5355X) - 12
grams can be shed from your Revo by replacing all of the steel hollow
balls with these lightweight hard anodized aluminum hollow balls. |  Aluminum pivot balls (4933X) -
Same optional aluminum pivot balls used in the Maxx trucks.
Hard-anodized and Teflon®-coated to be smooth and durable. Saves 19
grams. Aluminum pivot balls (4933X) -
Same optional aluminum pivot balls used in the Maxx trucks.
Hard-anodized and Teflon®-coated to be smooth and durable. Saves 19
grams. |
The suspension on the
Revo is a remarkable piece of engineering, but it's very easy to use.
It provides not only exceptional handling, but also a wide array of
tuning options and adjustments to tailor your chassis to any track. I
hope this section of my performance guide helps you to get your Revo
suspension dialed-in to your local track.
Set-up Sheets
Keeping an accurate account of set-up information can become a little tedious at times, so I recommend using these handy set-up sheets
to keep track of personal set-up information on each track that is
raced on. You can also share your information with fellow Revo racers
to help them try out your set-up. Click the link below for my complete
base set-up for the Revo. Stay tuned for the next part of my Revo
series when I cover all of the chassis tricks that I've performed on my
Revo. Until then, see ya!!!
Revo Base Set-Up Sheet
Article ID: 482 |
|
| Last update: 2006-02-01 17:09 |


