 I
don't know how many times I've seen it. What is "it" you might ask? "It"
is a car that has been assembled poorly, and that poor assembly process
normally translates into poor on-track performance. Over nearly 15 years
in the hobby, I have built a fair number of cars. Some cars I rushed
through, skipped steps and the initial on-track performance suffered
accordingly. With other kits,
I
don't know how many times I've seen it. What is "it" you might ask? "It"
is a car that has been assembled poorly, and that poor assembly process
normally translates into poor on-track performance. Over nearly 15 years
in the hobby, I have built a fair number of cars. Some cars I rushed
through, skipped steps and the initial on-track performance suffered
accordingly. With other kits, 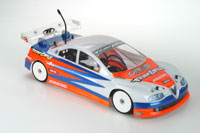 I
have been extremely meticulous during assembly and have been pleasantly
surprised at the on-track performance the moment I hit the track. So how
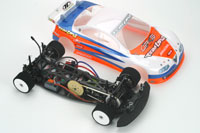
exactly do you build a car the right way? Follow along with me as I
build a new kit, a Team Losi JRX-S, and I will reveal many of the tricks
and tips that I have picked up over the years.
I
have been extremely meticulous during assembly and have been pleasantly
surprised at the on-track performance the moment I hit the track. So how
exactly do you build a car the right way? Follow along with me as I
build a new kit, a Team Losi JRX-S, and I will reveal many of the tricks
and tips that I have picked up over the years.
The
Right Tools for the Job
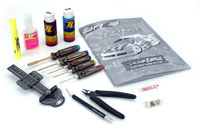 Most
kits include a rudimentary set of tools, be it Allen wrenches, box
wrenches, or a turnbuckle wrench. While the included tools may get you
through your initial building process, they tend to be made of rather
soft metals. This means that after repeated use, the ends of the Allen
wrenches may round off and potentially strip your screw heads. A number
of years ago, I picked up a set of Allen wrenches with hardened tips,
but over time and years of use they had worn out. When I picked up the
JRX-S, I also snagged a set of Team Losi Race Wrenches (LOSA99104).
These wrenches have color coded caps to make identifying the size easy,
and the tips are titanium nitride coated. Additionally, using pliers to
tighten the locknuts on your car or truck is not only hack, but you can
also damage or round off the hexes on the nut as well. Use an actual set
of nut drivers, such as the ones from Dynamite (DYN2812). Other tools
that you may find useful would be the RPM Precision Camber Gauge
(RPM70992), Dynamite Precision Ride Height Gauge (DYN2527) and Precision
Droop Gauge (DYN2528), Team Losi Shock Matching Tool (LOSA99170), some
sand paper, and a quality soldering iron such as the Weller Analog
Soldering Station (WELWES51).
Most
kits include a rudimentary set of tools, be it Allen wrenches, box
wrenches, or a turnbuckle wrench. While the included tools may get you
through your initial building process, they tend to be made of rather
soft metals. This means that after repeated use, the ends of the Allen
wrenches may round off and potentially strip your screw heads. A number
of years ago, I picked up a set of Allen wrenches with hardened tips,
but over time and years of use they had worn out. When I picked up the
JRX-S, I also snagged a set of Team Losi Race Wrenches (LOSA99104).
These wrenches have color coded caps to make identifying the size easy,
and the tips are titanium nitride coated. Additionally, using pliers to
tighten the locknuts on your car or truck is not only hack, but you can
also damage or round off the hexes on the nut as well. Use an actual set
of nut drivers, such as the ones from Dynamite (DYN2812). Other tools
that you may find useful would be the RPM Precision Camber Gauge
(RPM70992), Dynamite Precision Ride Height Gauge (DYN2527) and Precision
Droop Gauge (DYN2528), Team Losi Shock Matching Tool (LOSA99170), some
sand paper, and a quality soldering iron such as the Weller Analog
Soldering Station (WELWES51).
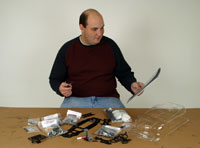
Prep
Work
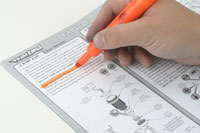 Ok,
I know how exciting it can be to get your new kit, and how tempting it
can be to simply dive into building. It is to your benefit to take a
deep breath and resist that temptation. Instead of opening up all the
parts bags at once and start piecing things together, take some time and
read through the manual. I will often use a highlighter as I go through
a manual for a new car for the first time to highlight steps that could
potentially pose a problem. For example, when I built my Team Losi XXX-S
Graphite Plus kit, I discovered that the front and rear shock shafts and
bodies are slightly different lengths. If I hadn't looked ahead, I may
have had to disassemble and reassemble my shocks from building them
wrong. I know a few racers who have done just that and became frustrated
because of it. Before you begin building, you may want to check out the
website for the manufacturer of your particular kit to see if there are
any building tips or assembly updates. Many manufacturers will even post
recommended setups for particular conditions for you to use as well.
This will help you stay one step ahead.
Ok,
I know how exciting it can be to get your new kit, and how tempting it
can be to simply dive into building. It is to your benefit to take a
deep breath and resist that temptation. Instead of opening up all the
parts bags at once and start piecing things together, take some time and
read through the manual. I will often use a highlighter as I go through
a manual for a new car for the first time to highlight steps that could
potentially pose a problem. For example, when I built my Team Losi XXX-S
Graphite Plus kit, I discovered that the front and rear shock shafts and
bodies are slightly different lengths. If I hadn't looked ahead, I may
have had to disassemble and reassemble my shocks from building them
wrong. I know a few racers who have done just that and became frustrated
because of it. Before you begin building, you may want to check out the
website for the manufacturer of your particular kit to see if there are
any building tips or assembly updates. Many manufacturers will even post
recommended setups for particular conditions for you to use as well.
This will help you stay one step ahead.
After
you've made any notes or highlights in the manual, it's time to set up
your building area. I highly recommend using some kind of pit towel on
your work space. It will prevent any small parts from rolling away, and
it will keep you from making a mess all over your work area with things
like spilt shock oil, diff lube, or other things such as that. Don't go
grabbing your mother's good quality towels either. (You know the ones I
mean; the ones you never actually use and only get put on display when
guests come over!) Additionally, try to set up in an area with the best
lighting possible. Finally, I use several inexpensive plastic bowls to
empty the contents of a parts bag into. From here, it's time to get
building.
Prepare
Your Chassis
 For
cars that use graphite chassis plates or shock towers, you don't want to
just start bolting things to the chassis. You'll notice that, out of the
box, a plate chassis has squared off edges from when its cut out of the
main sheet at the factory. You'll want to sand down the chassis to round
off the edges. The same thing goes for the battery slots, shock towers,
and any top decks that your car might have. If you don't sand down the
edges of your battery slots, your battery pack will sit higher in the
chassis than it should, affecting the center of gravity and adversely
affecting the handling of your car. Additionally, the edges of the
chassis can potentially cut through the shrink wrap of the cells,
causing a short and potential fire hazard.
For
cars that use graphite chassis plates or shock towers, you don't want to
just start bolting things to the chassis. You'll notice that, out of the
box, a plate chassis has squared off edges from when its cut out of the
main sheet at the factory. You'll want to sand down the chassis to round
off the edges. The same thing goes for the battery slots, shock towers,
and any top decks that your car might have. If you don't sand down the
edges of your battery slots, your battery pack will sit higher in the
chassis than it should, affecting the center of gravity and adversely
affecting the handling of your car. Additionally, the edges of the
chassis can potentially cut through the shrink wrap of the cells,
causing a short and potential fire hazard.
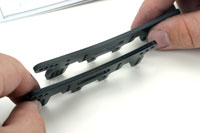
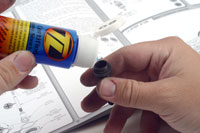
After
you've sanded everything down, you'll want to seal the edges of the
graphite plates to prevent the graphite from splintering or becoming
delaminated. The easiest way to do this is with some sort of fast-curing
CA (cyanoacrylate) glue. Team Losi's Todd Hodge recommends that you
first sand the edges of the chassis down with 400-grit sandpaper, spray
the freshly sanded edges with some Zip Kicker (PAAT50) and wipe down the
sides of the chassis with a rag. As soon as you've wiped the chassis
off, place the tip of your CA bottle against the chassis and squeeze out
a small amount, allowing it to run down the edges of the chassis. The
application of the kicker will make the CA dry almost on contact,
sealing the edges of the chassis. You can also apply some CA to a cotton
swab and run that around the chassis edges. Both methods work, it just
boils down to personal preference. I normally apply 3 to 5 coats of CA
to seal the edges of my chassis, sanding it down between each coat. Once
you have the main chassis plate sanded and sealed, it's time to sand and
seal the upper plates and the shock towers. Once everything is dry, it's
time to start building.
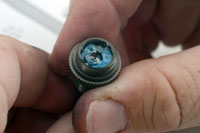
Differentials
 More
times than not, I see people that neglect the differentials and wonder
why the performance of their car suffers. The differentials have a huge
impact on the overall handling and performance of your car. If a
differential didn't have that big of an impact, there wouldn't be front
spools or one-ways, now would there? If you build your diff right the
first time, you will have better overall performance and the diff should
last longer between rebuilds.
More
times than not, I see people that neglect the differentials and wonder
why the performance of their car suffers. The differentials have a huge
impact on the overall handling and performance of your car. If a
differential didn't have that big of an impact, there wouldn't be front
spools or one-ways, now would there? If you build your diff right the
first time, you will have better overall performance and the diff should
last longer between rebuilds.
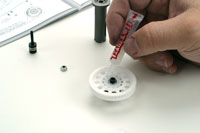
When
you build your diff, you need to remember less is more. If you apply a
huge glob of diff lube or thrust bearing lube, you will simply fowl the
action and attract dust, dirt, carpet fuzz, or other debris, all of
which will force you to rebuild your differential more often. I like to
actually coat the differential pulley or gear instead of the balls
themselves. I place a small dab of diff lube in each hole, and push the
ball into place with my finger. Absolutely do not use an Allen wrench or
other metal object to push the diff ball into place. You can potentially
flat-spot or otherwise damage your diff balls before you even get
everything together.
Once
you have the diff balls installed properly, it's time to build the rest
of the diff. Much like the main diff balls, only use a moderate amount
of bearing lube on the thrust bearing assembly. When you install the
thrust washers, pay close attention to the direction that they are
supposed to go into the outdrive. If you don't install the thrust
washers properly, it may be nearly impossible to properly tighten your
differential. 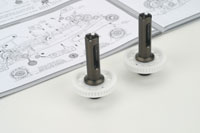 I've
also seen diff rings slide off the outdrive when racers go to install
the outdrives onto the pulley or gear itself. Some racers use contact
cement or CA to glue the rings to the outdrives, but this can raise the
diff ring up and create high spots. My recommendation is to simply take
your time and be careful when installing your outdrives. It may take a
couple tries to get right, but don't get frustrated. When everything is
put together, tighten the diff adjustment screw, but not all the way.
When you tighten the diff screw down, rotate the diff outdrives back and
forth in your hands to test the resistance and tension on the diff. As
you feel the tension increase, hold the pulley and one outdrive while
trying to rotate the opposite outdrive. Keep tightening until you cannot
move the outdrive, and you should be pretty well set. You'll need to
make the final adjustments in the car, however.
I've
also seen diff rings slide off the outdrive when racers go to install
the outdrives onto the pulley or gear itself. Some racers use contact
cement or CA to glue the rings to the outdrives, but this can raise the
diff ring up and create high spots. My recommendation is to simply take
your time and be careful when installing your outdrives. It may take a
couple tries to get right, but don't get frustrated. When everything is
put together, tighten the diff adjustment screw, but not all the way.
When you tighten the diff screw down, rotate the diff outdrives back and
forth in your hands to test the resistance and tension on the diff. As
you feel the tension increase, hold the pulley and one outdrive while
trying to rotate the opposite outdrive. Keep tightening until you cannot
move the outdrive, and you should be pretty well set. You'll need to
make the final adjustments in the car, however.
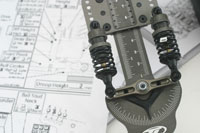
Shocking
Results
 Next
to tires, the suspension will have the biggest impact on the handling of
your car. Debuting on the JRX-S, Team Losi has released a new shock
design that is top-filled with a bladder. These new shocks are
absolutely trick and are so incredibly easy to build and bleed the right
way but, again, there are some subtle tips and tricks that will make
your shocks operate more smoothly, longer.
Next
to tires, the suspension will have the biggest impact on the handling of
your car. Debuting on the JRX-S, Team Losi has released a new shock
design that is top-filled with a bladder. These new shocks are
absolutely trick and are so incredibly easy to build and bleed the right
way but, again, there are some subtle tips and tricks that will make
your shocks operate more smoothly, longer.
Before
you even begin the assembly of your shocks, you need to prep the O-rings
seals. If you simply insert your shock shafts through the O-rings
without prepping them, you could potentially tear or damage them. A torn
seal will allow shock fluid to leak out of the body and lead to
inconsistent handling. You should coat the O-rings in either shock oil
or Green Slime (ASC1105) before you install them in the cartridge or in
the bottom of the shock. This extra step will prevent the shock shaft
from tearing and damaging the O-ring. Another thing that may damage your
O-rings would be a scratched or damaged shock shaft. Use a side or nippy
cutters to hold the shock shaft just above the threads while you screw
the shock bottom on. This will keep you from scratching or damaging the
shaft.
Bleeding
the shocks is one of the most crucial steps during assembly of any car.
Whether you're building the original Team Losi shock, the new ones found
on the JRX-S (or any other manufacturer's shocks), air and bubbles are
the enemy. I'll walk you through assembling top-filled shocks, like the
new JRX-S shocks. I begin with the shock shaft pushed in about ¼ into
the body. From here, I'll fill the shock up to the top of the body. Once
the shock is filled, I pull down on the shock shaft, which draws the
shock fluid down and under the piston. Work the piston up and down
several times to release any trapped bubbles from under the piston.
Before I cap the shock off or install the bladder, I let the shock sit
in a shock stand, such as the OFNA Shock Stand (OFN10912) to allow any
remaining bubbles to rise to the surface. Once I have filled all four
shocks, I go back to the one I started with, place the bladder back on,
and move the shock shaft up to clear any overflow from the shock body.
From here, install the shock cap and you're pretty well good to go. To
ensure that your shocks are all the same length and that the left and
right shocks have the same amount of fluid, invest in one of Team Losi's
Shock Matching Tools (LOSA99170). It's much less expensive than a
digital caliper and not only checks the length of your shocks, but also
indicates whether one shock has more oil in it than another. The shock
matching tool can also tell you if your springs are equal tensions as
well.
Electronics
Layout
When
you think of where you're going to mount your electronics on your
chassis, remember to think not only about wiring but also about weight
bias. While the size and weight of today's speed controllers and
receivers is next to nothing, they still have mass to them. Their
placement can affect the overall handling and performance of your
chassis. When choosing a location, try to keep things as low as possible
and as close to the centerline of the chassis as possible. Back in the
day, we would mount the ESC to the rear shock tower on off-road cars and
trucks but, through testing, it was discovered that mounting an ESC
lower on the chassis gave the vehicle more positive handling traits. I
have seen some racers mount receivers on top of the servos because the
lower chassis is too crammed to fit their electronics. If at all
possible, try to avoid this as not only will you raise the center of
gravity, you could potentially be more susceptible to RF interference.
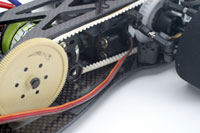 Routing
your wiring is also extremely important. Keep any ESC, personal
transponder, or servo leads as far away from moving parts as possible.
Spur gears and wiring don't play well together, so keeping them
separated is for the best. In most electric cars and trucks, this won't
be a major issue, but sedans and gas cars that feature 4WD have more
moving parts that could potentially snag a wire and damage the lead. Use
wire ties to bundle up any extra length of wire. Keep your power leads
from your speed controller and battery pack as short as possible, but
not so short that they would be pulling on the connectors, battery pack,
or the speed controller itself. Finally, use servo tape or wire clips
mounted to the chassis itself to hold wires in place and keep them from
working loose and getting damaged.
Routing
your wiring is also extremely important. Keep any ESC, personal
transponder, or servo leads as far away from moving parts as possible.
Spur gears and wiring don't play well together, so keeping them
separated is for the best. In most electric cars and trucks, this won't
be a major issue, but sedans and gas cars that feature 4WD have more
moving parts that could potentially snag a wire and damage the lead. Use
wire ties to bundle up any extra length of wire. Keep your power leads
from your speed controller and battery pack as short as possible, but
not so short that they would be pulling on the connectors, battery pack,
or the speed controller itself. Finally, use servo tape or wire clips
mounted to the chassis itself to hold wires in place and keep them from
working loose and getting damaged.
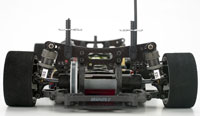
The
Jig Is Up!
Before
you hit the track, you need to make sure your car is squared up. I know
some of you just read that and wondered how you make a car with round
tires square, but I am actually talking about your camber and toe
adjustments. You wouldn't expect your personal car to drive right on the
freeway if you had 6-degrees of negative camber in the left front and
2-degrees of negative camber in the right, and your RC racecar won't
work right like that either. Just about every manual I've seen has a
photo or image of your different camber and steering links, but that's
not an exact replica. As a friend of mine says, if you can't measure it,
you can't manage it, so you're going to need some basic tools to check
your angles. Before you even think about checking your settings, you
need to make sure that your car or truck is set up as you would run it.
That means race tires, battery, motor, pinion, transponder, basically
everything you would hit the track with except for a body.
When
you get ready to set up your car, you'll want to place it on a very flat
surface, such as a piece of glass or a setup board like the Integy Setup
Board (INTC22348). Any sort of imperfections or unevenness in the
surface where you take your measurements can throw off your readings
rather dramatically. The first thing to do is set your ride height on
both ends of the car. It is very important that you set ride height
before adjusting camber or toe, as when you raise or lower your ride
height, you also change the angle of your camber links and steering
links. For on-road cars, use a Dynamite stepped ride height gauge
(DYN2527) for accurate measurements. You should give your car 5mm's of
ride height for rubber tires, 4mm's for foam, and depending on the
track, 3 to 4mm's for 1/12-scale cars. Once this is set, you need to
check the camber angle. I've used both the RPM camber gauge (RPM70992)
and the Integy Setup Station (INTC22305), and both work well. The RPM
gauge is convenient if you are in a hurry and need to make a quick or
last minute change, while the Integy Setup Station is a little more
precise and eliminates rim flex or distortion from affecting your
readings. The Integy Setup Station also gives you the ability to check
front and rear toe and front steering throw. Once you're finished
setting your camber and toe, you're almost ready to hit the track.
Where
the Rubber Meets the Road
 Before
you hit the track, you're going to want to use some sort of traction
compound or tire dressing on your car to increase traction during the
opening laps, before your tires have had a chance to build up any heat.
How you apply the traction compounds makes a big difference in the
performance of your car. As a general rule of thumb, for foam tires you'll
want to apply traction compound to the full face of the rear tires and
only the inside half of the fronts. If your car has too much front
traction, you can cut back on the amount of traction compound you apply
to the fronts to ¼ of the inside edge. If you need more front grip,
then apply more traction compound to the front tire. Rubber tires are a
bit different, as you'll generally apply traction compound to the full
face of all four tires. In fact, at many big races you'll see drivers
apply traction compound onto their tires and then use tire warmers to
further soften the rubber to enhance grip. With foam or rubber tires,
the length of time that you have the traction compound on your tires
will affect the grip of the tires. If you allow the sauce to soak in
longer, your tires will generally be softer; shorter, and they won't be
as soft.
Before
you hit the track, you're going to want to use some sort of traction
compound or tire dressing on your car to increase traction during the
opening laps, before your tires have had a chance to build up any heat.
How you apply the traction compounds makes a big difference in the
performance of your car. As a general rule of thumb, for foam tires you'll
want to apply traction compound to the full face of the rear tires and
only the inside half of the fronts. If your car has too much front
traction, you can cut back on the amount of traction compound you apply
to the fronts to ¼ of the inside edge. If you need more front grip,
then apply more traction compound to the front tire. Rubber tires are a
bit different, as you'll generally apply traction compound to the full
face of all four tires. In fact, at many big races you'll see drivers
apply traction compound onto their tires and then use tire warmers to
further soften the rubber to enhance grip. With foam or rubber tires,
the length of time that you have the traction compound on your tires
will affect the grip of the tires. If you allow the sauce to soak in
longer, your tires will generally be softer; shorter, and they won't be
as soft.
On
extremely high bite surfaces, the higher cornering speeds will literally
try to rip the sidewall of the tire from the rim. There are a few tips
to help reduce this effect, and increase the useful life of your tires.
Before you run your rubber tires for the first time, apply a thin bead
of Team Losi Tire Glue (LOSA7880) around where the rubber meets the rim.
This will prevent the bead from pulling off the rim and affecting the
handling of your car. For foam tires, you'll want to true them down
quite a bit to reduce the sidewall size and reduce the rotational mass.
If you only plan on running sedans, you can't go wrong with the Truecut-Light
Tire Truer (INTC22338) as it comes with the right arbor pre-installed
for you for the standard 12mm sedan hex. As a rule, for indoor racing,
true your tires down to between 58-60mm's for sedans or roughly 42-48mm
for 1/12-scale cars. Before I true my tires down, I like to apply a thin
bead of Team Losi Tire Glue around the tire where the foam is bonded to
the rim. This guarantees that the sidewall shouldn't deflect when the
foam is being cut or when the tire actually hits the track. This will
also help prevent the tires from chunking in the event of a crash.
 Anytime
you build a new car, you have a completely clean slate. A new kit doesn't
have a history of handling issues, parts falling off, leaky shocks or
other issues. Most, if not all of these problems can be avoided
altogether by taking your time when initially building your kit.
Building a new car or truck isn't rocket science, but many people are
surprised at the levels of intricacy involved with a "toy car." Most, if
not all, hobbyists are capable of building their own kit if they take
their time, read the manuals, and have the proper tools. Just remember
that building a kit is only one step in the long life of a car, buggy or
truck.
Anytime
you build a new car, you have a completely clean slate. A new kit doesn't
have a history of handling issues, parts falling off, leaky shocks or
other issues. Most, if not all of these problems can be avoided
altogether by taking your time when initially building your kit.
Building a new car or truck isn't rocket science, but many people are
surprised at the levels of intricacy involved with a "toy car." Most, if
not all, hobbyists are capable of building their own kit if they take
their time, read the manuals, and have the proper tools. Just remember
that building a kit is only one step in the long life of a car, buggy or
truck.
